Best Practices for Configuring Windows 10 Camera and Microphone Access

In my previous article, I discussed in detail my Best Practices for Configuring Windows 10 Location Access. In this article, I will go over my recommendations for configuring the camera and microphone settings. Consider this article Part II of the previous article. If you haven’t read my previous article, I encourage you to read it first because I won’t be repeating most of the information I’ve already discussed in my previous article here.
| Camera vs. Camera App: In this article, when I use the term camera, I am referring to the physical hardware device, such as the built-in camera in mobile devices, or an external USB webcam. When I am talking about the camera app in Windows 10, I will refer to it as the Camera app, which is the Microsoft Store app. |
CAUTION: Because one size doesn’t fit all, the recommendations in this article may not be applicable to every situation or individual, so make any changes to your configuration at your own risk. It will be prudent to use the best practices documented in this article as a guideline and adjust them to fit your environment as necessary.
Configuring the Camera Settings
In Windows 10, most people either use a built-in camera, such as those that are included in laptops and tablets, or they install a USB web camera (webcam). You can have multiple USB webcams attached to the same computer. For example, I have a couple of webcams that quite well. Multiple cameras can come handy if you are doing a webinar and want to share your screen on one camera and something else on another, such as your smartphone. Of course, you have to switch sharing between the two cameras, which is not as bad as it sounds.
Most people use their cameras for business meetings, chatting with friends and family, etc. During COVID-19, remote collaboration has made camera use an absolute necessity for people working from home and even the students have been using the cameras for remote learning. Although there are some exceptions, for a vast majority of people, I recommend the following configuration for the camera settings in Windows 10.
In Windows 10, go to Start > Settings > Privacy > Camera.
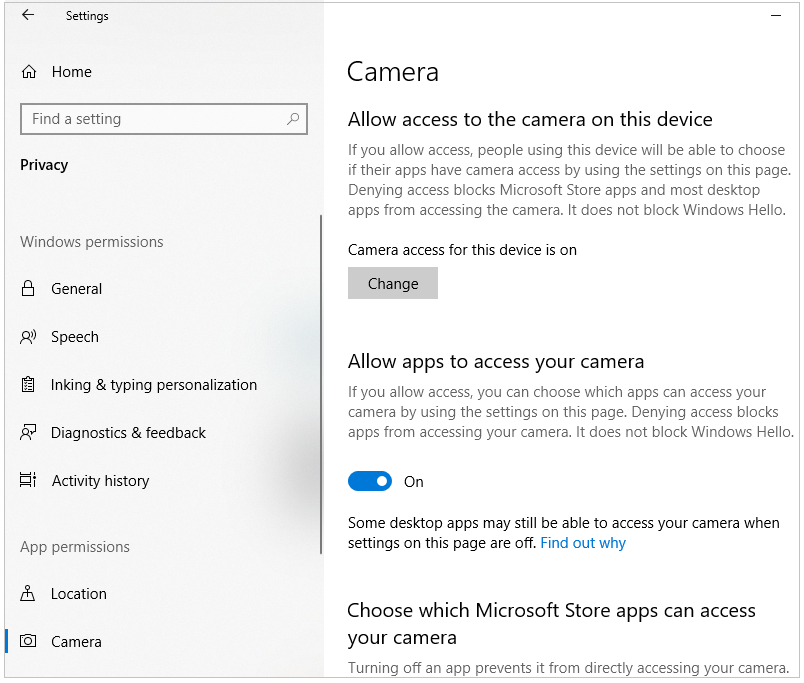
In the above screenshot, the first setting Allow access to the camera on this device applies globally to the Windows 10 device. It currently shows Camera access for this device is on. You can select Change to turn this setting off or on. This setting applies to the entire device, so it will affect the Microsoft Store apps and the desktop apps. Leave this setting on.
The second setting Allow apps to access your camera applies to the Windows 10 apps. These include both the Microsoft Store apps and the desktop apps. Leave this setting on.
NOTE: If both of the above settings are disabled, your camera is unlikely to work.
Scroll down to the section Choose which Microsoft Store apps can access your camera.
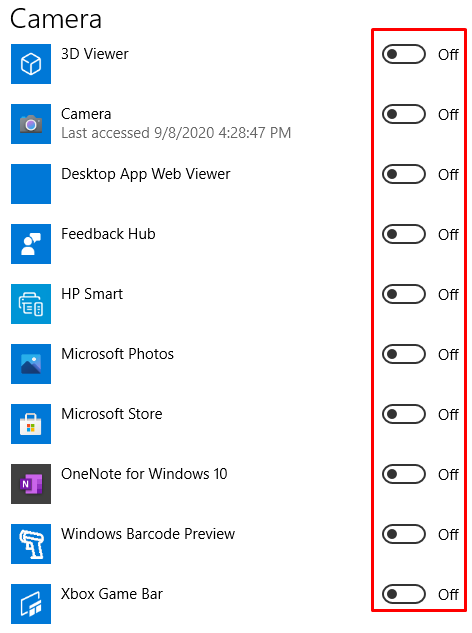
I recommend turning off all the Microsoft Store apps in this section. Although this section seems straight forward, there are a couple of things you need to know about this section.
- This section ONLY applies to the Microsoft Store apps. I know it clearly says that in the section heading, but most people don’t pay attention to the heading and that’s exactly why I want to point this out. If you disable the Camera app in this section, your webcam or the built-in camera in your laptop or tablet will work just fine with other apps or in the browser. If you disable OneNote for Windows 10, your OneNote that’s part of Office Professional Plus 2016 will continue to work just fine because it’s not a Microsoft Store app…..it’s a desktop app. For more information on Microsoft Store apps visit Managing Permissions for Microsoft Store Apps.
- If you must use your camera with one of the store apps, you can enable just that app and turn off all the other apps in this section. In my article Managing Permissions for Microsoft Store Apps, I talk about the security issues I have with Apple, Google, and Microsoft Store apps. For privacy reasons I don’t want any store apps to have access to my camera, so I turn them all off. As you can see in the above screenshot, I used my camera app for testing when I was writing this article and then turned it off. That’s why it shows the last accessed date and time.
| Remember the motto: Less is more! The less information you share with store apps, desktop apps, web browsers, and operating system, the more you’ll benefit from a higher level of security and enhanced privacy. |
Scroll down to the section Allow desktop apps to access your camera.
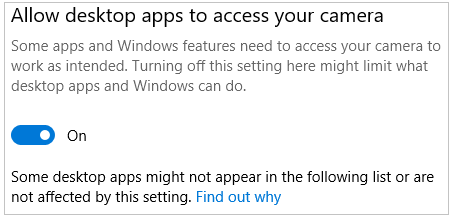
If you have downloaded and installed certain desktop apps locally on your device, you may notice them listed here, such as Microsoft Teams, Cisco Webex, etc. However, if you use those apps (e.g. Microsoft Teams, Cisco Webex, etc.) in your browser, they won’t be listed here because they are not desktop apps. This option to Allow desktop apps to access your camera should never be disabled or else your desktop apps may not work properly.
Do I Need to Configure Camera Settings if I Don’t Have One?
Even if you don’t have a built-in camera or a webcam on your Windows 10 device, I still recommend you configure the camera settings. That’s helpful in case you or someone else attaches a webcam to your computer. Keep in mind, by default the camera is enabled and every single store app can use it. The default settings are designed that way for convenience and help people who may not know how are where to configure the settings. I configure security and privacy settings on every single computer on my network that’s connected to my network, whether it has a camera or microphone or not.
Most cameras also include a built-in microphone. Use the following steps to configure camera settings on computers that don’t have a camera.
- If Allow access to the camera on this device is off, turn it on.
- If Allow apps to access your camera is off, turn it on.
- In the Choose which Microsoft Store apps can access your camera section turn off every single Microsoft Store app. If this section is grayed out, you need to follow step #2.
- Now go back to Allow access to the camera on this device and turn it off. This will disable all the camera settings and if someday you connected a camera, all the store apps won’t automatically have access to your camera, including the dangerous Camera app which allows all the other apps to indirectly access your camera even if they are disabled. Understanding these finer points can do a lot of good and can protect your privacy.
Best Practices for Using Camera
Cybersecurity criminals are known to hack into people’s webcams and record their audio or video, without their knowledge. They then use ransomware or blackmail to demand money. In September 2019, WizCase discovered over 15,000 potentially accessible webcams, many in people’s homes.
Here are my recommended best practices for working with cameras in Windows 10.
- For security and privacy reasons, it’s best to always physically unplug your webcam from the USB port when it’s not in use.
- If you’re using a built-in camera on your laptop, I recommend you purchase a webcam. I am not a fan of built-in cameras and you’ll soon find out why. A webcam gives you 100% privacy if you unplug the cable from the USB port when it’s not in use, built-in cameras don’t have this luxury and are therefore not as secure. Webcams are pretty inexpensive these days. You can purchase a really good webcam for about $35 on Amazon.
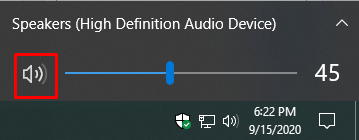
- If you must use the built-in camera, you have several challenges to address. Because you can’t physically unplug your built-in camera, the best you can do is either disable it in the Windows Settings when you are done using it (preferable), or use a security cover to cover the camera lens. If you don’t have a cover, just do an Internet search for “security cover for webcam.” The cover will protect you from a hacker watching you, or recording your video, but the hacker will still be able to record your audio. That’s almost, if not quite, as bad as recording your video. The easiest and most convenient way to deal with that is to mute your audio by clicking on the speaker icon in the taskbar, next to the date and time (see image below). It’s a toggle, so you’ll see an X next to the icon when it’s muted and clicking again will unmute it.
Another option to disable/enable the webcam would be to use a couple of PowerShell scripts. You can create a shortcut for the scripts on your desktop: one to disable the camera, the other to enable it. Simply double-click to run the script. Now you have all the necessary options and know what to do. But wait, there’s more. Even if you do all the things that I have told you, a Windows update or a malware can potentially turn on your camera. I know that’s no fun. Don’t you think it would be better to go with my recommendation in step #2 and just purchase a webcam? Keep in mind, even if you purchase a webcam, you should remove the built-in camera in Windows 10 Device Manager so it can’t be turned on. Make sure you uninstall it, not just disable it. If you ever need the camera, simply Scan for hardware changes and it will be available in seconds. Now you know why I said I am not a fan of built-in cameras. - When looking for a webcam, look for one that includes a security cover and a bright red light in the front so you can easily tell when your camera is on. Even if your camera doesn’t have a light, Windows 10 is supposed to send you a notification when the camera is on, but I won’t count on it.
- Look for a webcam that has a hole for a tripod at the bottom. The tripod can come handy, depending on how you use the webcam.
- If you don’t have a security cover or lost it, put a scotch tape over your webcam lens. It will completely block the video.
- Always test to make sure your cover is working, especially
- For security reasons, you should only allow a limited number of apps to have access to your webcam, such as Microsoft Teams, Webex, GoToMeeting, etc. and leave the Microsoft Store apps disabled.
- Visit the camera section in Windows 10 Settings once in a while. If you add any additional Microsoft Store apps, by default they will be enabled and can access your camera. Unless absolutely necessary, you should disable the app’s access to the camera.
- Configure the camera settings even if you don’t have a camera attached to your device at this time.
- One app that can cause some security and privacy issues is the Windows 10 Camera app. Here’s the reason why. Even if you turn off an app to prevent it from directly accessing your camera, the app can still indirectly use the camera through the Camera app. Therefore, you should always leave the Camera app turned off.
Configuring the Microphone Settings
Because I have walked you through the camera settings, this section would be quicker to go through. If you use microphone for conference calls, Google Voice, or other applications, you should pretty much do the same thing you did for the camera settings.
Leave the option to Allow access to the microphone on this device enabled, as shown below. Also, leave Allow apps to access your microphone enabled.
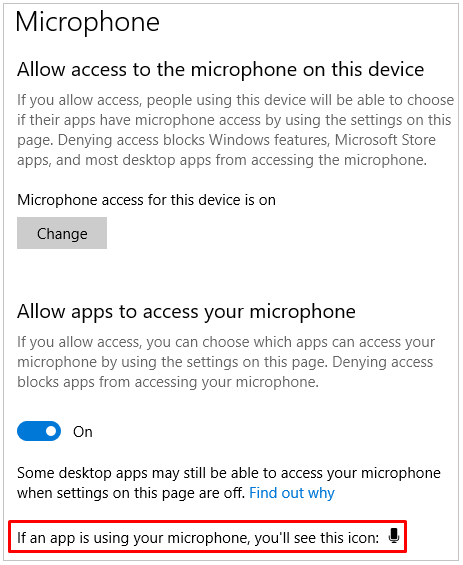
If an app, such as Microsoft Teams desktop app, is using your microphone, you’ll see the microphone icon in the taskbar.
Scroll down to the section Choose which Microsoft Store apps can access your microphone.
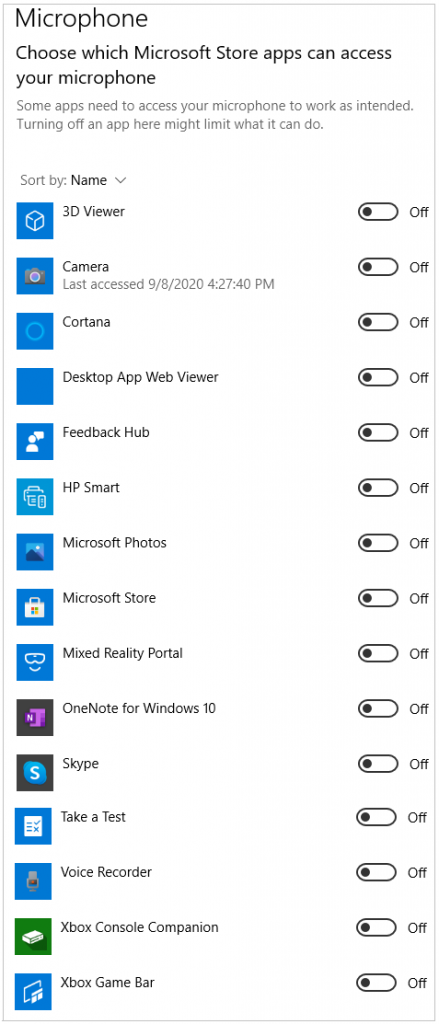
I recommend you don’t allow any Microsoft Store app to access your microphone. Of course, if there is a store app that you must use, you can enable only that app and disable all the other apps.
- Instead of using Microsoft Photos use the Windows Photo Viewer. The Windows Photo Viewer was available from the previous version of Windows, but is not available in Windows 10. That’s why I wrote this article How to Bring Back Windows Photo Viewer in Windows 10. You can also look for other desktop apps on the Internet.
- Instead of the Voice Recorder store app, which is not very useful anyway, use a third-party desktop audio app, such as Audacity. It has lots of features and it’s free, open-source, and cross-platform.
- Don’t use the store app for Skype. Use the desktop version of Microsoft Skype.
- Don’t use the store app for OneNote for Windows 10, use the desktop version which you can download from Microsoft. For more information, read my article Missing OneNote After Installing Microsoft Office 2019 on Windows 10.
- To protect your privacy, don’t allow the Camera and Cortana apps to use your microphone. Disabling Cortana all together is tricky, so I wrote this article How to Turn Off Cortana in Windows 10. From privacy perspective, I consider Cortana to be one of the most dangerous apps in Windows 10. I have similar privacy concerns about all voice or digital assistants: Alexa, Siri, Facebook Messenger, Google Assistant, etc. They all seem to have one thing in common: either they’ve been hacked already, or they will be hacked. Luckily, Microsoft has pretty much given up on Cortana and will phase it out on Android and iOS by early 2021, which might be the best news since astronaut Neil Armstrong walked on the moon.
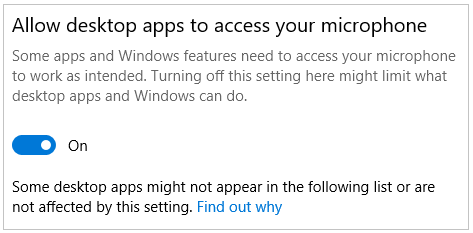
Go the the last section Allow desktop apps to access your microphone. Similar to camera setting, the desktop apps should be allowed to use your microphone.
In this section you may have several apps listed. Examples include:
- Conferencing software (e.g. Microsoft Teams, Cisco Webex, etc.).
- If you use Google Voice then you may find web browsers, such as Microsoft Edge or Google Chrome, listed here.
- Other apps that use your microphone, such as Camtasia or Audacity.
How Do You Know if Your Camera or Microphone is On?
If Windows 10 camera or microphone is turned on without your knowledge, that should obviously raise a red flag and it could be a serious privacy issue. A malware or a hacker can potentially turn on your device, without your permission. In addition, Windows 10 is known to reset your privacy and security settings without a warning with a Windows update. I have to fix my security and privacy settings regularly after certain Windows updates. That’s why it’s important for you to know when your camera or microphone is in use.
|
The Windows 10 Updates Dilemma: Can’t Live With or Without Them Because Windows 10 updates, especially the major updates, are known to reset your customized security and privacy settings without your permission, you can argue that these updates themselves pose a security risk. Microsoft needs to either stop modifying users’ settings without their knowledge, or notify the users which settings were changed and why, so the users can go back and fix them. However, despite this nuisance, I don’t recommend you delay or stop applying the Windows 10 updates. These updates are extremely crucial and usually include several security fixes and enhancements. You should ensure that Windows updates are automatically applied as soon as they become available. |
Exceptions to the Camera & Microphone Privacy Settings
When it comes to configuring camera and microphone settings, there are a couple of exceptions that you should know about.
When Windows Hello is turned off, it can’t access your device camera. However, when Windows Hello is turned on, even if you disable the setting Allow apps to access your camera, it will still use your camera to sign you in.
The desktop apps behave differently so they don’t always show up in the list of apps that are available on the camera and microphone settings page. According to Microsoft, the desktop apps may be able to access your camera or microphone even if you’ve disabled the settings for camera and microphone. That’s not as bad as it sounds because desktop apps are usually not anywhere close to as dangerous as the store apps.
TIP: If you see an app that you don’t recognize in the list of camera or microphone apps, you can select the app and look at the executable file that was used to run it. This information can be used for further investigation to determine the legitimacy of the app.
What to Expect in the Future
I’ve already mentioned the Windows 10 updates dilemma earlier but it’s worth mentioning again. Save the link to this article. Every six months, Microsoft makes major updates and improvements to Windows 10. After you install a major Windows update, check your privacy settings. You may discover that several settings have been reset, without your knowledge. When that happens, go over the steps in this article to reconfigure your privacy settings. If the settings stayed weren’t change, you are the luck one. You should count your blessings. Because Microsoft doesn’t issue any warnings about wiping some of the Windows 10 privacy and security settings with the updates, you may have to review these settings more often than every six months. The major updates are more likely to modify your configuration settings, but some of the regular updates may also do the same.
Were your settings modified unexpectedly by Windows 10 updates? Please share your experience in the comments section below.
Related Articles
Here are some links that are related to the topics covered in this article.
- Best Practices for Configuring Windows 10 Location Access
- Unexpected Microphone and Camera Behavior in Windows 10 Settings
- Windows 10 Webcam Troubleshooting Tips
- Managing Permissions for Microsoft Store Apps
- Why Can Apps Be So Dangerous?
| Thanks for reading my article. If you are interested in IT consulting & training services, please reach out to me. Visit ZubairAlexander.com for information on my professional background. |
Copyright © 2020 SeattlePro Enterprises, LLC. All rights reserved.

