The Easiest Way in Windows to Extend the System Partition (Drive C)
")
Have you ever run into a situation where your Drive C is very low on free disk space. Drive C is usually where Windows is installed. This partition is referred to as the System partition. Although you can resize disk partitions using Disk Management tool, which is included in Windows Vista/7/8/8.1, it is not always easy to resize the System partition (drive C). Let’s take an example where you have two logical drives:
- Drive C where Windows is installed.
- Drive D where you keep your data, or install applications.
I recently ran into a situation where two different Windows 7 computers on my company’s network were extremely low on free disk space. The Drive C (System partition) on both these computers was 50 GB. One computer had about 2 GB left and the other had only 3.68 GB remaining on Drive C. Obviously, running out of disk space can cause all kinds of issues, not only with the ability to save your work but also to write to temporary files used by applications and it can even crash your system.
The File Explorer (called Windows Explorer in Windows 7) was showing the disks in red color, indicating low disk space availability. I ran the Clean Disk which freed up quite a bit of disk space because, among other things, it cleans up the previous Windows updates, Recycle Bin, Temporary Internet Files, etc. For more information on Disk Cleanup please see my article Use Disk Cleanup Utility to Clean WinSxS Folder in Windows Clients and Servers. After a few days the disk was again low on free disk space. On one computer after I ran Clean Disk, after about 5 or 6 hours later I noticed deleting System queued Windows Error Reporting was going to free up another 1.29 GB (see screenshot below). Obviously, Windows eats up a lot of disk space over time. Among other reasons, Windows Updates is the biggest culprit and it uses a significant amount of disk space on Windows computers.

Challenge with Extending Drive C
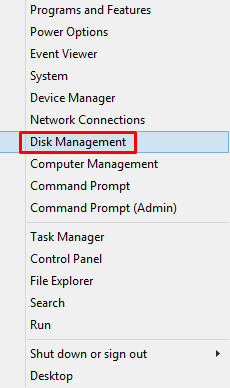
You can extend any partition in Windows Vista and later operating systems using the Disk Management utility. In Windows 7 you can right-click Start and in the Search box type disk management. The first option at the top will be Create and format hard disk partitions, which will take you to Disk Management. In Windows 8.1 you can get to the tool by right-clicking the Windows icon (Start) in the taskbar and then selecting Disk Management, as shown below.
When you are in the Disk Management you may notice that when you right-click Partition C the option to extend the partition is grayed out.

The reason I can’t extend the partition C in this scenario is because I don’t have any unallocated disk space. In fact, Windows will not let you extend the partition size of Drive C unless you have “unallocated” disk space (i.e. raw partition) adjacent to drive C. If you have two partitions (Drive C and Drive D), you have a couple of options to extend the Drive C.
- Shrink Drive D to create “unallocated” space BEFORE drive D. If the space is created after Drive D it won’t help because you won’t be able to extend Drive C. Once the unallocated space is available, you can extend Drive C. This doesn’t require a third-party tool. You can do this in Computer Management in Windows. You do not need to reboot the computer. At least when I tried this method it worked and I didn’t have to reboot the computer.
- Use a third-party tool to resize the partition. Depending on how the tool works and what method you used to resize the partition, you may have to reboot the computer.
In the past I have used many tools to manage partitions on Windows computers. Today I decided to try three tools that I have not used before. All of these tools are free.
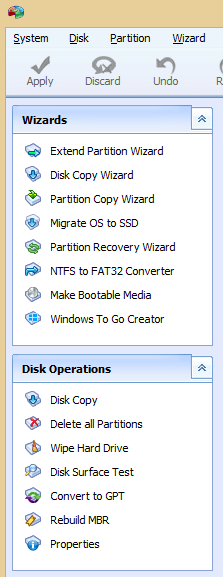
AOMEI Partition Assistant
First, I used AOMEI Partition Assistant. It has some nice features like Migrate OS to SSD, NTFS to FAT32 Converter, Make Bootable Media, Windows to Go Creator, Rebuild MBR, Wipe Hard Drive, Convert to GPT, etc. Of the three tool I tested, this one had the most useful features. However, it didn’t allow me to resize my System partition. Apparently, others have been able to use this tool successfully but I discovered that not every tool works for everyone, and frankly a lot depends on the drive configuration, available space, and other similar factors. You really have to try different tools until you find the one that works for you.
MiniTool Partition Wizard
Then I tried another tool called MiniTool Partition Wizard. This was the second tool that had worked for some people but it didn’t work for me. It had some features that were similar to Partition Assistant but it had fewer features than the first tool. It included features like Migrate OS to SSD/HD Wizard, Partition Recovery Wizard, Rebuild MBR, Wipe Disk, Convert MBR Disk to GPT Disk, etc.
Partition Resizer
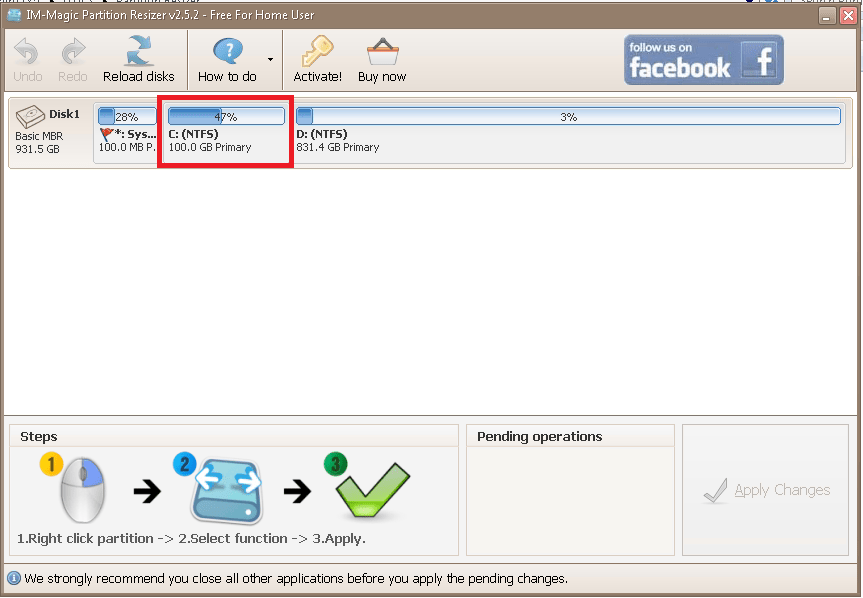
The third tool I tried was Partition Resizer. It doesn’t have all the fancy features of the previous two tools. However, it was the only one that was able to resize my Drive C without a hitch. In my opinion, this is the best tool to use to resize partitions, even the System partition (Drive C) where Windows is installed. As I mentioned earlier, I tried AOMEI Partition Assistant and MiniTool Partition Wizard, which have some very nice features and can come handy for other disk management tasks, but this software is by far the easiest to work with and will let you resize the partition without creating “unallocated” disk space which is required by other programs. This is a big deal because it can save you a lot of time and hassle. This program simply lets you “steal” disk space from another disk by using a slider to specify how much space you want to shrink or extend in a partition. I was able to grab 50 GB from my drive D and add it to the drive C. I rebooted my computer keeping my fingers crossed because it took a while for the system to move the data from one partition and add to the other. Keep in mind it is not moving to a third drive, it literally needs to shuffle data on the existing partition to perform the maneuver. The tool essentially guarantees that you won’t have any data loss…..and it was right. It did the job flawlessly. Just make sure you are patient. It may seem to you that your computer is not going to reboot or finish the job but you need to stay calm. Depending on your drive speed, drive size, and the amount of space you are going to shrink and add, it can some time take hours but that’s normal. By the way, if your partition is encrypted with BitLocker, make sure that you decrypt it before you resize the partitions.
The maker of Partition Resizer, a company called IM-Magic, claims 100% safety:
“With unique safety power, this program will never hurt your data nor partition and provides a 100% of safety for the whole repartitioning even when your computer was shut down accidentally during the resizing.”
This is quite a bold claim and after using the product, albeit only once, I can see why they are so confident about their product. The following screenshot from Partition Resizer shows the drive C has been extended from the original 50 GB to 100 GB. This tool only does one thing (resize partitions) but it does it extremely well. In fact, it does it better than any other partition management tool that I have ever used……and I have used a lot of these tools over the years. Next time you need to resize your partition, save yourself time and give this tool a try before you reach in your toolbox and look for any other software.
You can download the three partition tools mentioned in this article from the following links.
Copyright © 2015 SeattlePro Enterprises, LLC. All rights reserved.


Thanks for sharing your experience!