Use Disk Cleanup Utility to Clean WinSxS Folder in Windows Clients and Servers

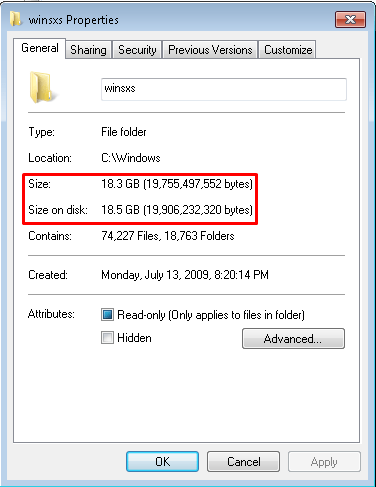
The WinSxS folder eats up a lot of disk space on Windows computers (both clients and servers). If you go to your WinSxS folder located in C:\Windows and look at the properties of the folder, you will notice that the size is in several gigabytes. The size depends on several factors, such as the length of time your operating system has been running because this is where all the Windows Updates are kept so that if you wanted to uninstall an update you will be able to remove it from your computer. Keep in mind that when a new update supersedes an older update, the old update is still stored in this folder. That’s why I said over time, the amount of disk space used by WinSxS folder increases.
The obvious question is how to reduce the size of this folder. According to Microsoft, in Windows 7 Service Pack (SP) 1 and Windows Server 2008 R2 Sp1, Microsoft added an update that includes a Disk Cleanup Wizard. This tool will remove the old updates and cleanup the disk. On Windows 7 SP1 you can go to Start -> All Programs -> Accessories -> System Tools and access the Disk Cleanup tool. However, on Windows Server 2008 R2 SP1 you will need to install the Desktop Experience feature as Microsoft’s KB article 2852386 . On Windows 8.1 the tool is available by default. On Windows Server 2012 and Windows Server 2012 R2 you need to enable this functionality manually by installing the Windows Desktop Experience feature.
I will use Windows 8.1, Windows 7 SP1, and Windows Server 2012 R2 as an example and show you the disk cleanup options that you may already have, or you will need to enable. Windows 2008 R2 has identical requirements as Windows Server 2012 so withing that section I will point out any differences between the two operating systems. First let’s look at Windows 8.1.
Using Disk Cleanup in Windows 8.1
- In Windows 8.1 there at least three ways that I know to access the tool.
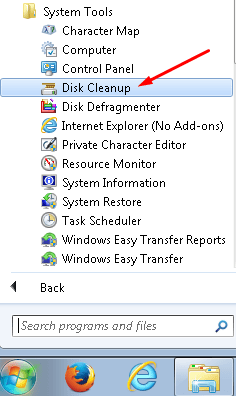
a) You can go to Control Panel and click Free Up Disk Space under Administrative Tools.
b) Another easy way to access the tool is to use the “Windows Key + S” combination and in the Search box type Disk Cleanup.
c) The third method is to type cleanmg.exe in the Run box (“Windows Key + R” combination will bring up the Run box).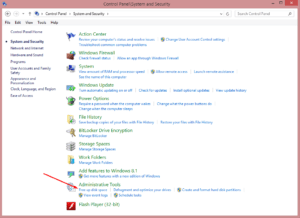
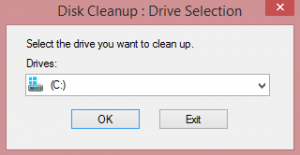
- Select the drive letter, e.g. C where the WinSxS folder is located and click OK.
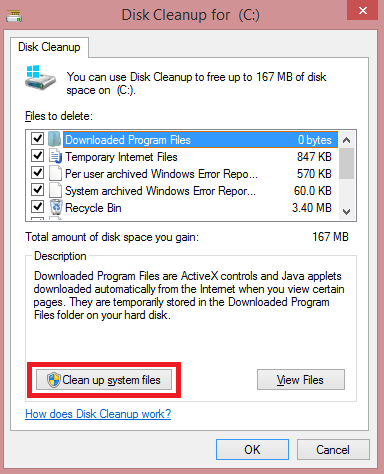
- Windows will estimate the amount of disk space that can be freed by Downloaded Program Files, Temporary Internet Files, Recycle Bin, Setup Log Files, temporary files, thumbnails, user file history, Windows Defender, device drive packages, Windows upgrade log files, user file history, etc. The list of item depends on the type of system, how you use your system, and what type of updates you have installed. I keep my system fairly cleaned and I still have 167MB of disk space that can be freed up. Select or clear the boxes as necessary and click OK.
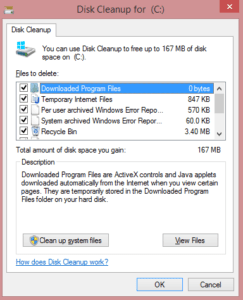
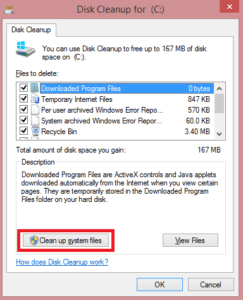
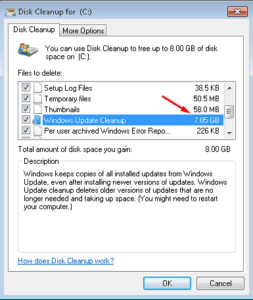
- You can also select Clean up system files at the bottom (see screenshot below). This is likely to clean up gigabytes of disk space. It will take quite a bit longer for system to estimate the amount of free disk space when you select this option.
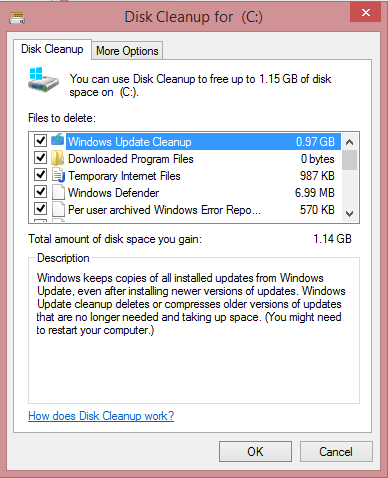
- When the system recalculates the disk space it may look like the screenshot below. Notice this time it included Windows Update Cleanup, which alone is using 0.97GB that I can free up. You can also click on the More Options tab to clean up programs that you don’t use anymore, or delete the old system restore points. Click OK to start the clean up.

Using Disk Cleanup in Windows 7
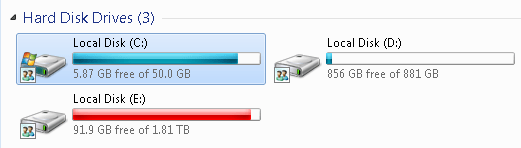
I noticed that my drive C was running out of disk space on my Windows 7 computer, ash shown below.
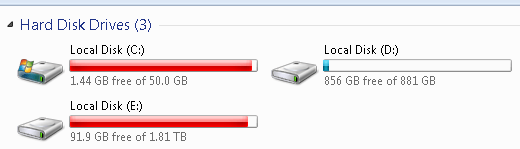
I ran a script and found out that my WinSxS folder was using most of my disk space. When I looked at the disk usage for the WinSxS folder it was more than 18GB.
If you have Windows 7 Service Pack 1 installed, the Disk Cleanup tool is located in Start -> All Programs -> Accessories -> System Tools.
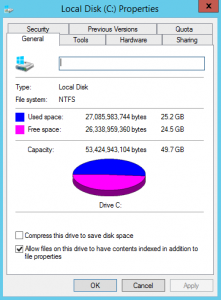
I selected the option to Clean up system files and noticed that I can free up 8 GB of disk space. The old Windows Updates alone gave me over 7 GB of free space.
After the cleanup, instead of 1.4 GB I now have almost 6 GB of free space and the drive is no longer showing up in red, which means I have some breathing room.
You may have to restart the computer after the disk cleanup.
Using Disk Cleanup in Windows Server 2012 R2
On a Windows Server 2012 R2, initially you will not see the Disk Cleanup utility on the Properties of your drive. After you install the Desktop Experience feature you will see the tool.
NOTE: You can also get Disk Cleanup tool in Windows Server 2008 R2 by installing the Desktop Experience as described in this section.
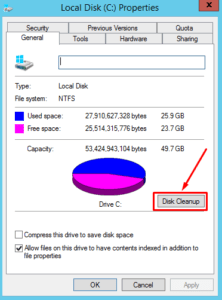
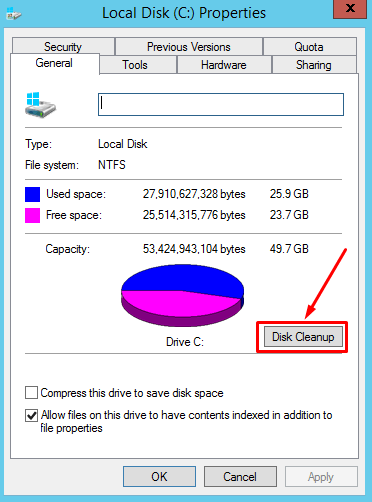
- Go to the Properties of your disk drive and notice there is no option for Disk Cleanup on the General tab at this time.
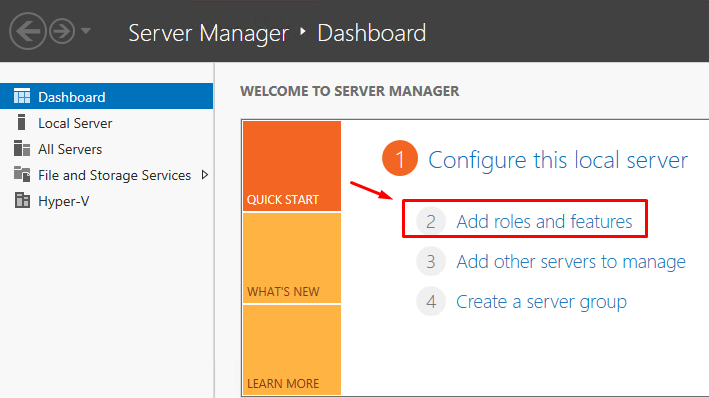
- Start the Server Manager.
- Click Add roles and features on the Dashboard.

- Keep clicking next until you get to the Features section.
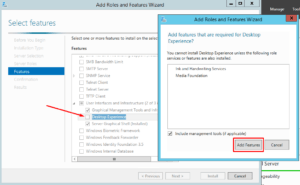
- Expand the User interfaces and infrastructure feature and then select the box Desktop Experience. You will be prompted to add additional role service or features as shown in the screenshot below. Click Add Features.NOTE: On a Windows Server 2008 R2 the Desktop Experience is not listed under User interfaces and infrastructure. It is listed alphabetically along with the other features.
- You should restart the server after the feature installation is complete.
- After the restart, go the the Properties of any drive, e.g. drive C. Notice now you have the option for Disk Cleanup. If you don’t see the option, you probably haven’t restarted the server. The tool works exactly the same way on a server as it does on Windows 7 and Windows 8.1 clients as described above.
Summary
Disk Cleanup tool is a great way to do some house cleaning on your computer and free up disk space. The system drive, which is Drive C by default, can get full after an extended usage. You can keep your system clean and get rid of the junk files that are useless on your computer.
On Windows 7, the SP1 update adds a new plugin to the Disk Cleanup wizard. Once you have the SP1 installed, you can use the Windows Update Cleanup option to delete Windows updates that you no longer need. Windows 8.1 has the Disk Cleanup feature available by default. On Windows Server 2008 R2 and Windows Server 2012 R2 you have to enable the Desktop Experience feature before you can use this feature. The following KB article 2852386 has some additional information that you may find useful.
While there are other methods, such as copying the cleanmgr.exe and cleanmgr.exe.mui in the appropriate location on the Windows server, as described in this Microsoft article, according to Microsoft, the best practice is to use the Desktop Experience as I have described in this article.
Copyright ©2014 Zubair Alexander. All rights reserved.

