How to Expand Hard Drives in Hyper-V Virtual Machines

Running out of disk space on a Windows computer is fairly common, especially on Windows servers. There are several reasons for low disk space on a computer, such as too much data, too many applications, Windows Updates that have accumulated over the years, you don’t run Disk Cleanup on a regular basis, size and number of the pagefiles, etc. Talking about pagefiles, Windows reserves a certain amount of space on the disk for the pagefile (also known as swapfile), which is used to swap pages in memory to disk if the computer is low on physical memory. For example, SharePoint Server Health Analyzer displays a warning when the disk has less than 20% of available space, which means if you have a 1 TB disk the server will give you a low disk space warning when you still have about 200 GB of free disk space on your hard drive. When the disk space is low, you can see the hard disk color turn red in Windows File Explorer, as shown below. Obviously, this requires immediate attention and somehow you need to make more room on the hard disk.

If you are running Windows on a physical computer, making more room on the hard disk drive can be cumbersome and depending on the situation it may not be possible at all. However, expanding hard disk drives is much easier in a virtual environment, such as Microsoft Hyper-V. In this article I will show you how you can expand a Hyper-V virtual hard disk to create more space for your server. When it comes to virtual machine (VM), the behavior and solution is the same whether it’s a server or a workstation. However, I will focus on a Windows server because, as I mentioned earlier, it’s much more common to run out of disk space on Window Servers, such as any file server, SQL Server, Exchange Server, SharePoint Server, etc.
Virtual Machine Scenario
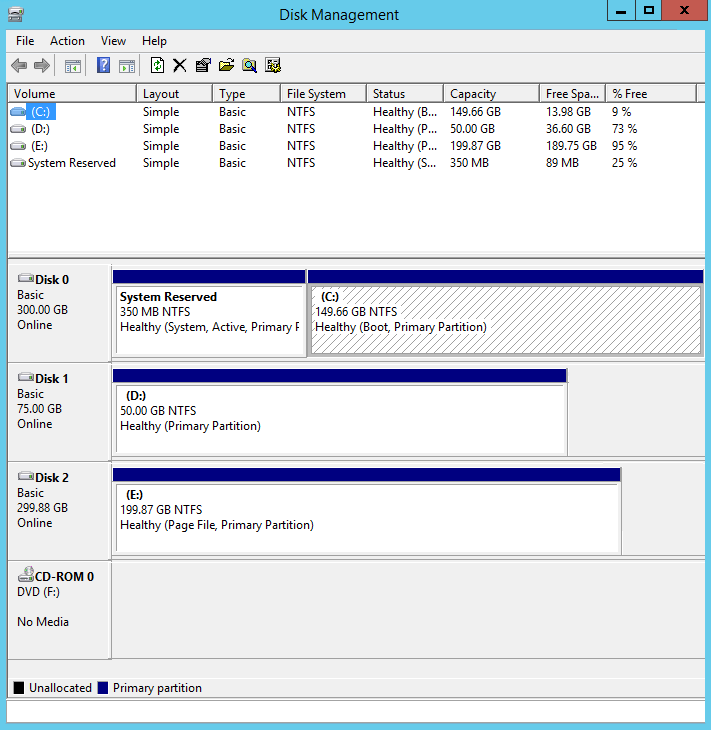
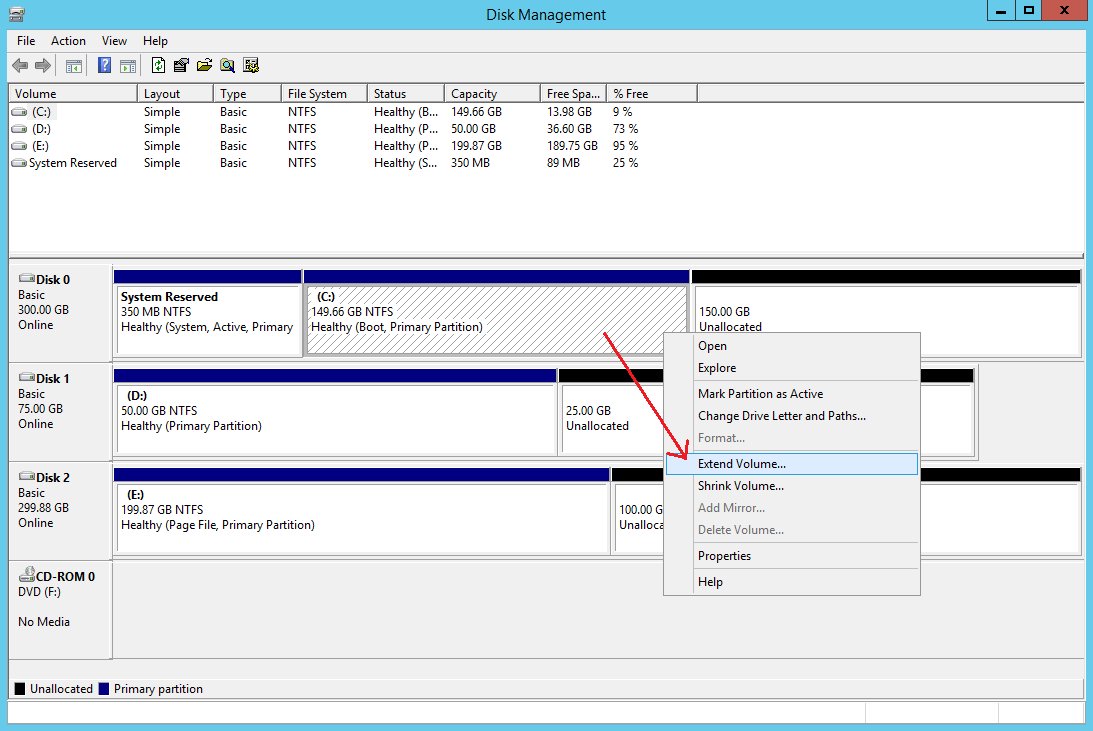
In our scenario, we have a Hyper-V VM running Widows server with three physical drives: Disk 0, Disk 1 and Disk 2. The capacity and free space is displayed in the Disk Management console as follows.
| Disk No. | Capacity | Free Space | Volume Information |
| Disk 0 | 149.66 GB | 13.98 GB | Logical Disk C (System, Active, Primary Partition) |
| Disk 1 | 50.00 GB | 36.60 GB | Logical Disk D (Primary Partition) |
| Disk 2 | 199.87 GB | 189.75 GB | Logical Disk E (Page File, Primary Partition) |
Because the server is running out of disk space on the system drive, where the operating system is installed, we must make more room on the drive or else the system can automatically shutdown (i.e. crash). You can use the builtin Disk Cleanup utility in Windows, which is available on all Windows clients and servers, to create more room. For more information on this topic visit Use Disk Cleanup Utility to Clean WinSxS Folder in Windows Clients and Servers. If after running Disk Cleanup you still don’t have enough free space, it’s time to expand the virtual hard drive.
Expanding a Virtual Hard Disk in Hyper-V
Before you do anything else, you first need to shut down the virtual machine. Then you will expand the disk to increase its capacity.
- Start Hyper-V and shutdown the VM that’s running out of disk space.
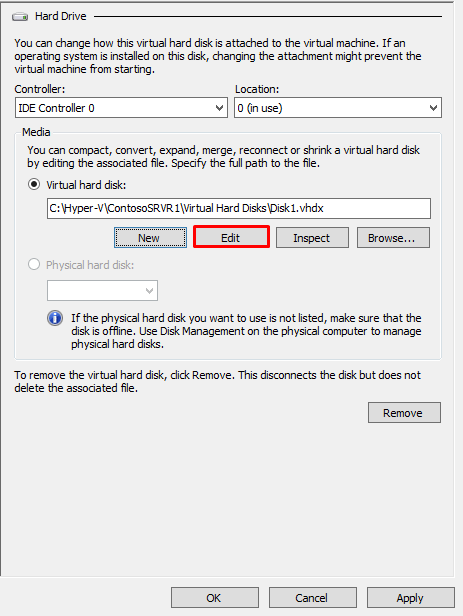
- Once the VM is off, right-click the VM and select Settings.
- Select the virtual hard disk that you want to expand and click Edit.
NOTE: If Edit is grayed out then the VM is probably still running. Another reason that you may not be able to edit the hard disk is that you may have one or more checkpoints for the VM, in which case you will see an error Edit is not available because a checkpoint exists for this virtual machine. If you want to keep the changes in the checkpoint then merge the checkpoint by applying it, or to discard the changes simply delete the checkpoint and wait until the merge is complete then properly shutdown the VM. Do not use the Turn Of option in Hyper-V, use the Shut Down option.
- When you edit the disk, a wizard will walk you through the steps. On the Choose Action screen select Expand.
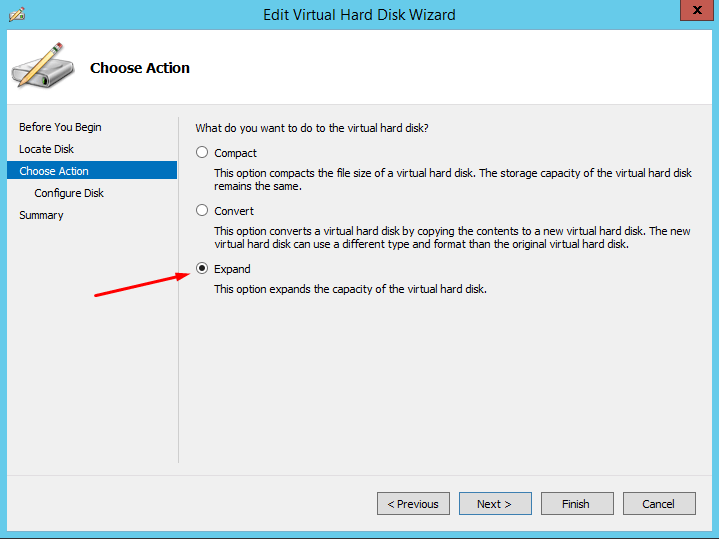
- On the next screen specify the size you want for the new disk, e.g. 300 GB and then click Finish. This will double the size of our drive C from about 150 GB to 300 GB.
- In our case we will repeat the above steps to expand drive D from 50 GB to 75 GB and drive C from about 200 GB to 300 GB just to plan ahead and not worry about repeating this step anytime soon.
- Start the virtual machine.
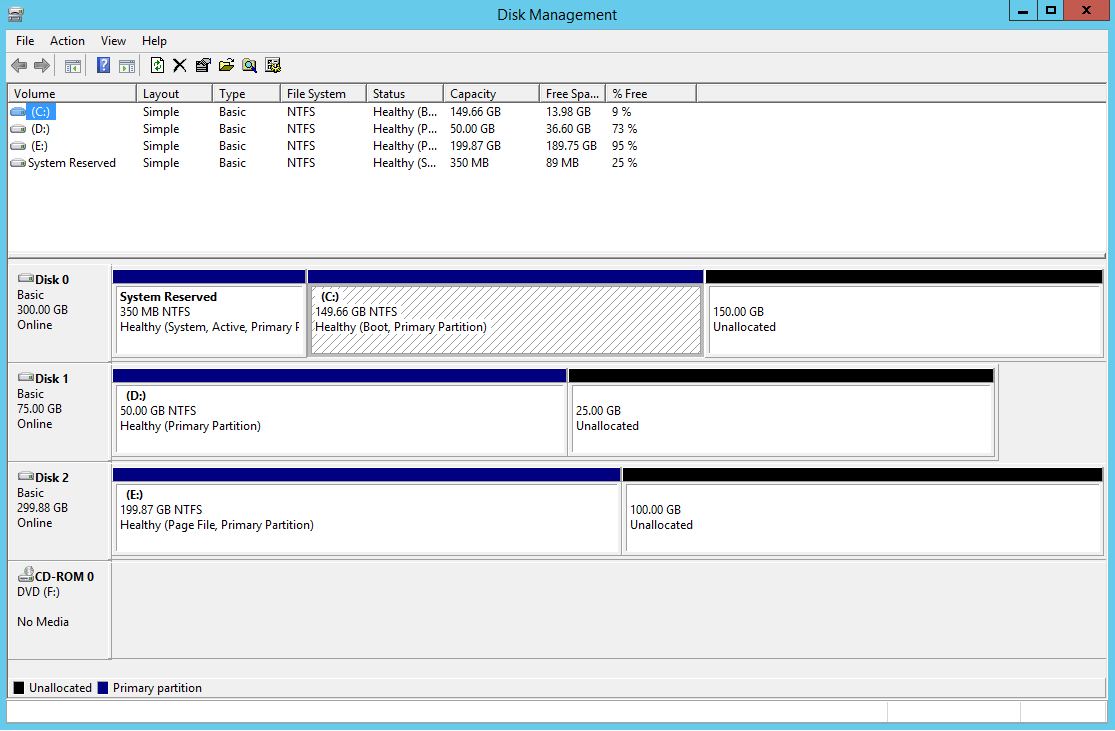
- At this point if you look in the File Explorer it will still display your old information because the extra space that we added to the drive is still unallocated.
- Right-click the Start button on the computer and select Disk Management. You will see the unallocated disk space for each drive.
- Right-click Drive C on Disk 0 and select Extend Volume. This process will expand the disk to give us more available space.
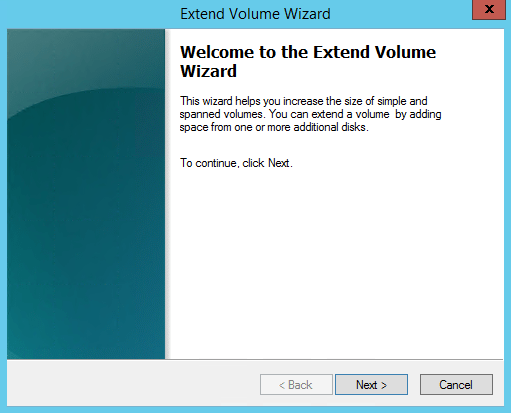
- You will go through the Extend Volume Wizard. Click Next on the Welcome screen.
- Accept the default value to select the entire available space and click Next.

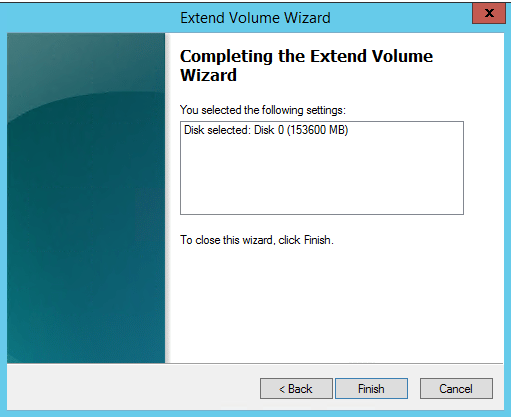
- Click Finish to close the wizard.
- Notice that the size of drive C is now doubled to about 300 GB.
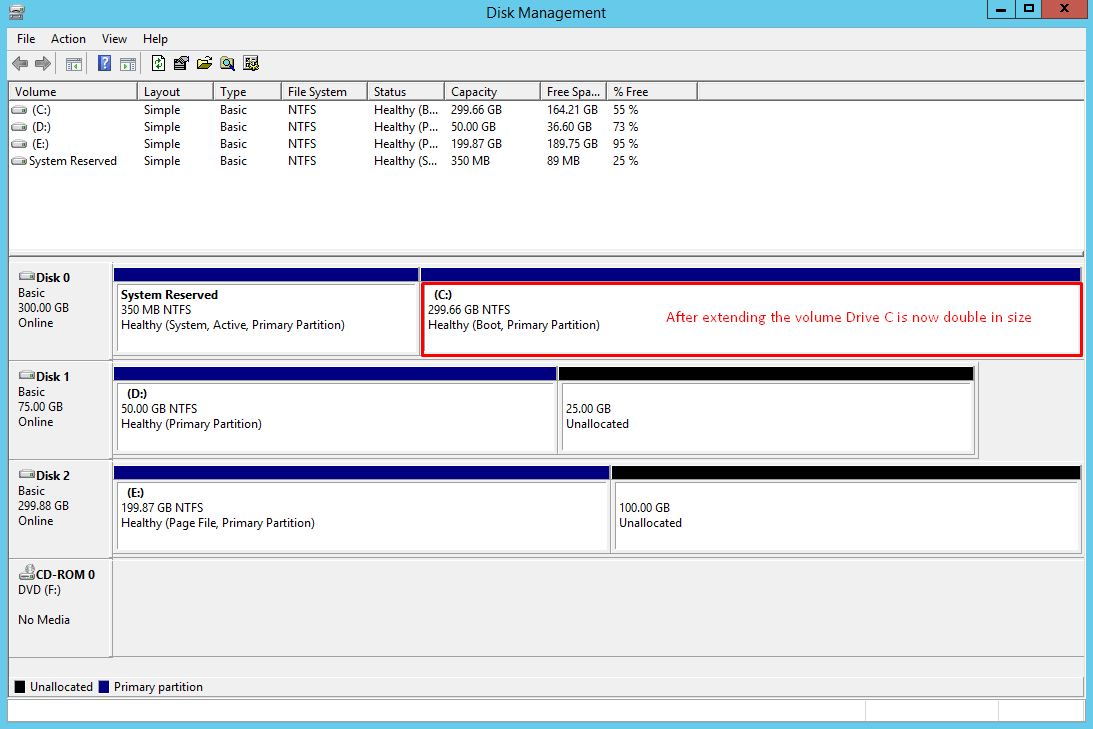
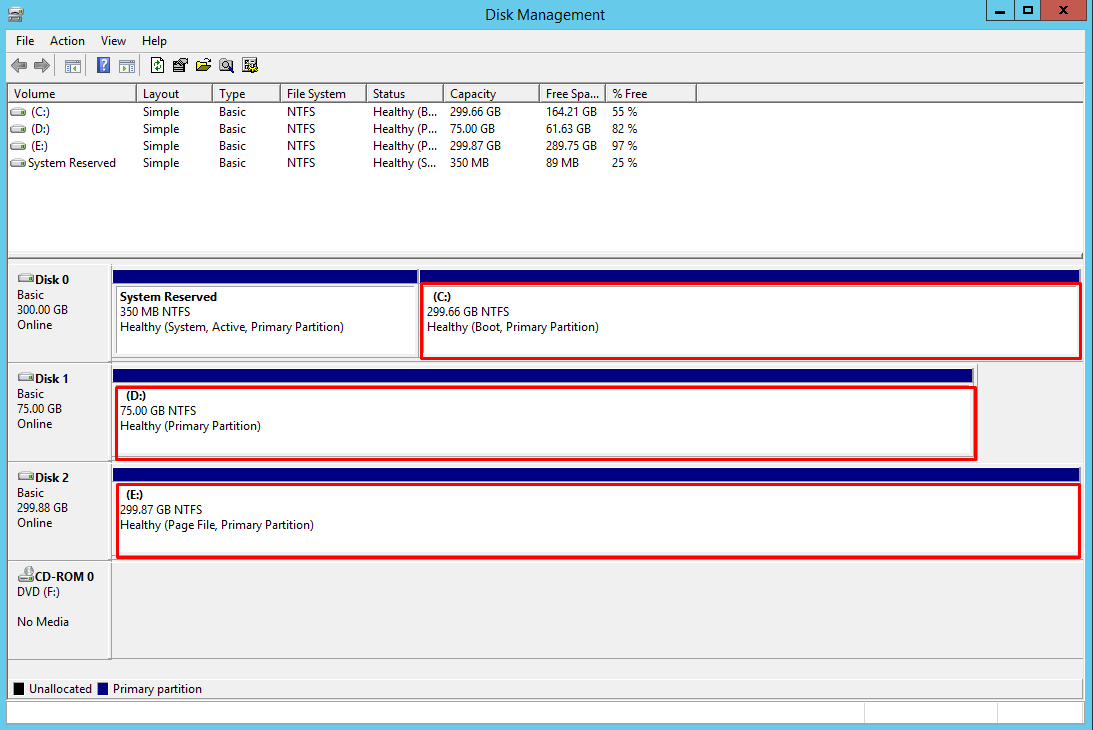
- Repeat the above steps to extend drive D and drive E. When all three volumes are extended, the screen looks like this.
- The File Explorer displays the following information before and after expanding the drives.


Final Thoughts
As you can see, Microsoft has made the process of expanding the drives very simple in Hyper-V. By default, when you create a new virtual hard disk it is configured as a dynamically expanding virtual hard disk. Once you create a checkpoint, the disk is considered a differencing virtual hard disk. The checkpoint contains the changes (difference) to the original hard disk.
When expanding virtual hard disks, one of the most common problem that you are likely to experience has to do with editing the disk. I mentioned earlier that you need to make sure that you don’t have any checkpoints before you edit the disk and that the VM has been shut down properly. In case you are not familiar, there is a difference between shutting down a VM and turning it off. The Shut Down option in Hyper-V is the proper way to close a VM. The other option is to Turn Off a VM. This is similar to pulling the power plug on a computer and should be only used as a last resort.
According to Microsoft, if you edit the following types of virtual hard disks, it may result in data loss.
- Virtual hard disks in a differencing disk chain that have child virtual hard disks associated with them.
- Virtual hard disks that have checkpoints.
- Virtual hard disks associated with a VM that has replication enabled and is currently involved in initial replication, resynchronization, test failover, or failover.
| Thanks for reading my article. If you are interested in IT training & consulting services, please reach out to me. Visit ZubairAlexander.com for information on my professional background. |
Copyright © 2018 SeattlePro Enterprises, LLC. All rights reserved.


Well explained, keep it up 👍
Well explained, Thanks & keep it up 👌
Wonderful Article! Thank you 🙂