Working with Content Types in SharePoint 2007

In Microsoft Office SharePoint Server (MOSS) 2007, by default users can only create one type of document in a Document Library. In other words, when users create a new document, it can only be from the default template that you selected at the time you created the Document Library. For example, if you selected Word 2007 (that uses template.doc file), then users can only create Word 2007 documents in the library when they click the New button. They do not have the option to “create” new Excel or PowerPoint documents. They can upload different types of document to the library but uploading a document is not the same as creating it from scratch based on a template. You can, however, add additional templates so users have the option to create additional types of documents (Excel, PowerPoint, Access, etc.) using the Content Types feature in MOSS 2007. In this article I will show you how to accomplish this task.
What are Content Types?
A Content Type is a group of reusable settings that describe the shared behaviors for a specific type of content. In MOSS 2007, Content Types can be defined for any item type, such as documents, list items, and folders. Content Types in Windows SharePoint Services (WSS) 3.0 and MOSS 2007 allow you to define and manage the metadata of your documents so you can effectively organize your data in a centralized location. Content Types are pretty impressive in SharePoint and learning how to use them is something that every Site owner or SharePoint administrator will find beneficial.
Step-By-Step Procedure for Creating Custom Menu Items
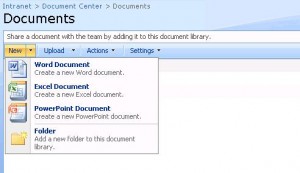
In this article I will show you how you can customize the menu in a document library to have Word, Excel and other applications added to the menu by using Content Types, as shown below.
1. Open Excel 2007.
2. Click Office button and then click Save As, Excel Workbook.
3. In the Save as type drop-down button select Excel Template (*.xltx).
4. Name the file something like ExcelTemplate.xltx.
5. Close Excel.
6. Go to your SharePoint site.
7. Go to Site Actions, Site Settings, Modify All Site Settings.
8. In the Gallery section click Site content types.
9. In the Site Content Type Gallery page click Create.
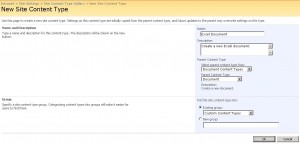
10. Enter a name for the Content Type. In our example, I will call it Excel Document.
11. In the Description type Create a new Excel document. Fill out the rest of the options as shown below. Notice that the default existing group is Custom Content Type.
NOTE: I usually prefer to use a different name that is easily identifiable, rather than using the default group. For example, I would select the New group option and then create a group called SeattlePro, or Intranet Site Collection so when I am searching through the Site Content Type Gallery I can locate my own Content Types easily.
12. You will be returned to the Site Content Type: Excel Document page.
13. There is one more thing we need to take care of before we are ready to add the Content Type to the document library. Go to the Document Library where you want to add the Content Type.
14. Go to Settings, Document Library Settings.
15. Click Advanced settings.
16. Check the option to Allow management of content types. Accept the defaults for all the other options and then click OK.
17. You will be taken back to the customize page. Notice a new section for Content Types. Allowing management of content types is necessary if you want to be able to manage the content types and add items to the menu as described in this article.
18. Now that we are done creating the Content Type, we will add the Content Type to the Document Library. In the Content Types section click Add from existing content types.
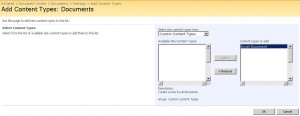
19. From the drop-down button select Custom Content Types.
20. In the Available Site Content Types box, double-click Excel Document to add it to the Content types to add section in the right-hand side box as shown below.
21. Click OK.
22. Now you should have two Content Types listed. One is the default called Document. This opens a Word document. The second called Excel Document that we’ve just created. Double-click the Excel Document link.
23. Click Advanced settings.
24. On the List Content Type Advanced Settings: Excel Document page notice that the URL for the template is pointing to a Word template, called template.doc. Click Upload a new document template and then click Browse.
25. The templates are saved by default in the location C:\Users\%username%\AppData\Roaming\Microsoft\Templates. If you saved your Excel template in a different location, upload it from there.
26. That’s it. You are done.
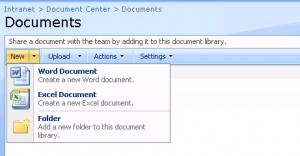
27. Go to your Documents Library and you will notice a new item added to the New drop-down box, as shown below.
28. In case you are wondering why the screenshot says Word Document instead of Word, that’s because I went into the Name and description option for the default Document content type and changed it from Document to Word Document. I also modified the description so it says Create a new Word document.
29. Now that you know how to add a template for Excel, use the same procedure to add templates for PowerPoint and other applications. Keep in mind that the Content Type you created can be reused in other Document Libraries. All you have to do is make sure that you do step 14-16 to allow management of content types for each Document Library that you want to add menu items. Then simply follow the steps for adding from existing Content Types to that library.
Conclusion
Content Types are a useful feature in SharePoint and hopefully now you will put it to good use. In this article I showed you how to add the templates to the menu for creating new documents in a Document Library. Of course, you can create custom templates that accomplish certain tasks for the users. For example, you could create an invoice template based on an Excel spreadsheet or a Word document, a PowerPoint template that is used by employees to create presentations for customers, a Word template to send out company faxes, a custom template for writing reports, the possibilities are endless. You can also attach workflows to the templates, apply information management policies, and even define custom columns associated with the content (metadata), as explained in Sharee’s article listed below.
Copyright ©2009 Zubair Alexander. All rights reserved.


Great information. Thanks for the references.
Great write up but when I try to save the new document created I get “the folder you’ve selected for the file (name of file) is not an actual file system location”
I am using Ofice 2003. Any ideas what may cause this?
disregard the comment. I had “/” in the file name.
Once again great post!
I would like that the end user save the new file directly in the list, which i guess is the most common use of it, but instead we have to save it in the C:
How can i setup the list in order the default location is the list’
Thanks
Hello Seb,
You might want to check out my blog post from December 2008 called “SharePoint Files Directed to Save Locally Instead of Server”: https://www.zubairalexander.com/blog/archives/642. Good luck!
I was told I couldn’t do this. Thank you for proving the so-called experts wrong.