How to Get Rid of Unwanted Horizontal Line in Word
Have you ever run into a situation in Microsoft Word where you somehow ended up with a horizontal line that you absolutely can’t delete? In this article I will show you what can cause this situation and what you can do to fix the problem. In my opinion, it’s one of the most irritating things in Word that I have ever encountered. The fix is so easy even a cave man can do it…..as long as he’s comfortable with using a mouse and keyboard, of course.
Problem
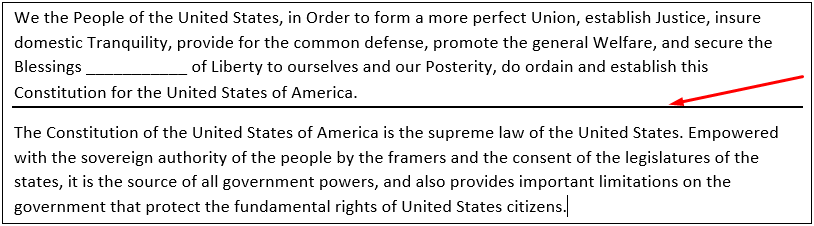
On a blank line in Microsoft Word, you enter a series of underscores, perhaps to create a line like the one in the image below to separate the two paragraphs. As soon as you hit the Enter key, the disaster strikes because now you can’t delete the line. If you were to add a series of underscores on a line that has text (see third line), and then hit the Enter key, there won’t be a problem. The problem is only experienced when you do this on a blank line (see 5th line). I typed a series of underscores and then pressed the Enter key, which created a bold line. If my cursor is above the thick line at the end of line 4, pressing the Enter key simply moves the horizontal line down.
If I create some space above and below the bold line, select the area above and below the line with my mouse and then delete the entire area, it sure will delete the line. Right? Wrong!
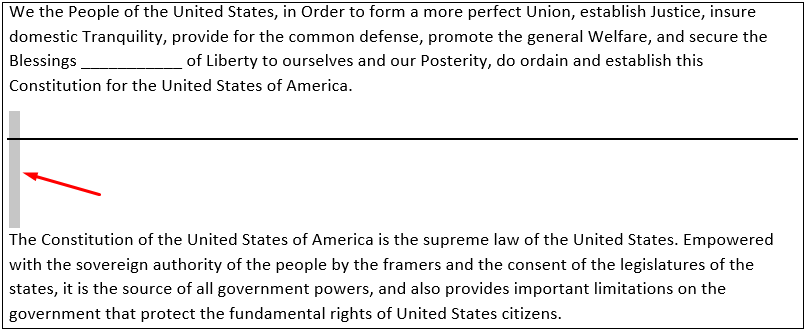
The bold line is practically invisible to Word and Word can’t delete what it can’t see. Don’t bother copying these paragraphs to a new Word document because you will be copying the problem to the new document.
You may also run into another challenge. Let’s say you delete all the text below the line (the second paragraph in the above image). You just created yet another serious problem for yourself. Now there is absolutely no way for you to go down below the line and add any text. Remember, the line behaves as if it were “invisible” to Word. Even if you select the area that contains the line, you just can’t delete it. It’s like Jason in the movie Friday the 13th, you just can’t kill him.
Solution
The solution works in most, if not all, versions of Microsoft Word. However, I’ve tested it only on the newer versions of Microsoft Word, up to Word 2019.
First let me explain what’s going on. If you type 3 of the following characters consecutively in a blank row, that doesn’t have any text, and then press the Enter key, Word creates a border around that paragraph.
- Tilde (~)
- Pound or hash sign (#)
- Asterisk (*)
- Underscore (_)
- Hyphen (-)
- Equal to sign (=)
In the image below, I typed each of the above characters 3 times, without a space between them, and hit the Enter key. You can see the results. After you hit the Enter key, you won’t see the 3 characters that you typed, you will only see the horizontal line that can’t be deleted. The horizontal line is actually a border created by Word at the bottom of the paragraph.
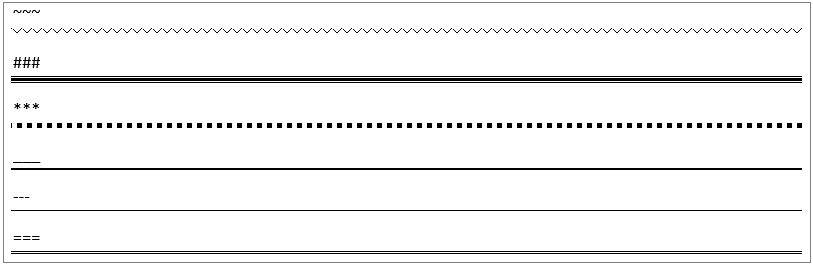
If you keep pressing the Enter key, you keep on creating a new paragraph that contains the border at the bottom of the paragraph.
What you’ve experienced is the default behavior in Word that you can change. The horizontal line is actually a border at the bottom of the paragraph and is part of the paragraph’s formatting. The easiest way to get rid of it is to use the Ctrl+Q combination on your keyboard. CTRL-Q removes the formatting around the paragraph that has been selected (highlighted). Just move your cursor anywhere in the paragraph above the line that you want to delete, and then use Ctrl+Q to get rid of the formatting. For example, if you want to delete the line with the tildes in the above screenshot, move your cursor somewhere in the line above the tildes, let’s say, at the beginning of the line before the first tilde (pronounced “till-duh” but sometimes called squiggle, or twiddle), then use Ctrl+Q to remove the line. It really doesn’t matter where you put the cursor above the horizontal line, as long as it’s within the paragraph. If you are not sure, just move it to the beginning of the line just above the line that you can’t delete so you can get rid of the border. As I mentioned earlier, the horizontal line is a border at the bottom of the paragraph and is part of the paragraph’s formatting.
Alternate Method for Deleting the Border
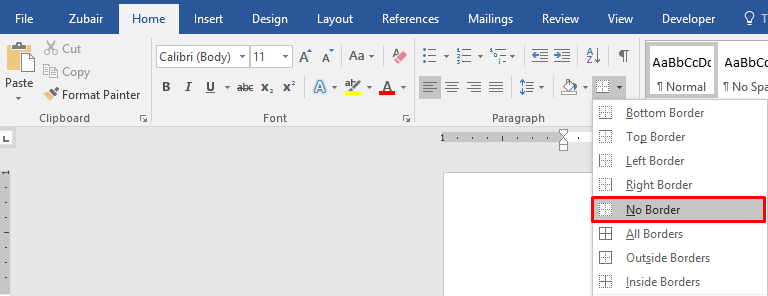
Besides the Ctrl+Q method, which I find much easier to remember, you can also use the Word ribbon to delete the paragraph border. Depending on the version of Word you are using, the options might be slightly different. You basically need to go to the formatting area where you can remove the border at the bottom of the paragraph. The screenshots in this article are from Word 2016.
Word 2013 & Later: Home tab -> Paragraph section -> Border button -> No Border
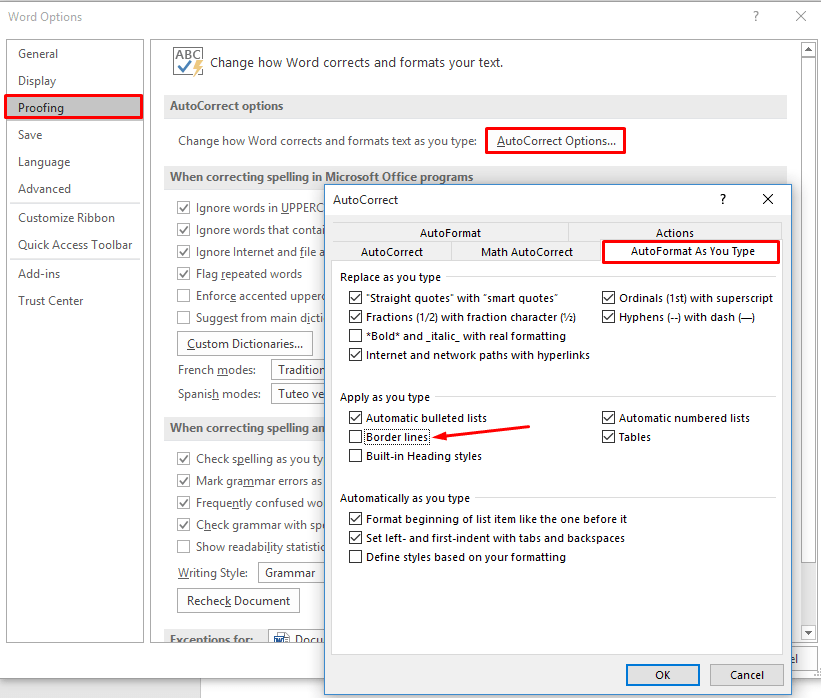
In the previous image where I have all the different types of lines, if you want to delete all of them, simply select all the paragraphs and then use Ctrl+Q. All the paragraph borders will disappear, but your text will stay intact. If you are like me and don’t like this default behavior where Word adds borders at the bottom of the paragraph, you can go to File -> Options -> Proofing -> AutoCorrect Options -> AutoFormat As You Type -> and clear the box next to Border Lines.
While you are at it, review other settings on this tab. You may like some of them but want to change the default behavior of others. For example, I like the option under Replace as you type for Ordinals (1st) with superscript, but don’t like the default option for Hyphens (–) with dash (–). Poke around on the other tabs of AutoCorrect to see if there’s something else you don’t like. Whenever I install Microsoft Office, I have a series of tweaks that I do in Word, Excel, PowerPoint, Outlook and other applications. Customizing the AutoCorrect is an essential part of my usual tweaks.
Article Updated: January 19, 2022
Article Updated: April 29, 2022
| Thanks for reading my article. If you are interested in IT consulting & training services, please reach out to me. Visit ZubairAlexander.com for information on my professional background. |
Copyright © 2016 SeattlePro Enterprises, LLC. All rights reserved.


Thanks for the explanation. It was helpful in my document.
This is the most valuable explanation I have seen online. It is extremely thorough! I have struggled with unwanted lines at various times and tried everything I know of to delete them, and nothing worked. This is easy to understand and works! THANK YOU SOOOOOOOOOOOOO MUCH!
Thank you so much! This worked.
None of these work. I absolutely can’t get rid of this line. I think it is for a footnote(?)
Ctrl+Q; that worked well. Thank you! Got rid of all these unnecessary lines!
Thank you thank you for getting me out of a very frustrating situation. Learned a lot from your explantations and finally found the ‘no border’ option worked!
@Edith: Thanks for your feedback. This border issue has been one of the most frustrating thing in Word for many people. Glad the solution worked for you.
Blasted invisible line is still there! This is ridiculous…help please?
Wow. I asked many computer experts on how to remove the border. None knew. Presto! Gone in one Ctrl Q. Thank you for your knowledge.
Sorry – didn’t work for me. Still getting extremely annoyed.
Ctrl+Q worked like a dream. Free of the nightmare zombie lines at last. Thank you Zubair for kindly sharing your knowledge.
@Allison: Glad it worked for you. “Nightmare zombie lines” are a good way to describe them :-). These line are incredibly irritating and drive people nuts.
Control Q did not work for me, but the NO BORDER remedy did the trick. Thanks.
Amazing! Thanks. I was looking for a while for a solution to this. Nothing worked until this. Thank you very much.
Zubair, thanks your suggestion helped and worked.
5 stars for u
Thank you so much this is really helpful. I had this issue, and it was frustrating that it would not go away.
The problem was solved like magic, a BIG thank you!!!
This worked– thank you!! For those still having problems, make sure your cursor is in the line of text above the line you want to delete (not on a blank line)…then the Control-Q should work (at least it did for me). Thank you again, Zubair!!
Thanks so much. Very useful.
Great explanation – super frustrating !!!
But how can I accomplish the same thing on my IPad please?
@Cathy: Thanks for your feedback. Have you tried clearing the “Border lines” box under AutoFormat? If you clear the box, the border lines are gone for good, unless you check the box again.
Zubair: I tried all of your suggestions. I had NO success. Any other suggestions?
Could you explain how to change the color of an automatic line as you cannot select it?
@Nancy: As I mentioned in my article, the line behaves as if it were “invisible” to Word. You can’t change its color because you can’t select (highlight) it, as you’ve indicated. You can only change color and apply other formatting options to an object that you can highlight.
If you want to insert your own line in Word, you can go to the Insert tab, select Shapes in the Illustrations section, and select the line from the Lines category. Click and draw the line in Word, select the line with your mouse, right-click the line and change the outline color. You can also use other formatting features. For example, change the weight (thickness) of the line, drag the handle on either end of the line to increase or decrease the size, change its angle, and click and drag the entire line freely anywhere on the page.
Thank you so much!
I was already at the edge of the mental breakdown with that stupid line 😀
@Nitta: Glad you were able to get rid of the unwanted line.
Thank you! I even copied and pasted text to a new document and that border followed me – it stuck like chewing gum to the cat.
Googled what the Ctrl-Q action performs in Word: “In Microsoft Word, Ctrl+Q is used to remove the paragraph’s formatting.”
Would have been helpful for this article’s author to explain that, so that we’ll know the source of Word’s aberrant behavior, hopefully enabling us to remember what’s causing the ‘mystery’ lines. Thank you for providing this very simple solution!
@Karen: Thanks for your feedback. The entire SOLUTION section in my article goes into great detail to explain what exactly these lines are. “The horizontal line is actually a border created by Word at the bottom of the paragraph.” The last image in the article shows how to clear the “Border lines” option and remove autoformatting in Word, which also gets rid of the horizontal lines. You are correct though that I didn’t specifically say that CTRL-Q removes the paragraph’s formatting, I just showed readers how it removes it. Sorry about the confusion. I have updated the article to make it clear that CTRL-Q removes the paragraph’s formatting. Thanks again for your feedback.
Hi, this article was very helpful. Thanks.
Thank you so much! You solved this very frustrating problem for me.
For those with a never-disappearing line on the bottom of the page: A vestigial footnote line could be the problem. I had deleted the text of a footnote in the footer but I had not deleted the number and footnote itself. Microsoft Word 7 puts a line above any footnote. Simply look for a footnote number on the page and delete the number. The footnote line will disappear.
Two comments:
1. I had to highlight the whole document in order for your method to work. When I tried your method on any (and/or all) of the paragraph(s) above and/or below the line, it didn’t work — the line just kept moving up.
2. Using Cntrl + Q removed *all* my formatting. But using the ribbon border control only removed the *border* formatting (which is what I wanted).
Thank you!!!
Several years ago, writing my biography in Word, that dotted line showed up. After trying for several days to delete that line I gave the file to a friend that is an expert in Word and after many days he gave it back to me. He could not fix it. Today I could not go out because of a severe rainstorm, I said let me Google it, I found your article and apparently solved my problem because that line is gone. Thank you.
@Luis: Thanks for sharing your story. I am glad you didn’t give up and found a solution that worked for you.