How to Configure POP in Outlook Client to Connect to Office 365, Gmail and Outlook.com Mailbox

When you subscribe to Office 365, you don’t have to use all the features. For example, you may decide to use SharePoint Online and Skype for Business but not necessarily Exchange for email in office 365 because you may have your own Exchange Server. Even if you are using your email in Office 365, you may find it convenient to use the Outlook client application that is included in Microsoft Office because it will allow you to manage all your emails in one place. For example, you can use Post Office Protocol (POP) to add your business email from Office 365 and all your personal emails, such as Gmail, Outlook.com, etc. Here are the step-by-step instructions on how to configure POP in Outlook client.
Configuring POP for Office 365 Email
- In Outlook 2016, go to File -> Info -> Account Settings -> Account Settings.
- On the E-mail tab click New.
- On the Auto Account Setup screen select Manual setup or additional server types and then click Next.
- On the Chose Service screen select POP or IMAP and then select Next.
- On the POP and IMAP Account Settings screen enter the information as necessary. The following screen shows an example for user Bill Gates. Enter your name and email address and password and use the following information for incoming and outgoing mail servers and then click More Settings.
Incoming mail server: outlook.office365.com
Outgoing mail server (SMTP): smtp.office365.com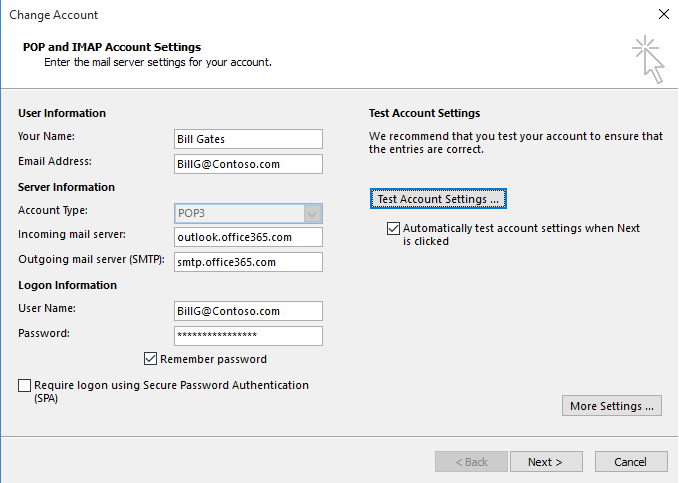
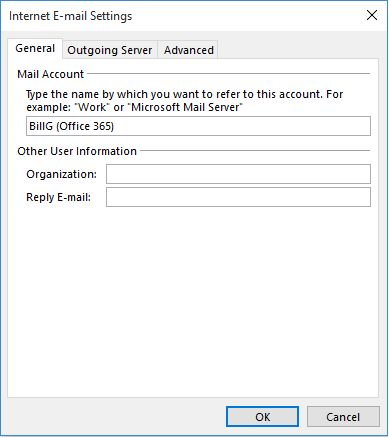
- On the General tab of the Internet E-mail Settings type a name for the mail account. I usually enter the user name and then in parenthesis enter the type of email (e.g. Gmail, Outlook.com, Office 365, etc.). Click the Outgoing Server tab before you click OK.
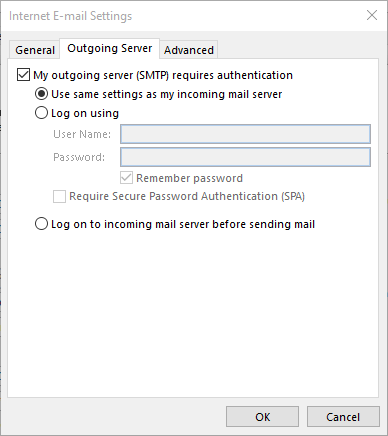
- On the Outgoing Server tab make sure the box My outgoing server (SMTP) requires authentication and the radio button Use same settings as my incoming mail server is checked and then click the Advanced tab.
- On the Advanced tab, use the following information.
Server Port Numbers
Incoming server (POP3): 995
This server requires an encrypted connection (SSL): checked
Outgoing server (SMTP): 587
Use the following type of encrypted connection: TLSServer Timouts
Accept the default value.Delivery
Select the options as necessary. If you are not sure then accept the default setting. I prefer to clear the box next to remove from server after X days and clear the box next to Leave a copy of messages on the server because once I have read my messages in Outlook I don’t want clutter my Outlook.com or Gmail account on the server.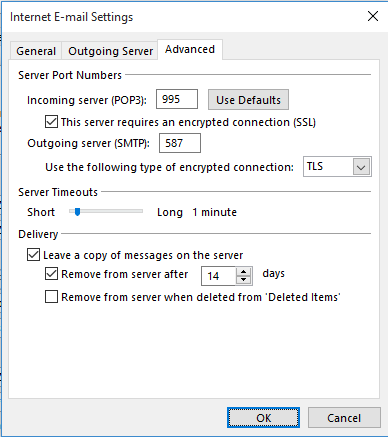
- Click OK then click Next.
- If the information you entered is correct, Outlook will test the configuration and if successful you will see the status for the test as Completed.
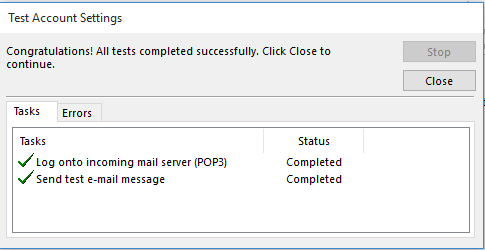
- Click Close and then click Finish.
Configuring IMAP for Office 365 Email
To configure IMAP for Outlook.com, use the same configuration as POP except for the following. In step 5 change POP to IMAP. Use the following information for server name, port and encryption method.
Server name: outlook.office365.com
Port: 993
Encryption method: SSL
Configuring POP for Gmail
To configure POP for Gmail, use the same steps as above in Configuring POP for Office 365 Email, except for the following.
- In step 5, use the following:
Incoming mail server: pop.gmail.com
Outgoing mail server (SMTP): smtp.gmail.com
Change the Email Address and User Name accordingly (e.g. BillG@Gmail.com).
- In step 6, change BillG (Office 365) to BillG (Gmail).
Configuring POP for Outlook.com
To configure POP for Outlook.com, use the same steps as above in Configuring POP for Office 365 Email, except for the following. Notice that Outlook.com uses Live, instead of Outlook, for the POP and SMTP servers.
- In step 5, use the following:
Incoming mail server: pop3.live.com
Outgoing mail server (SMTP): smtp.live.com
Change the Email Address and User Name accordingly (e.g. BillG@Outlook.com).
- In step 6, change BillG (Office 365) to BillG (Outlook.com).
Additional Reading
You may also be interested in reading the following related articles. By the way, Outlook 2013 configuration is very similar to Outlook 2016.
- How to Add Outlook.com POP3 Account to Microsoft Outlook 2013
- How to Export and Import Outlook 2013 Account Settings
- How to Backup and Import Email Signatures in Outlook 2013 Profiles
Copyright © 2015 SeattlePro Enterprises, LLC. All rights reserved.

