How to Configure Incoming E-mail for SharePoint 2010 Lists & Libraries

When you enable incoming e-mail on a SharePoint Server 2010, SharePoint sites can receive and store e-mail messages and attachments in Lists and Libraries. Here are the steps necessary to configure incoming e-mail for a SharePoint Server 2010 farm.
- Logon to the SharePoint Server 2010 as an administrator.
- You will require SMTP service installed on the server. If you haven’t, when you try to configure the incoming e-mail service you will be warned that the SMTP service is not running.
NOTE: Incoming e-mail for SharePoint Server 2010 uses the SMTP service. You can use the SMTP service in one of two ways. You can install the SMTP service on one or more Web front-end (WFE) servers in the farm, or administrators can provide an e-mail drop folder for e-mail that is forwarded from the service on another server. If you are not using a drop folder for e-mail, the SMTP service must be installed on every WFE server in the farm that you want to configure for incoming e-mail. - In our example, we will configure the email drop folder so we don’t have to install SMTP on every WFE server in the farm.
- To configure the SMTP service open the Server Manager and go to the Features section. Add the SMTP feature. In most cases you can simply accept all the default options. To manage the SMTP service on Windows Server 2008 and Windows Server 2008 R2, you must use Internet Information Services (IIS) 6.0 Manager. Make sure you install the IIS 6 Management Tools when you install the SMTP service.
- Because you can’t use IIS 7.o Manager to manage the SMTP server, go to the IIS 6.0 Manager console (available in the Administrator Tools) where you will see the SMTP virtual server.
- Add your domain as an alias domain.
- If the SMTP virtual server has not started, right-click the server and click Start. You can further configure the SMTP server if necessary.
- Start the Services console (services.msc) and configure the Simple Mail Transfer Protocol (SMTP) service to start Automatically.
- Ensure that you have an MX record for the zone in the DNS for your SMTP server. For example, go to the Forward Lookup zone in the DNS console and add a Mail Exchanger (MX) record that points to the IP address of your SMTP server, which in this case will be your SharePoint server.
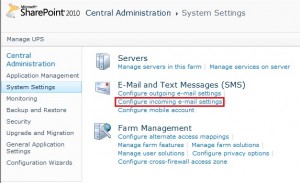
- Go to Central Administration -> System Settings -> Configure incoming e-mail settings under the E-mail and Text Messages (SMS) heading. These settings apply to the entire SharePoint farm.
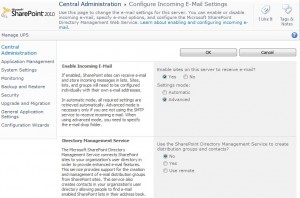
- Configure the settings for the entire farm as shown below. In the Automatic settings mode, you can select to receive e-mail that has been routed through a safe-e-mail server and in the Advanced settings mode you can instead specify a drop folder. We will use the Advanced settings mode.Enable sites on this server to receive e-mail?: Yes
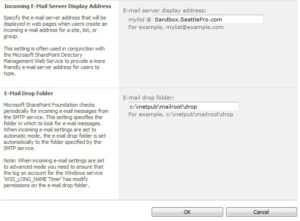
Settings Mode: Advanced - Configure E-mail drop folder as shown below.
E-mail drop folder: c:\inetpub\mailroot\drop
- After you configure incoming e-mail, users who have Manage Lists permissions can configure e-mail–enabled Lists and Document Libraries.
- Once incoming e-mail has been configured, go to the List or Library’s Settings where you want to configure the incoming e-mail settings.
- Under the Communication section you will notice a link for Incoming e-mail settings. Not all lists have this option. For example, the Calendar list has this option but you won’t find this option for a Tasks List.
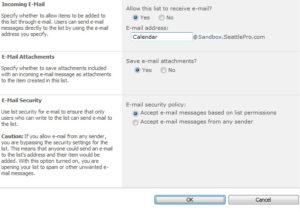
- The options to configure a List are different than the options to configure a Document Library. The options for a Calendar list are shown below.
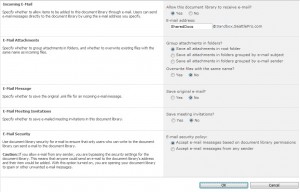
- For a Document Library the options look like this. You can configure these options as necessary. Here are my preferences.
- At this point when someone sends an e-mail to the List or Library, the item is added to the respective List or Library automatically. If you are doing a test, be patient because it may take a minute or two for the document to show up in SharePoint. You can always go to the drop folder on the server and verify that the document is there and then wait until the timer job runs and the item is displayed in the destination List or Library.
If you want to configure more advance options, such as Directory Management Service, check out this article on the TechNet.
Copyright ©2011 Zubair Alexander. All rights reserved.


Hello,
I installed a new copy of SharePoint 2010. I don’t see the “Configure incoming e-mail” link under “System Settings”. I already configured outgoing but not the incoming. Any idea?
Thanks.