How to Change the Browser Icon for SharePoint 2010 Sites

If you go to Google or Bank of America’s Web site you will notice that your browser displays a custom logo to the left of the URL. It’s nice to have a custom icon or logo for a SharePoint 2010 site so when visitors add the site to their Favorites in Internet Explorer or Bookmarks in Mozilla Firefox it displays the custom icon/logo. I wrote about this last year but in this blog I have added numerous troubleshooting tips that will come handy. You can follow the procedure described below to change the browser icon for a SharePoint 2010 site.
There may be other methods of achieving this but this is the method that I use. The procedure is very simple but it requires you to use SharePoint Designer 2010. The good news is that SharePoint Designer 2010 is a free download from Microsoft. The bad news is that if you don’t know what you are doing you can completely destroy your site by “messing” with your site in SharePoint Designer.
WARNING! Always backup your site before you make any modifications to your site in SharePoint Designer 2010.
- Create your site icon and save it as favicon.ico. There are lots of free programs that you can use. I have been using an old program called Easy Icon Maker. Keep in mind that you don’t have to use such a program. You can use any application (MSPaint, Word, etc.) to create the icon then copy it to MSPaint program and save it as a JPG or PNG. Then convert it to .ico file using a convert utility. More on that in the Troubleshooting section.
- Upload the favicon.ico file to the SharePoint site. I prefer to upload it to the SiteCollectionImages library so it is available to me for all the subsites.
- Go to the SiteCollectionImages library and open the favicon.ico file.
- Copy the path to the clipboard.
- Open SharePoint Designer 2010.
- Open your SharePoint site.
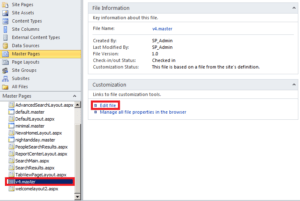
- In the Site Objects section select the Master Pages folder. You will notice a default.master page and v4.master page.
- Select the v4.master page.
- Under Customization, click Edit File.

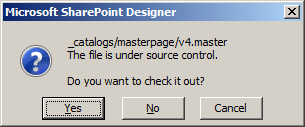
- When prompted to check out the file, select Yes.

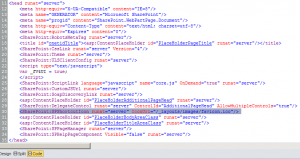
- On the toolbar, in the Page Views section click Code.
- Notice the line that starts with SharePoint:SPShortIcon. The path in this line determines which icon will be displayed in the browser. By default, it points to the favicon.ico file in the images library.
<SharePoint:SPShortcutIcon runat=”server” IconUrl=”/_layouts/images/favicon.ico”/>

- Change the path for the IconURL to your custom favicon.ico file. For example for my winnetusergroup.com site I would change it to http://www.winnetusergroup.com/SiteCollectionImages/favicon.ico.
- Save the v4.master file.
- You will prompted by a warning that once you save the file your page will not longer be based on the original site definition. Did I mention that you should always backup your site before you make any modifications to your site in SharePoint Designer 2010? If you have backed up your site, select Yes.

- In the left hand pane right-click v4.master page and select Check In.
- Select an option for the version. If you are not sure what to select, accept the default option of Check In a minor version and click OK. You will notice that the green check mark changes to a blue icon with an “i”. This means the page is no longer based on the site definition. If things get messed up you can right-click the file and select Reset to Site Definition.
- Close SharePoint Designer.
- You should now see your custom icon when you refresh your browser screen. When visitors add your site as Favorite they will see the custom icon in the listing. In addition, the address bar will display your custom icon instead of the default icon.
- Here’s a sample of SeattlePro’s Web site displaying custom space needle icon in the address bar as well as the Bookmarks toolbar.

NOTE: If you are working with a standard HTML-based Web site (not a SharePoint site) then all you have to do is copy the favicon.ico file to the root of the Web site, e.g. wwwroot folder, and your icon will be displayed automatically. The root folder is where your home or index file is located. There is no need to edit any files.
Troubleshooting Tips
If your icon is not displaying properly, here are some troubleshooting tips.
- Make sure that you modified the v4.master page and not the default.master page.
- If your site is using SSL, depending on how you configured your site, you may see the custom icon when you add it to the Bookmarks toolbar in Mozilla Firefox or Favorites bar in Internet Explorer if you do not add the s after http. However, it will not display the icon in the address bar. To see the icon in the address bar you must use https in the URL when you edit the master page.
- In Mozilla Firefox your icon will always be displayed properly. If you want to test your icon use Firefox. In Internet Explorer (all versions) it’s hit and miss. In my experience, Internet Explorer displays it only about 5% of the time. And that 5% is completely random. Do not waste too much time trying to get this to work in Internet Explorer.
- If your site gets messed up because you modified the master page, reset it to the site definition. Just right-click the master file and select Reset to Site Definition. It will create a copy of the current master page and reset the site definition.
- If your icon is not displayed, you may have forgotten to check in the master page. Unless the page is checked in, visitors cannot see the changes.
- If your icon is not displayed, you may have to login to the SharePoint site. For example, if its a public site the icon may not be displayed but if you login to the site with your account the icon will show up right away.
- If you have an existing icon and then you change the icon by uploading a new favicon.ico file you may have to clear the cache and restart the browser. Sometimes the old icon will be cached and you must restart the browser while other times your new icon will be displayed right away. A lot depends on which browser you are using and how you have configured your browser.
- The icon has to be certain size or else it may not display at all. Check out my blog post.
- You can’t just rename a jpg, bmp or png file to favicon.ico. You must either use a utility that allows you to save files with .ico extensions or use a tool that allows you to convert it from other formats to .ico format. There are a number of free utilities available to do the conversion. The quickest way is to use an online conversion tool like this one.
- Although I have used GIFs (including animated GIFs) and you can also use PNG files, I would suggest you stick with ICO files because all the browsers support ICO files. The name of the file must be favicon.
- If your custom icon is not working, make sure the size of the favicon.ico file is 16×16 pixels. Sometimes you can have a larger file, such as 64×64 pixels and you can try and convert it to ICO but in my experience the smaller size icons work the best. I often reduce it to 32×32 pixels, save it, and then convert it to ICO format. Larger file sizes tend to cause problems.
Copyright ©2011 Zubair Alexander. All rights reserved.


This worked like a champ!! Thank you so much for sharing!!
Is it possible to do this in WSS 3.0?
Nick, I haven’t tried it in WSS 3.0 but it should work in WSS 3.0 as well.
Yeah, it works without any problem. Thanks for sharing. BTW, I also changed the icon for MYSITE and works :).