Configuring Name Protection on a DHCP Server to Prevent Name Squatting

Dynamic Host Configuration Protocol (DHCP) Name Protection is a feature available on Windows Server 2008 R2 and later to prevent name squatting of non-Windows clients. In this article, I will explain what Name Protection is, how it can prevent name squatting, and how you can configure Name Protection on a Windows DHCP server.
What is Name Protection?
In an environment where Windows and non-Windows computers (Mac, Linux, Unix, etc.) co-exist, any DHCP client (Windows or non-Windows) can request and obtain IP address, subnet mask, router, and other information from the Windows DHCP server. The Windows DHCP server can be configured to automatically update authoritative Windows DNS servers with the host (A) and pointer (PTR) records of DHCP clients. These options can be configured on the DHCP server by going to either the DHCP scope’s properties or the IPv4 (and IPv6) properties and selecting the DNS tab, as shown below. The DHCP server can not only update the client’s A and PTR records in the DNS server, it can also discard them when the DHCP lease expires.
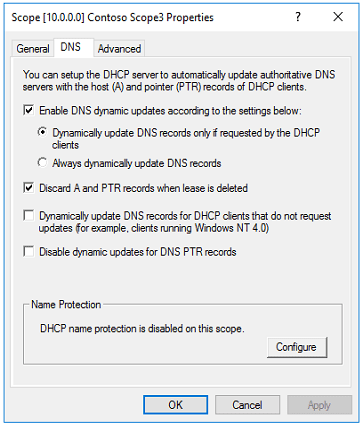
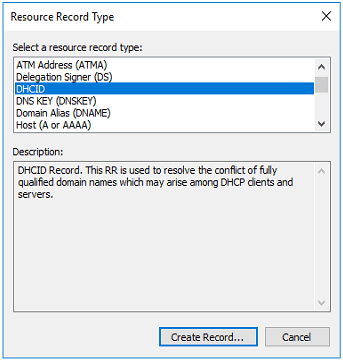
Name Protection is a feature that prevents name squatting and can be configured either at the DHCP server or the scope level. This feature is disabled by default. Just like the Scope Options settings in DHCP, which too can be configured at both the server level and the scope level, the scope level settings override the server level settings. When Name Protection is enabled, the DHCP server will register both A and PTR records on behalf of a non-Windows client. In addition, it will also register another resource record called DHCID (short for DHCP Client ID) for the non-Windows client. The following screenshot shows DHCID as one of the resource record types available on a DHCP server. As far as the Name Protection feature is concerned, there is no need for you to manually configure this record. DHCP takes care of this for you.
DHCID identifier is stored on the DHCP server and is useful in resolving the Fully Qualified Domain Name (FQDN) conflicts. If one DHCP client’s FQDN has been registered in the DNS as sales2.contoso.com, another client won’t be able to register the same FQDN in the DNS because the DHCP server will refuse registration to a second client if its DHCID matches with an existing one.
Without Name Protection, it’s possible to have a non-Windows client register its FQDN in the DNS that matches with another non-Windows client’s FQDN. This is an example of Name Squatting. Imagine the problems this type of conflict can cause when two computers can have the same host name but different IP addresses. Among other things, this can also be a big security issue.
Configuring Name Protection
Configuring the Name Protection feature is very simple. Just follow these steps.
- Open the DNS Manager console.
- Go to the properties of the DNS zone and on the General tab ensure that the Dynamic updates have been configured for Secure only. If you have multiple zones, then they may need to be configured for secure dynamic updates, depending on your network configuration. Just keep in mind that the Name Protection will only work for DNS zones that have been configured to enforce secure dynamic updates.
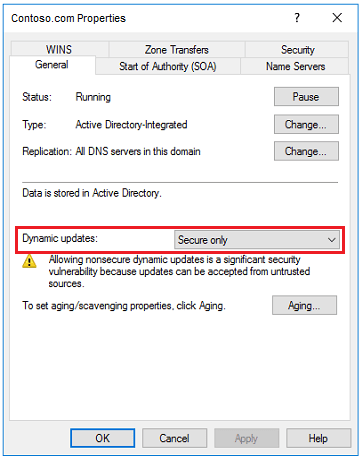
NOTE: The Name Protection feature on the DHCP server will only work if the secure dynamic update has been enabled on the DNS server. - Open the DHCP Console on your Windows Server.
- Decide whether you want to enable Name Protection at the DHCP server level or scope level. If you configure it at the server level then Name Protection will be implemented on all your DHCP scopes. If you configure it at the scope level then it will only affect the scopes where Name Protection has been enabled.
- To configure Name Protection at the server level, right -click IPv4, select Properties, and then click the DNS tab. If necessary, repeat this step for IPv6 (this is usually not necessary). To configure Name Protection at the scope level, right-click the scope, select Properties, and then click the DNS tab.
- On the DNS tab, click Configure in the Name Protection section. Check the box Enable Name Protection and click OK twice to close all windows.
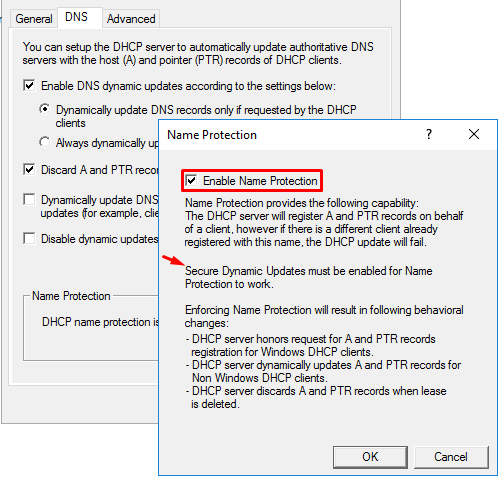
Implementing Name Protection has the following impact on Windows and non-Windows clients.
- DHCP server honors request for A and PTR records registrations for Windows DHCP clients.
- DHCP server dynamically updates A and PTR records for non-Windows DHCP clients.
- DHCP server discards A and PTR records when lease is deleted. This is the default behavior that’s controlled by the check box in the above screenshot in step 6.
According to Microsoft, the Name Protection feature in DHCP can prevent the following name squatting situations:
- Client name squatting by a server
- Server name squatting by a client
- Client name squatting by another client
- Server name squatting by another server
What About the Windows Clients?
Notice that I have been talking primarily about the non-Windows clients throughout this article. That’s because on a Windows domain network we are not as concerned about the Windows clients as we are about the non-Windows clients. Windows clients that are part of an Active Directory (AD) domain can benefit from the AD Access Control Lists (ACLs), which can prevent name squatting by limiting the access rights of devices. The Name Protection feature in DHCP is meant for non-Windows clients that don’t belong to an AD domain.
| Thanks for reading my article. If you are interested in IT training & consulting services, please reach out to me. Visit ZubairAlexander.com for information on my professional background. |
Copyright © 2018 SeattlePro Enterprises, LLC. All rights reserved.


Hi Alexander, thanks for your clear explanation.
I have a second DHCP configured as FailOver DHCP server on my second Domain Controller.
I Replicated all scopes to failover server but DNS Credentials and Name Protection did not update on the failover server.
Shoud I update DNS Credentials and Name Protection manually on failover DHCP server ?
Thank you
Bye
Massimo
Yes. You can update the Name Protection manually on your failover DHCP server.