Best Practices for Organizing Data on Your Computer

One of the most common challenges that computer users often face is data organization. I see users with cluttered desktops full of individual files, folders that are duplicated (desktop and default home directory), and users struggling to find their own data which makes content management very difficult.
In this article, I will share some guidelines for organizing your data. I would suggest some ideas for selecting a method to organize your data, dealing with the folder structure, sharing files with your family, using drive partitions to your advantage, etc.
Importance of Organizing Data
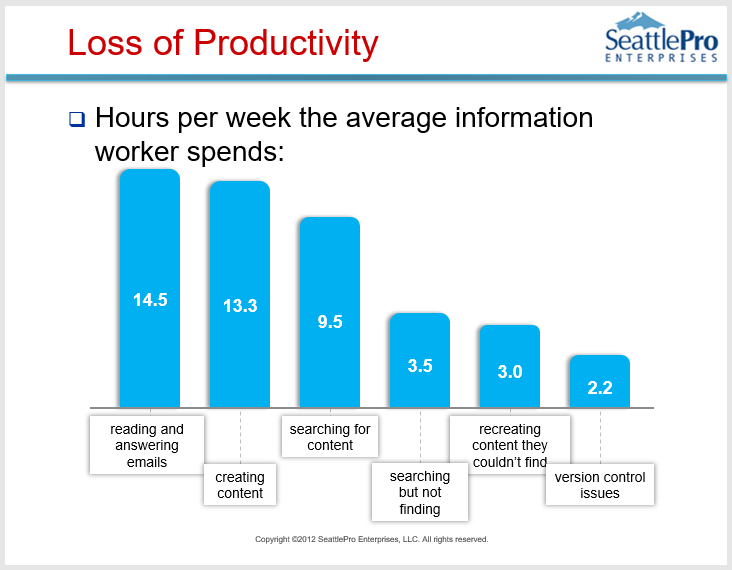
To understand the importance of data organization (or content management) and put things in perspective, it’s helpful to consider some challenges that businesses face. The purpose of sharing this information with you is to help you understand the enormous amount of time we spent in a work day on managing our data, which includes creating, searching, deleting, sharing, duplicating, emailing, reproducing, and updating documents, images, multimedia files, etc. Each week an average information worker spends:
- 9.5 hours searching for content
- 3.5 hours searching but not finding the data
- 3.0 hours recreating it
- 2.2 hours struggling with document versioning
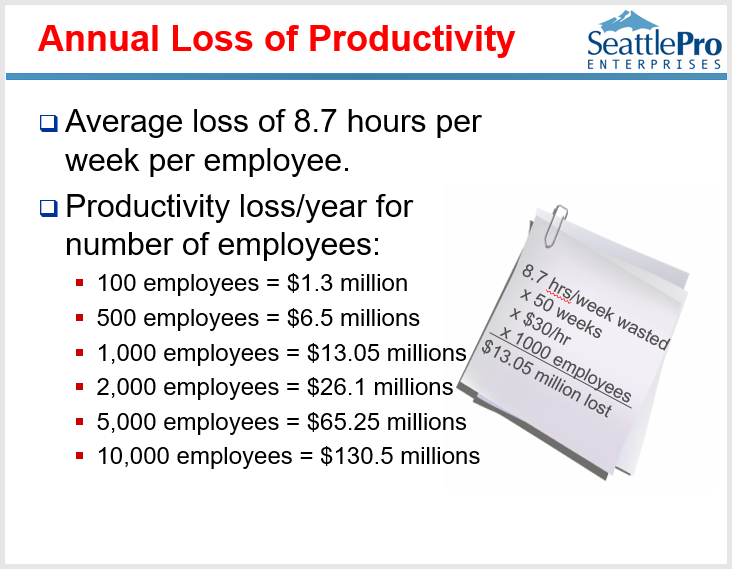
When you crunch the numbers, you’ll discover that the amount of time users waste dealing with content management can really add up. For example, if an organization has 1,000 employees and the employees are spending 8.7 hours per week searching but not finding, recreating the content they couldn’t find, and dealing with multiple versions of the same document (the last three bars in the above graphic), it can cost the organization over $13 million dollars per year. This can be avoided by better organizing the data and associating metadata with it so it can be easily be located in seconds.
Obviously, businesses have much more resources and money than their employees. If their employees are wasting so much time with content management, you can only imagine what the statistics might be for home users. One of the main reasons that organizations struggle with content management is lack of data organization. That’s why many businesses spend millions of dollars hiring consulting companies who help them with content management, i.e. organizing their data.
Home users, which also include small business owners who work from home, face the same challenges with content management as the businesses, except that they have a smaller data set. The small businesses often can’t afford to hire IT staff, so they don’t have a specialist training them how to organize their data and become more efficient. That’s why I have included the home users in my target audience, as I explain in the next section.
Target Audience
The goal of this article is to help anyone who is struggling with organizing their data and can use some guidance. By following my suggestions and best practices, you can save considerable time and money. The guidelines in this article may not work for everyone because as they say, one size doesn’t fit all. However, I have trained literally thousands of students and numerous business clients over the years. I am hoping you will benefit from my tips. Remember, you don’t have to organize your data exactly the way I suggest. You can make adjustments based on what works best for you.
Selecting a Method to Organize Data
Should you organize data based on category, projects, date, or user? The answer is yes. It doesn’t really matter whether you choose category, project, date, user, or something else to organize your folder structure. You should pick one method and stick with it, but it’s okay to make exceptions if necessary. Remember, this is your data and you are the one who needs to find it. If you decide to organize data based on a category, e.g. food, then data related to food will go in that folder hierarchy. This includes all things related to the food, such as images, recipes, books, etc. If there are 20 recipes that were emailed to you by your cousin Rose, then save them under the Food folder, rather than a folder named Rose. If you decide to organize your folders based on date, then you can use a folder structure based on years and months. For example, you will create folders for years (2018, 2019, 2020…..). Each year can then have subfolders for months (January, February, March, …..). You may not need separate folders for each month or each week, if there’s no data to add to certain months or weeks. It’s totally up to you to make that decision.
As far as images, you may want to organize them using the date category, as shown in the screenshot below. Use date, month, and day separated by underscores. This allows easy sorting of images. If you only have to store images when they were taken, then there’s no need to create a folder for every month or year. Simply create folders for when the images were taken.
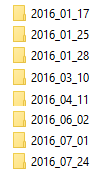
Image 1
Dealing with the Folder Structure
As a general rule, I recommend you create a folder for your data hierarchy and make sure that every single data file on your computer is saved within the data hierarchy. You can then make the top-level folder in your hierarchy the default documents folder in Windows 10. It doesn’t matter what you call the top-level data folder. In my example, I will just call it DATA. You can use uppercase for certain folders to make them stand out if you want. Your folder structure then should look something like this.
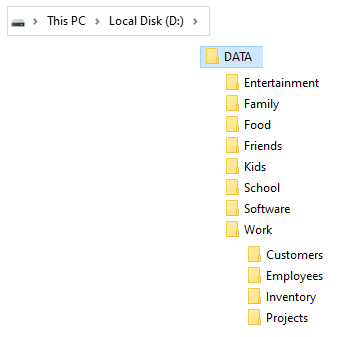
Image 2
You have various categories of folders under DATA that will contain your files. Within each folder, you may have several subfolders. For example, you’ll have a bunch of folders under Work and the subfolders also may have additional subfolders under them. Your goal is to organize your folders and files in a way that you will be able to find them quickly. Keep in mind, there is no such thing as a perfect folder structure. What works for you, may not work for someone else.
One major advantage of organizing data this way is that if you ever need to back up your entire data to the cloud, or to an external USB hard drive, all you have to do is simply drag one folder at the top of the hierarchy to the destination and you are done. You will also find this to be helpful when you are searching for data. Just highlighted the top folder (e.g. DATA) and search the entire folder hierarchy, which includes all its subfolders.
Use Quick Access for Shortcuts to Folders
Windows 10 File Explorer gives you the ability to create a shortcut to your folders for quick access. Rather than putting folders on your desktop, you can pin the most frequently used folders to the Quick access (see Image 3 below). By adding folders to Quick access, you are simply creating a shortcut to the folder that will still reside in its original location under D:\DATA (see Image 2).
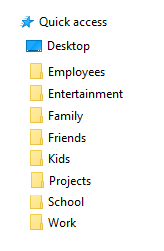
Image 3
Notice your folders and some of the subfolders in Image 2 are pinned to the Quick access area in the above screenshot.
There are a couple of ways to pin folders to Quick access. Method 1 is preferable, but use Method 2 if it’s easier for you.
Method 1
Select the folder you want to pin to Quick access and then click-and-drag the folder to the Quick access area. This is quicker and easier of the two methods.
Be careful when you drag a folder to Quick access. If you are not careful you will accidentally move the folder inside another folder and won’t be able to find it in your DATA hierarchy anymore. This can be confusing and a bit scary at times when your folder disappears. When you click and drag a folder, wait until it shows a horizontal bar in the location (see Image 4 below) where you want to create a quick access for the folder, and then release the mouse. You will also notice a small popup box Pin to Quick access with an arrow next to it.
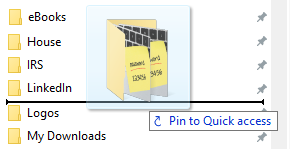
Image 4
Windows 10 clearly tells you whether you are moving a folder, copying a folder, or pinning to Quick access. Sometimes when you are in a hurry, it’s easy not to pay attention to the popup box that tells you what you are about to do, so be careful.
NOTE: You can only pin folders, not files, to Quick access.
Method 2
Another way to pin your folder to Quick access is to highlight the folder you want to pin, then on the Home tab of File Explorer click Pin to Quick access. This will add the folder to the bottom of the list. You can manually click and drag the folder to arrange you list. This extra step makes this method a bit slower than the first method.

There is no easy way to sort the items alphabetically in Quick access, you need to manually arrange them.
Sharing Files with Your Family
If you will be sharing data with other family members then you need to have a strategy on how you will share the data. Not everyone thinks the same way. If you want to store pictures of snow at Christmas, you may choose to label the folder Snow. However, your spouse may put it in a folder called Winter, and your kid may store it in a folder called Christmas because she associates the images of snow with Christmas. It doesn’t hurt to discuss with your family how you would like to store the files on a shared computer. If you’re the only person who has to deal with your data then things are relatively easier, but you still need to have a plan and organize the data in a way that’s easy for you to locate.
Follow these best practices when working with files and folders.
- Use names for files and folders that are easy to recognize.
- Avoid the bad habit of creating long filenames as a substitute for metadata.
Metadata is entered under File -> Info in Office applications. It includes the properties of a file, such as author, title, comments, status, categories, subject, company, etc. Metadata is used for searching information related to a file. Because you can enter metadata in the document Properties of a file (Word, Excel, PowerPoint, etc.), get into the habit of using short names for files and folders. - Avoid duplicate names.
- Save your data on a drive other than your system drive C (e.g. D:\DATA).
More on this in the next section.
- Don’t use the default home folder location which points to C:\Users\YourProfileName\Documents.
While some people encourage you to use the default location, I don’t. Your data should not be on the system drive where the operating system is installed. I discuss this in more detail in the next section. - Avoid saving files to your desktop.
Your desktop should be clean with just a wallpaper and only one shortcut to your DATA. People only store files and folders on their desktop because they feel they will find them quickly, only to discover that once they have a few hundred files on their desktops they have trouble finding them. Create a shortcut to a folder on the desktop that points to your data folder. All your files should be under the data folder hierarchy. That’s the only folder you need on your desktop. If you don’t stop saving files to your desktop, you will always struggle with data organization. - Encrypt the data drive (e.g. drive D) with Windows 10 BitLocker to secure your data.
BitLocker is included in Windows 10 Pro and Enterprise editions, but not in Windows 10 Home. You can, however, upgrade Windows 10 Home to Windows 10 Pro for free using the tip in the next section.
Using Drive Partitions to Your Advantage
As a best practice I recommend creating at least two partitions on your computer (it’s okay to have more than two, if necessary). Normally, this is accomplished when you first time install the operating system, or you wipe your hard drive completely to do what’s known as a fresh install, or a clean install. However, when home users purchase a new computer from a large vendor (Lenovo, Dell, HP, Acer, etc.), it usually:
- Comes with Windows 10 Home preinstalled.
- Contains tons of useless files, freeware, bloatware, adware, unwanted toolbars and potentially unwanted programs (PUPs). The folks in IT refer to these useless files as garbage or junk software.
- Comes configured with only one partition on drive C to keep things simple for the users.
Windows 10 Home is basically a limited version of Windows 10 Pro. Tech-savvy individuals and business employees use Windows 10 Pro because it offers several security and networking features that Windows 10 Home lacks.
|
TIP: Upgrade Windows 10 Home to Windows 10 Pro for Free You can upgrade your Windows 10 Home to Windows 10 Pro for free if you have a product key for Windows 7 Professional or Ultimate, Windows 8/8.1 Pro, or Windows 10 Pro. Simply type “activation settings” in the Windows search box and press Enter, click Change product key, and enter the product key for a Pro version of a previous edition of Windows. Your computer will be upgraded to a Windows 10 Pro digital license, which means even if you were to reinstall Windows on this computer, it will be automatically activated. |
Although new computers often come preconfigured with only one partition on drive C, Windows 10 allows you to create another partition without starting all over and wiping your original partition. You can use the Disk Management tool included in Windows 10 to accomplish this. There are other third-party free tools available to accomplish the same goal. Check out my article The Easiest Way in Windows to Extend the System Partition (Drive C). I discuss several partition sizing tools in this article.
The system partition (usually Drive C) is where all your operating system files are stored. By storing data on a different drive (e.g. drive D) you are isolating your data from the system files. If your operating system ever crashes or if you upgrade your operating system, it won’t impact your data at all because it’s on a different partition. But wait, it gets even better.
If you want to go one step further, add a second hard drive to your desktop computer. Unlike desktop PC, you can’t easily add a second fixed drive to a laptop, you can only add external hard drives, USB drives, etc. By adding a second hard drive, you can configure it as your drive D and then create your DATA folder on the drive D. For all practical purposes, you won’t notice any difference between drive C and drive D, even though they are two physically separate disks.
Most experts don’t like to simply upgrade an operating system, they like to wipe their computers clean and start fresh. This is how I have been installing my newer versions of operating systems on servers and client computers for several decades. The fresh install keeps my system clean and fast. Fresh install is also necessary if your computer crashes because of a hard drive failure or an operating system crash that’s not recoverable. If you store your data using the default method, which saves your data within your user profile on the system partition (drive C), you may lose your data when the hard drive or the operating system fails. You can also lose some of your data if you have power issues in your area (e.g. blackouts and brownouts). An uninterruptible Power Supply (UPS) can help mitigate this problem.
| BEST PRACTICE: Use a reliable cloud data backup solution to easily restore your files in case of a hard disk failure, operating system crash, or accidental file deletion. |
By isolating your data from the system partition as described above, even a system drive failure or a fresh install will have no effect on your data. In addition, because your data won’t be sharing the drive with the system partition, which is constantly reading and writing data to drive C, your drive D won’t be as fragmented. Less fragmentation means better performance and faster access to your data. Another nice thing about following my recommendation is that if you ever buy a new computer, you can simply take out drive D (which will be a separate physical drive) and install it in your new computer. Your data will be all in tact.
| WARNING: If you’re moving your encrypted hard drive from one computer to another, make sure you decrypt the drive first (i.e. turn off BitLocker) and then move it, otherwise you won’t be able to access your data. Install your hard drive as partition D in the new computer and then use BitLocker again to encrypt the entire drive. For more information, visit Securing Windows 10 with BitLocker Drive Encryption. |
When it comes to content management, there is too much to talk about. Frankly, it’s easy to write an entire book on this topic. Hopefully the few ideas in this article will help you get started. Feel free to share your ideas with other readers and ask questions in the comments section below.
| Thanks for reading my article. If you are interested in IT consulting & training services, please reach out to me. Visit ZubairAlexander.com for information on my professional background. |
Copyright © 2020 SeattlePro Enterprises, LLC. All rights reserved

