Unable to Map a Drive or Ping a Computer That’s Connected to the Network

Here’s a situation that you may have experienced. You discover that you are suddenly not able to ping a computer that was available before. You are also not able to map a shared drive or access a printer directly attached to that computer. Let’s take a closer look at the problem and a possible solution.
Problem Scenario
Although the scenario I am using in this article assumes that you’re working on a Windows 10 Professional or Windows 10 Enterprise computer, the situation in this article also applies to Windows Server computers.
You discover that ComputerA, which is running Windows 10, can successfully ping all other computers (e.g. ComputerB, ComputerC, ServerA, ServerB, etc.) on the network. You open a web browser and are able to successfully connect to the Internet. You connect to a shared folder located on Windows Server 2019 and it works. Everything seems to work just fine on ComputerA.
You sign in to ComputerB, which is also running Windows 10, and ping ComputerA. The ping is unsuccessful.
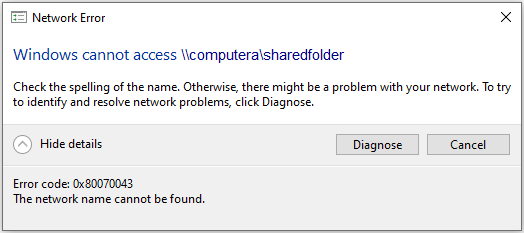
You try to map a drive from ComputerB to ComputerA, first by using the computer name (\\ComputerA\SharedFolder), and then the IP address (\\192.168.1.25\SharedFolder). You are unsuccessful in mapping a drive.
You get the following error.
Error code 0x80070043. The network name cannot be found.
This is unexpected behavior for a couple of reasons. You didn’t make any changes to the Windows Firewall on ComputerA that could prevent other computers from connecting to the shared folder and mapping the drive to ComputerA was not a problem earlier in the morning.
You restart both ComputerA and ComputerB, but it doesn’t solve the problem.
You then try to use Remote Desktop (mstsc.exe) to connect to ComputerA from ComputerB and that works. You can also connect to ComputerA from other computers (servers and workstations) using Remote Desktop Protocol (RDP) successfully. Remote desktop connectivity works as expected.
Conclusion: Users are unable to successfully ping or map a drive from their computer to ComputerA. However, a user on ComputerA can not only ping all other computers on the network successfully, but also successfully map a drive to any shared folder on another computer for which the user has permissions.
A Common Solution
While there are different reasons that you may not be able to ping the remote computer or map a network drive, one of the most common reasons for not being able to ping a computer that’s connected to the network (and the Internet) has to do with network discovery. In our scenario, the likely reason could be that the services that rely on the network discovery and file sharing are not working on ComputerA. We need to ensure that these services are available to the users on the network.
| What is Network Discovery? It is a service running on a Windows computer that allows computers and other devices on the local network to see the computer and communicate with it. In addition, the service allows users to print documents on a network printer or scan a document on a network scanner. |
There are various reasons why your network discovery service may be turned off. You could have intentionally or unintentionally turned it off while working on your Windows 10 network profile, a Windows Update may have turned it off, a malware could be the culprit; a dependent service, such as Remote Procedure Call (RPC) may not be working, or perhaps some other technical issue may have prevented the service from starting.
There are several ways to fix this issue. You can take care of the problem in Windows Advance Firewall, Windows Settings, Windows File Explorer, Control Panel, Function Discovery services in the Services Console (services.msc), use PowerShell, etc. In this article, I will show you how to use the Windows File Explorer to fix the problem because that’s my preferred method to quickly fix the problem.
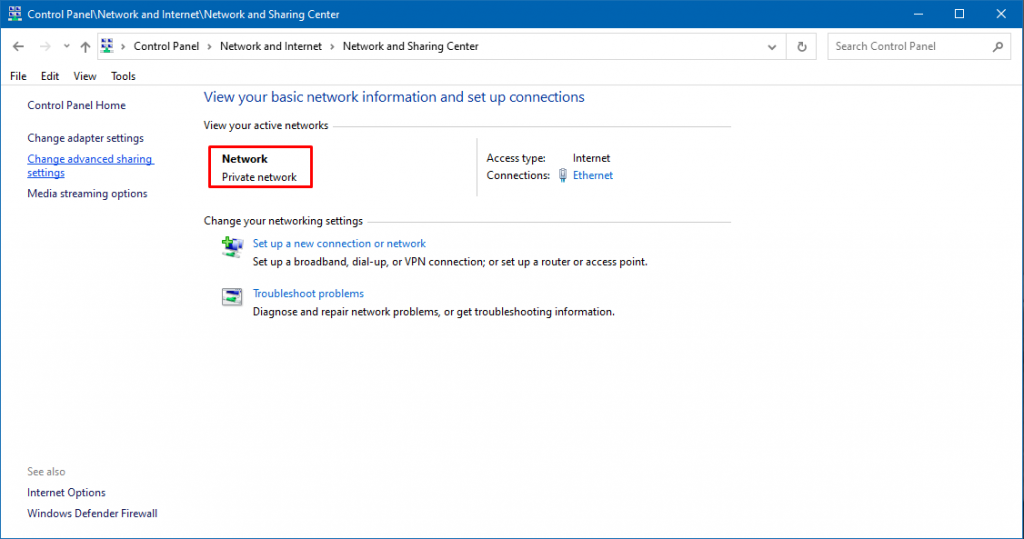
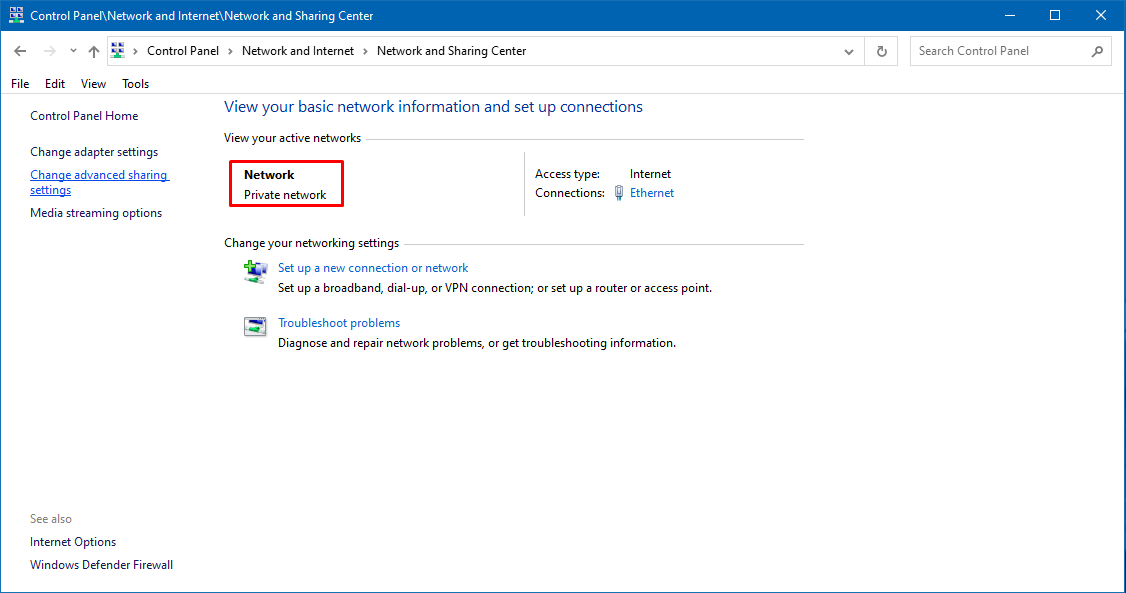
- First, go to the Control Panel -> Network and Sharing Center and look at the status of your active network. You will notice it’s listed as Public network. Leave this window open, you will come back to this in a minute to verify the setting has changed.

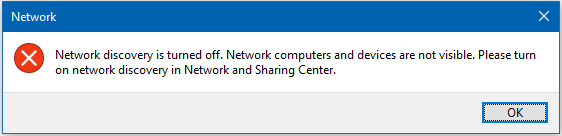
- Now go to the Windows 10 File Explorer and select Network. You will see the following warning message.
Network discovery is turned off. Network computers and devices are not visible. Please turn on network discovery in Network and Sharing Center. Go ahead and click OK.
- When you click OK, you will see a yellow bar with the same notice and an option to change the setting.
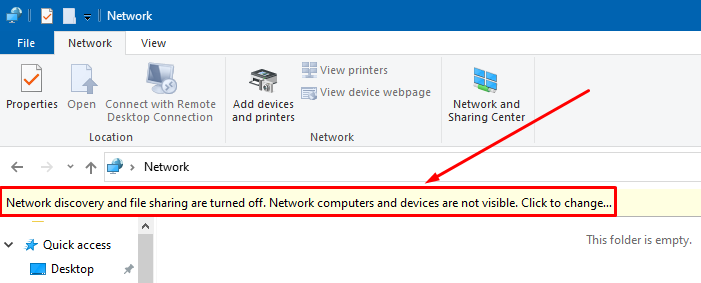
- Click anywhere in the yellow box on the notice and select Turn on network discovery and file sharing.

- You are provided options to either turn on the network discovery for all public networks, which you should never do, or to make your network private. Select the first option No, make the network that I am connected to a private network. This will secure your computer and turn on network discovery and file sharing.

- Now you should see computers and other devices on your network.
- Go back to the Network and Sharing Center (step #1). Your active network should now be a Private network. The name of your network may be different than what you see in the screenshot, but that’s okay.
- Now try to ping ComputerA. Also try to map a network drive to a shared folder from ComputerB to ComputerA. Ping and drive mapping should be successful. They should also be successful from any other computer on the network.

Here are some additional information that you will find useful. I encourage users to customize and tweak their sharing options to enhance security.
Customizing Sharing Options
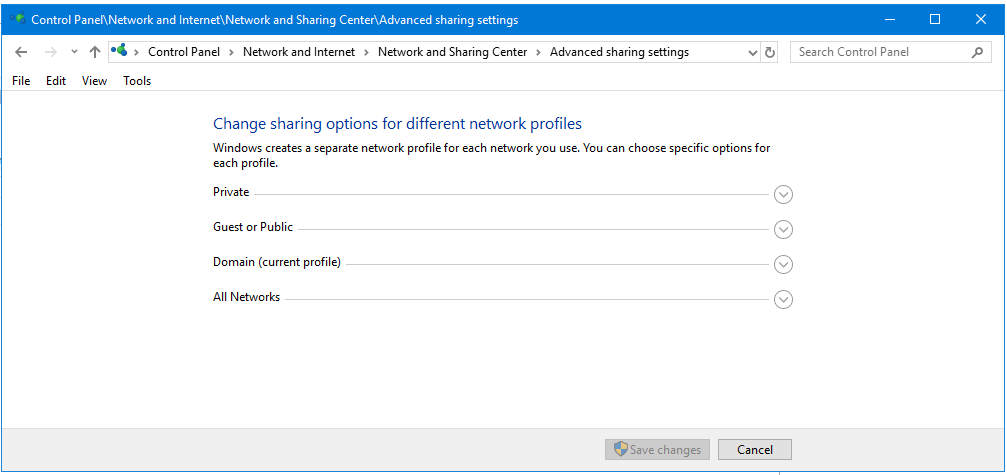
For security reasons, it’s a good idea to customize your sharing options for the different network profiles. The options are available under Control Panel -> Network and Internet -> Network and Sharing Center -> Advanced sharing settings. To better understand these network profiles, let me explain what private and domain profiles are in this context.
Private vs. Domain Profile
It’s important to understand the difference between the Private profile and the Domain profile. If your computer is connected to a Windows domain, which is usually the case in a business environment, you will see a domain profile that will be listed as Domain (current profile). If you are logged in to your local computer profile at home or work, then your current profile will be the Private (current profile).
On a Windows Server, and a Windows 10 workstation that’s joined to the domain, there will be four sharing options:
- Private
- Guest or public
- Domain
- All Networks
On Windows 10 computers that are not joined to the domain, such as home computers, or some business computers that are intentionally not connected to the domain, there will be three sharing options, because the domain option won’t be applicable.
Network Sharing Recommendations
Here’s the simple rule I recommend for configuring network profiles. For security reasons, only enable the network discovery and file and printer sharing options for your current profile. Disable them on all other profiles.
Private Profile
A Windows 10 Professional or Windows 10 Enterprise computer that’s not joined to the domain, the network sharing options should look like this for the Private (current profile).
Network discovery
- Turn on network discovery: Selected
- Turn on automatic setup of network connected devices: Box checked (enabled)
File and printer sharing
- Turn on file and printer sharing: Selected

Although for general public I recommend leaving network discovery on, I do not enable network discovery on any computer on my network (server or workstation) to enhance security and improve performance.
| Check out my article How to Switch the Network Profile from Public to Private on Windows 10 for more details. You will find a lot more details on the network profiles, plus information on how to switch between profiles, what to do if you don’t see the option to switch profiles, how to change the network name, and why it’s best to turn off network discovery on all networked computers, especially in secure environments. |
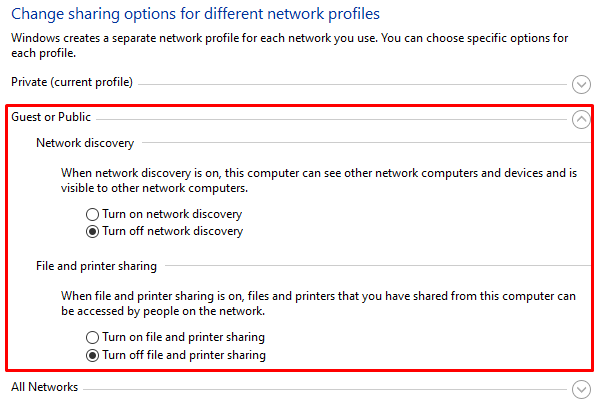
Guest or Public Profile
Your Guest or Public profile should have the network discovery disabled under all circumstances. The file and printer sharing should also be disabled. This is true whether your computer is domain-joined or not and whether you are working with a Windows Server or a workstation, such as Windows 10.
Network discovery
- Turn off network discovery: Selected
File and printer sharing
- Turn off file and printer sharing: Selected
Domain Profile
Your Domain (current profile) would usually be controlled by the Domain Administrator. The settings would depend on your network security policies and how your business operates. Workstations are usually not configured to share folders or printers with other users on the network. In fact, most network administrators have policy in place to prevent users from accomplishing these tasks. File sharing roles are typically reserved for file servers. Network discovery is also not encouraged on wireless networks, especially in secure environments. Some organizations may not allow network discovery for domain-joined computers for security and performance reasons.
All Networks Profile
The All Networks profile should be configured as follows.
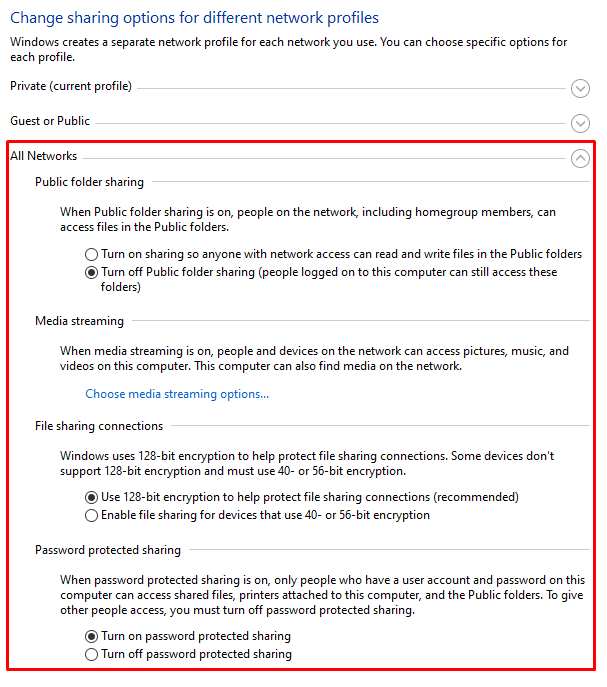
Notice that Public folder sharing feature is turned off for this profile. Public folder sharing is different than Guest or Public sharing. I don’t recommend using the public folder sharing feature in Windows 10. This feature makes it easier to share files because you simply add the files to a “public folder” and other can access it without a password. This feature requires that you turn off the Password protected sharing feature. I am not a fan of public folder sharing and discourage people from using it.
I recommend using the Password protected sharing feature to share folders and configure permissions to restrict access to the users. This feature requires a user account and password on this computer to access files and printers attached to this computer.
The media streaming option is turned off by default for the All Networks profile.
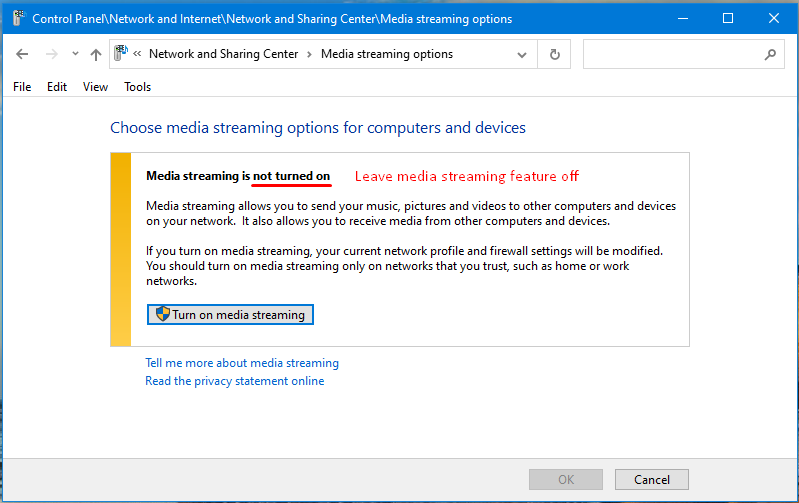
When media streaming is on, your users and their devices will be able to send and receive pictures, music, and videos from and to this computer. Most people do not need this feature. I recommend you leave this feature off.
Related Articles
The following articles have lots of useful information that’s related to this article. The first article has more details on the network profiles, plus information on how to switch between profiles, what to do if you don’t see the option to switch profiles, how to change the network name, and why it’s best to turn off network discovery on all networked computers, especially in secure environments. The second article has a list of services that need to be running for the network discovery to work. Although the second article is written for Windows 7/8, you may want to take a look if you are having issues with your network discovery service.
- How to Switch the Network Profile from Public to Private on Windows 10
- Unable to Turn on Network Discovery on Windows 7 or Windows 8
| Thanks for reading my article. If you are interested in IT consulting & training services, please reach out to me. Visit ZubairAlexander.com for information on my professional background. |
Copyright © 2020 SeattlePro Enterprises, LLC. All rights reserved.

