How to Switch the Network Profile from Public to Private on Windows 10

In this article, I will explain how to switch a network profile from public to private on Windows 10 and Windows Server 2019. First, here’s a quick primer on the different types of network profiles on Windows computers (clients and servers). If you are not familiar with these profiles, I encourage you to read this section so you have a better understanding of the purpose of these profiles before learning how to switch between them.
What are Network Profiles?
Windows computers have three types of network profiles: Private, Domain, and Guest or Public.
- Private
A private profile is meant for a computer at home or work connected to a private, internal network. This computer is part of a Workgroup and is not connected to the Active Directory domain. For private networks you can turn on Network Discovery as well as File & Print Sharing so that other computers can easily find your computer and access network shares and other resources that you have shared on your private network, such as network shares, printers, and scanners. If your computer is part of a business network, but is running in a Workgroup, rather than a domain, then your settings would depend on the security requirements. - Domain
A domain profile is designed for computers in a business network that have “joined” the Active Directory domain. This offers a much higher level of security and authentication for users and devices. For domain networks the Network Discovery and File & Print Sharing may or may not be turned on. These settings are determined by the network administrators and depend on how your network is configured. The domain profile is only applicable when a computer has joined a Windows domain, which is usually the case in a business environment. Did you notice that I used the word applicable, rather than visible? That’s because users can’t switch their profile on a domain-joined computer so the option to switch to another profile doesn’t apply and therefore it isn’t visible. However, you can go to the Control Panel and configure a couple of options under Change advanced sharing options for your domain profile. - Guest or Public
A guest or public profile is designed for public networks that are not secure. This profile is used on mobile devices for wireless networks at a coffee shop or an Internet cafe. For security reasons, you want to turn off Network Discovery and File & Print Sharing on this profile because you don’t want hackers to easily access resources on your laptop or other mobile device.
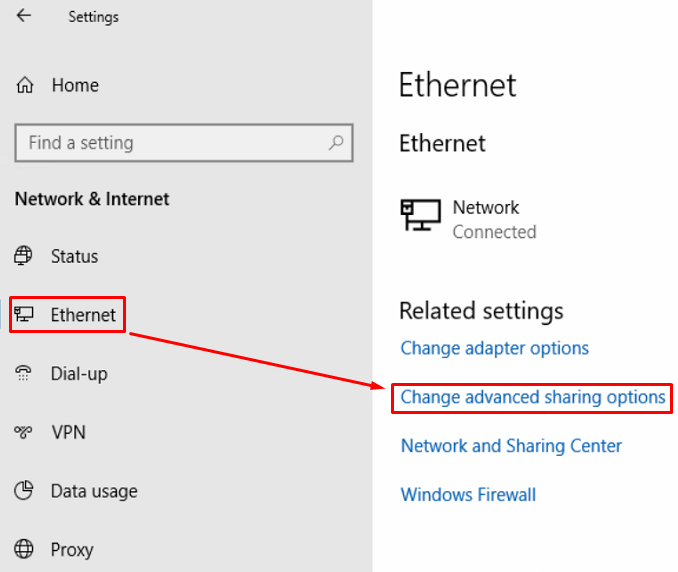
The network profiles can be accessed by going to Settings -> Network and Internet -> Ethernet -> Change advanced sharing options.
As mentioned earlier, for Guest or Public networks you should turn off network discovery as well as file and print sharing, as follows.

The screen shots in this article are from Windows 10 Enterprise and Windows Server 2019 member servers. Your screen may look slightly different depending on the version and build of your operating system.
TIP: For security reasons, you can leave the network discovery off on all networks, public, private, and domain. Turn on file and printer sharing for your domain or private profile, but create all the shares as hidden shares by adding a dollar sign ($) at the end of share name. You won’t be able to browse them in your File Explorer, which uses the browser service, but because you know their names you will be able to connect to them easily or map a drive permanently. Using the browser service is very slow anyway, using universal naming convention (UNC) to map drives (e.g. \\servername\sharename) is much faster.
How to Switch Between Profiles
To switch between the profiles you need to click on the network icon, as shown below.

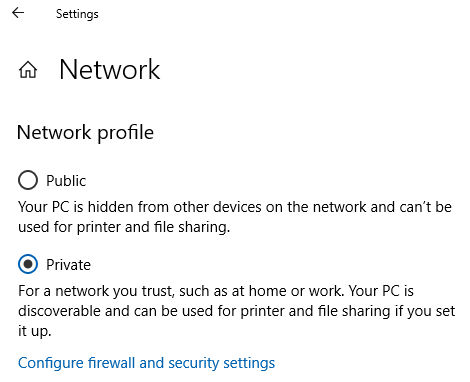
If you want to switch your profile from public to private, simply select the Private radio button.
NOTE: You can only switch between Private and Public profiles on computers in a Workgroup. Domain-joined computers are controlled by the domain administrator and for security reasons don’t allow users to change the network profile on a workstation.
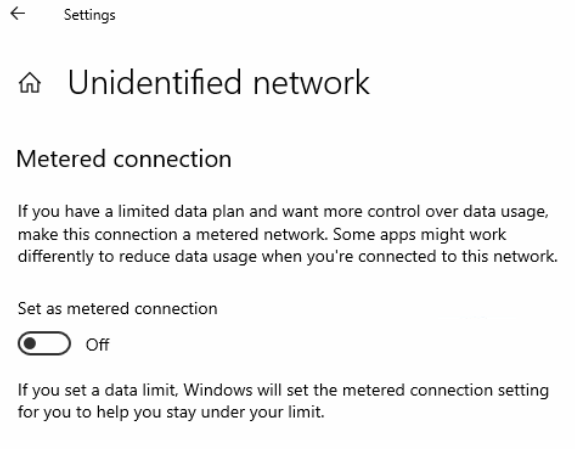
What if You Don’t See the Option to Switch Profiles?
Sometimes, when you click on the network icon, instead of the option to switch between network profiles (above screenshot) you may just see the Metered connection screen.
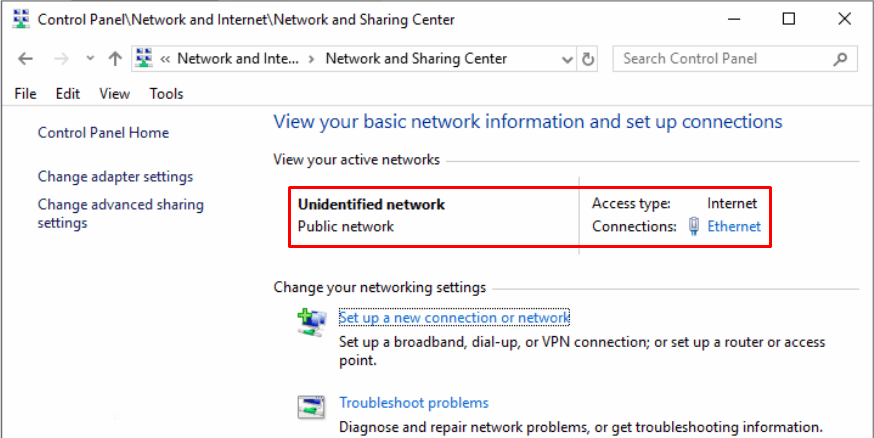
The Control Panel will display the unidentified network profile as public.
SOLUTION #1
One solution that worked for me and may be helpful to you is this. Temporary enable the Metered connection, close the Settings window and go back into the network icon. You will see the option to switch between profiles. Change the profile from public to private and go back and turn off the Metered connection. Your profile should stay as private. This solution worked for me on Windows 10.
SOLUTION #2
If the first solution doesn’t work then try this second solution. I have tested this solution several times on Windows 10 workstations and Windows Server 2019 member servers. The Windows Server 2019 Domain Controllers always have the Domain profile as their current (i.e. active) profile, so the issue doesn’t apply to them.
- Make sure you only have the Ethernet interface enabled for the public network that you are trying to switch. Disable all other interfaces temporarily.
- Go to File Explorer and click the blue Network icon in the navigation pane.
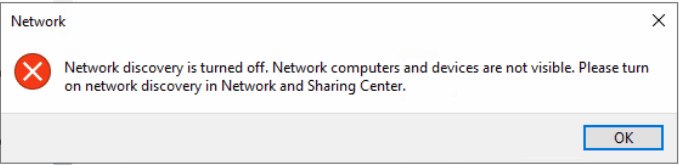
- You should see the following error message. Click OK.
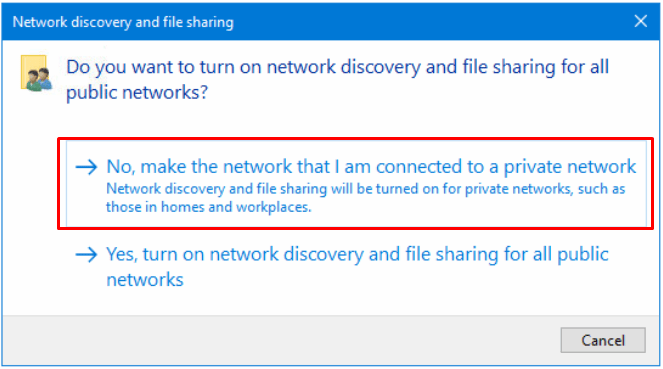
- You will see the following message in the top bar. Click anywhere in the bar.

NOTE: If you don’t see the above message in the File Explorer, go to the Control Panel -> Network and Internet -> Network and Sharing Center -> Advanced sharing settings and make sure that network discovery and file and printer sharing are both turned off. - From the drop-down message select Turn on network discovery and file sharing.

- When prompted to turn on network discovery and file sharing for all public networks, select No, make the network that I am connected to a private network.
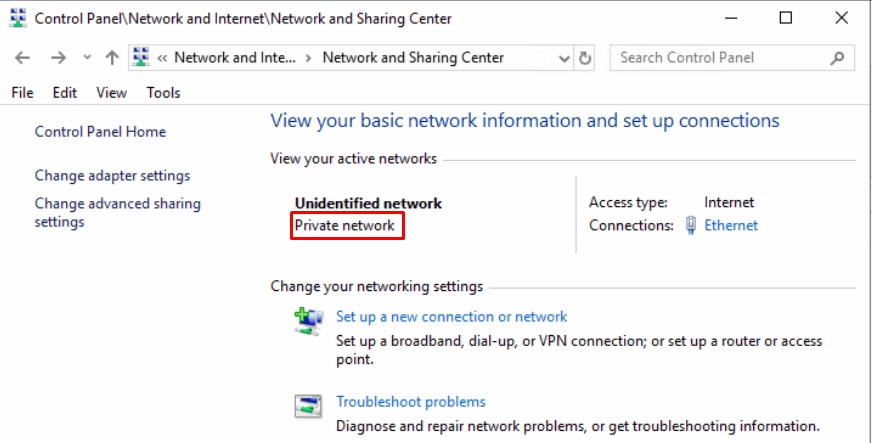
- Now if you go to the Network and Sharing Center in the Control Panel you can verify that the profile has been switched to private.
- To change the name of the network use the following PowerShell commands. The first command can be used to get the information about the connection profile and the second to change the name of the profile.
Get-NetConnectionProfile
Set-NetConnectionProfile -Name “NETWORK” -NetworkCategory Private - You may also want to run the Get-NetConnectionProfile again to verify that the name has been updated.
Please let me and the readers know if either one of these solutions worked for you by posting a comment.
Update: September 21, 2020
I forgot to mention that you can turn off network discovery once your profile has been switched to private. Thanks to the reader Peter for pointing this out. You can turn off network discovery in Control Panel -> Network and Internet -> Network and Sharing Center -> Change advanced sharing settings. I prefer to leave network discovery off for both security and performance reasons for all three profiles (Private, Public, and Domain) because I have seen the profiles switched to public on Windows 10 workstations and Windows Server 2019 member servers. Domain Controllers will always have the Domain profile so you don’t have to worry about their profile switching to public.
| Thanks for reading my article. If you are interested in IT training & consulting services, please reach out to me. Visit ZubairAlexander.com for information on my professional background. |
Copyright © 2018 SeattlePro Enterprises, LLC. All rights reserved.


I honestly don’t understand why Microsoft can’t make management of their networks easier. I’ve followed all the steps above with Windows Server 2019 however it will will not allow me to make my second Network card a Private network. The best I can get is “no Internet” on the LAN NIC and Public on the WAN NIC.
Worked! Thank you 🙂
Worked on Win2019. I think HyperV breaks the network settings app.
Thanks, your SOLUTION #2 saved my problem.
Two comments:
1 – It seems on Windows 10 version 1909 (my build is 18363.1082), the radio buttons to choose between Public and Private are not taken away from the Settings pane. They are there, also not greyed-out, but they just do not function.
2 – You may want to add to your SOLUTION #2 that people can switch off network discovery and file and printer sharing after the network was once recognized as private. I tested it, the private status survives reboots. To switch off just go to Control Panel\Network and Internet\Network and Sharing Center\Advanced sharing settings.
@Peter: Thanks for your feedback. I have updated the article. As for your first comment, are you using a Domain or Private profile in Windows 10?
The easiest way that I’ve found to change this setting is using PowerShell. Just run it as administrator, then (assuming you have one active network interface!), ‘Get-NetConnectionProfile | Set-NetConnectionProfile -NetworkCategory Private’. The first command retrieves the Connection Profile for the active interface, and the second command forces its Category to “Private”.
James B is right. Several iterations of the UI and of the underlying logic are confusing to the user and admin.
Get-NetConnectionProfile -> list of network connections (if you have more than one)
Set-NetConnectionProfile – Name “name is in list” -NetworkCategory Private -> sets the category to Private
James & Sebastian: Thanks for your feedback. Unfortunately, the implementation of network profiles in Windows is rather confusing and that’s why most people find it difficult to manage.