How to Update Integration Services and Use Guest Services in Windows Server 2012 R2

Microsoft has made several enhancements to Hyper-V in Windows Serer 2012 and then again in Windows Server 2012 R2. Unlike previous versions, Integration Services are now installed by default in Windows Server 2012 and later.
In Hyper-V, you can double-click a virtual image to open what is called a Virtual Machine Connection (VMC). When you open a VMC window, you cannot copy a file to or from your host computer to a virtual machine unless you are running Windows Server 2012 R2. In previous versions of Hyper-V, a Hyper-V administrator may have needed to shut down a virtual machine to copy files to it. In Window Server 2012 R2, Microsoft added a Hyper-V Integration Service called Guest Service which allows the Hyper-V administrator to copy files to a running virtual machine without using a network connection. Microsoft also added a Windows PowerShell cmdlet called Copy-VMFile for this new feature.
Guest Services
When you update the Integration Services on a virtual machine, it adds the Guest Services to the list of integration services that were previously available. Guest Services copy files across the Hyper-V Virtual Machine Bus (VMBus), rather than using virtual network switch connections and shared folders to transfer files into each Virtual Machine. Guest Services are extremely useful in isolated environments, such as development and training. They are also useful for servers in the DMZ (Web, FTP servers, etc.). As a Microsoft Certified Trainer (MCT), I often need my students to copy files between their host and the guest Virtual Machine. In an isolated training environment, I had to go through a lot of hoops to give my students such an ability. With Guest Services this is no longer an issue.
After you have installed Guest Services, you can use Copy-VMFile PowerShell cmdlet to copy files between a host and the Virtual Machines. You cannot, however, copy and paste files like you do in a Remote Desktop Connection session.
Enhanced Session Mode
The enhanced session mode in Windows Server 2012 R2 allows Virtual Machine Connection in Hyper-V to redirect local resources in a Virtual Machine Connection session. In previous versions of Hyper-V, Virtual Machine Connection allowed redirection of only the virtual machine screen, keyboard, and mouse with limited copy functionality. As a workaround, administrators had to initiate a remote desktop connection session. Now any of the following local resources can be redirected when using Virtual Machine Connection.
- Display configuration
- Audio
- Printers
- Clipboard
- Smart cards
- Drives
- USB devices
- Supported Plug and Play devices
NOTE: Currently only Windows Server 2012 R2 and Windows 8.1 guest operating systems support the enhanced session mode connections.
Updating Integration Services
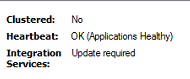
If you imported a virtual machine that was created in Windows Server 2008 into Windows Server 2012 or Windows Server 2012 R2, you will notice a message in Hyper-V console on the Summary tab indicating that the integration services require an update, as shown below.
Here’s the procedure for updating the Integration Services in Windows Server 2012 R2.
- Double-click the virtual machine in the Hyper-V console to open the Virtual Machine Console window. You must be in this console, not connected to the virtual machine using Remote Desktop Connection or any other method.
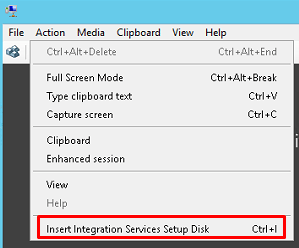
- On the Action menu click Install Integration Services Setup Disk. This will attach an ISO image called vmguest.iso to the DVD drive so you can install the software.
- Logon to the virtual machine that requires the Integration Services update. You may use either the Virtual Machine Connection or a Remote Desktop Connection for this step.
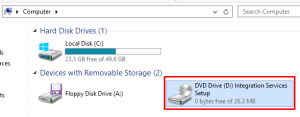
- Open File Explorer (formerly called Windows Explorer).
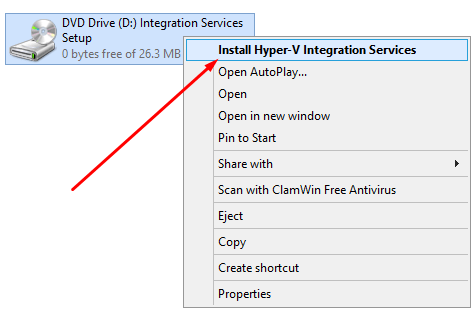
- Notice the DVD Drive has loaded the Integration Services Setup disk.
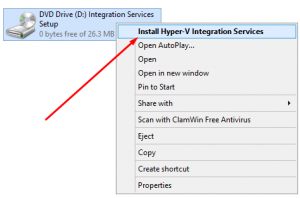
- Right-click the DVD drive and select Install Hyper-V Integration Services.
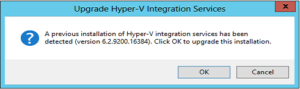
- Click OK to upgrade the previous version of Integration Services.
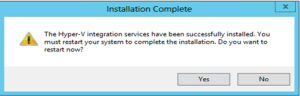
- Click Yes to restart the server.
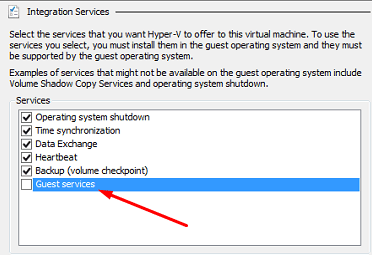
- In the Hyper-V console, right-click the virtual machine that required the update and select Settings. Notice there is a new option in the Integration Services section called Guest services. Select the Guest services box and click OK.

- Now you should be able to copy files back and forth between a VMC and other computers on your local network.


WARNING! The Integration Services are configured individually for each virtual machine. Therefore, once you have updated the Integration Services, you need to enable the Guest Services for each virtual machine manually. Unless you use PowerShell to enable the feature on multiple virtual machines.
PowerShell Cmdlets for Managing Guest Services
Here are some PowerShell cmdlets that you can use to manage Guest Services in Windows Server 2012 R2 Hyper-V.
To enable Guest Services on a Virtual Machine.
Get-VM –Name VM_NAME | Enable-VMIntegrationService -Name “Guest Service Interface”
To verify Guest Services are running on a Virtual Machine.
Get-Service -ComputerName VM_NAME –DisplayName “Hyper-V Guest Service Interface”
To enable Guest Services on all the Virtual Machines on a host use this command.
Get-VM | Enable-VMIntegrationService -Name “Guest Service Interface”
To verify that the Guest Services are enabled on all the Virtual Machines, use this command.
Get-VM | Get-VMIntegrationService
To disable Guest Services in each Virtual Machine.
Get-VM | Disable-VMIntegrationService -Name “Guest Service Interface”
To copy file from a host to all the Virtual Machines use the Copy-VMFile cmdlet. The following example copies the file “test.txt” from the host operating system into the guest operating system of the virtual machine “Test VM”. It will create the directory “C:\Temp” inside the guest operating system if it doesn’t exist already.
Copy-VMFile “Test VM” -SourcePath “D:\Test.txt” -DestinationPath “C:\Temp\Test.txt” -CreateFullPath -FileSource Host
Copyright ©2013 Zubair Alexander. All rights reserved.


Hi Zubair:
Ok, love this article and have the quintessential question regarding this. The ISO for Server 2012 R2 will not install a GUI version of Server 2012 R2; thus, there is no server 2012 R2 Host O/S in my install. I had to install Server 2012 NON R2. with that, the screen shots above are great but don’t exist the same without R2. Exactly how does one get Server 2012 R2 installed as GUI so one can manage VM’s as shown in screen shots.
I am asking all this because I am hosting a 2012 R2 guest under a host 2012 NON R2 and need the guest OS to use USB printers and share. The Guest OS is in production now and runs AD, etc. Am I looking at a different ISO than the MS Open License 2012 R2 that I purchased for my client and then installing all over again and importing this existing Guest OS to a 2015 R2 Host?
Any specific info would be greatly appreciated.
Thanks! Steve
Ok scratch that last comment is sent; here is a more accurate update after slowing down and getting things right:
After careful re-reading of your process, I see I can get to step 7. This is where things fall apart. Instead of the message you show which includes an option to upgrade the installation, I get the same window but it simply reports that “..this computer is already running the current version of integrated services (version 6.3.9600.16384) and naturally, there is no step 8 to restart. However, in step 9, there is no “Guest Services” option to check and it reports that “All services are offered”. Sooo…my question has changed; is there an alternate way to get these services installed? Do I need to add server roles and/or features for this option to show up?
Thanks!!!