How to Secure Google Chrome Browser

Google Chrome is one of the most popular browsers in use today. Just like any other browser, I recommend customizing Google Chrome browser to protect your privacy and enhance your security. In this article, I will offer guidelines for configuring several features in Chrome. Before I do that, let me mention something important.
| IMPORTANT! Because one size doesn’t fit all, use the information in this article as a general guideline to secure your Google Chrome browser and adjust it to your environment as necessary. |
Step-by-Step Instructions
Follow these instructions to secure your Chrome browser. Using the screenshots makes it easier to quickly go through the steps. I have made some pertinent notes right in the screenshots for your convenience. I include extra details in my articles because I write them under the assumption that some of my readers will be new to the technology or the topic I am writing about. This allows a vast majority of my readers to benefit from my articles.
NOTE: Not all the settings I cover in this article are related to security or privacy. A few of them are simply configuration options. I only point these out to help those who are not familiar with configuring their web browsers.
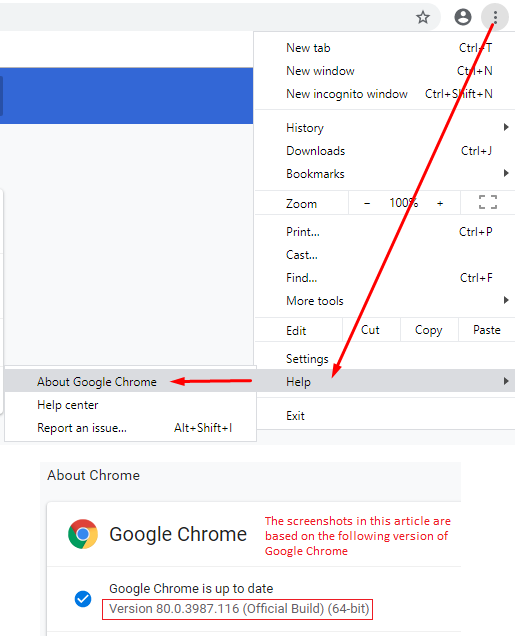
Find Out Your Chrome Browser Version
Start Google Chrome browser and click on the ellipsis (three vertical dots) in the upper right corner, select Help, and then select About Google Chrome to find out your browser version. This is not required to configure your browser settings. This is only for you to know whether your browser’s version matches with mine or not. I wrote this article on February 20, 2020 and version 80.0.3987.116 was the latest version of Google Chrome at that time. If your browser version is different, your options may be slightly different than what you see in the screenshots in this article. For the most part, you will be able to follow the screenshots below without feeling lost, even if your browser version is different. If you have any questions, please let me know in the comments section at the end of this article.
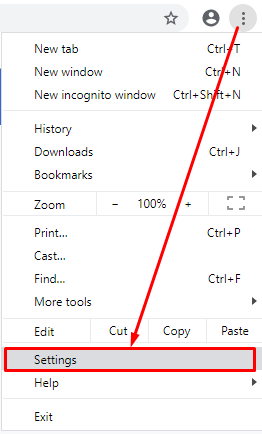
To configure the security and privacy settings, you need to go to the browser Settings, as shown below.
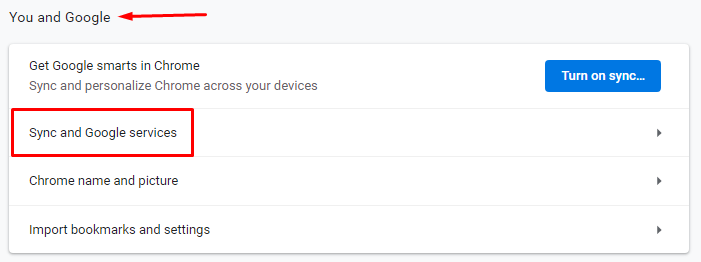
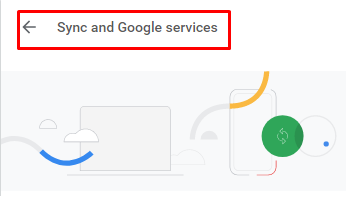
First, we will focus on the Sync and Google services settings in the You and Google section. Click Sync and Google services.
If you are an advanced user and understand how the synchronization of data works across multiple devices then you already know how to turn on sync. If you don’t fully understand the consequences of sharing your personal data across your network or multiple devices then don’t turn it on.
| WARNING! In general, synchronizing data across your network, or across your devices, can make you vulnerable to cyberattacks if you haven’t implemented proper security controls and taken appropriate measures to safeguard your privacy and security. In a corporate environment, your Information Technology (IT) department or security team would most likely have implemented the appropriate security measures so you don’t need to worry about synchronizing your browsing history and recent tabs in Chrome across your devices.
At home, or in small business environment that doesn’t have dedicated IT staff, you are unlikely to know exactly what data you’ve synchronized with which device and where. You also have to be logged in to the same account on all the devices. The more you spread parts of your digital life across multiple devices without having a good system in place for implementing security controls and protecting your privacy, the higher the risk. |
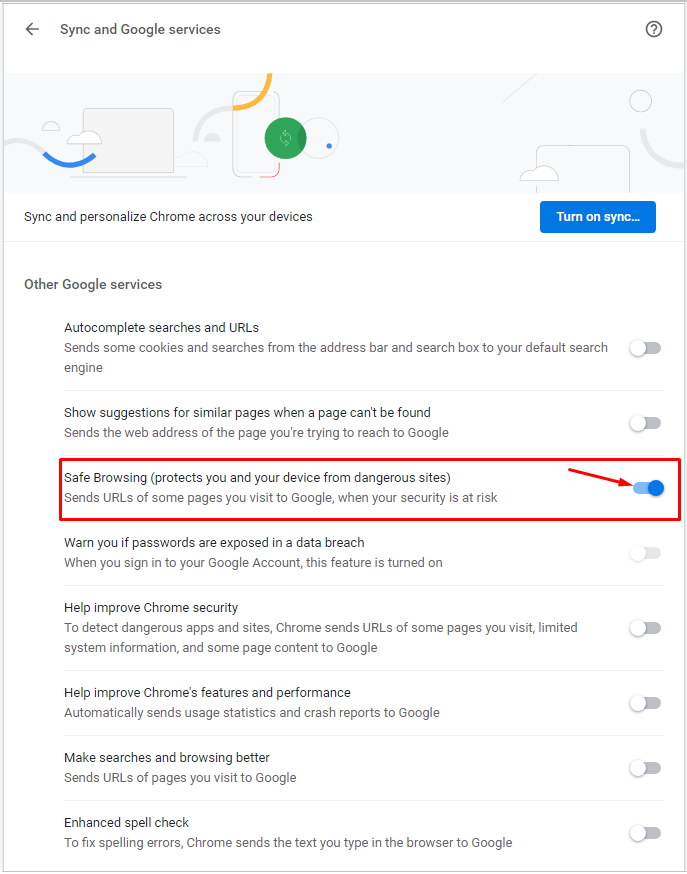
Click on the Safe Browsing slider button to turn it on. It will turn blue when the feature is turned on (enabled). Gray means it’s turned off (disabled). You will notice that the option to Warn you if passwords are exposed in a data breach is turned on and cannot be disabled. This is for your protection.
Turn off all the other options as shown in the screenshot.
Click the Sync and Google services link at the top of the page to go back to the previous page.
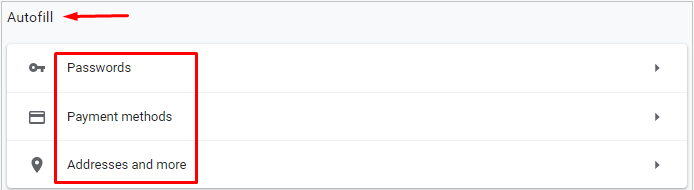
In the Autofill section you will visit all three sections.
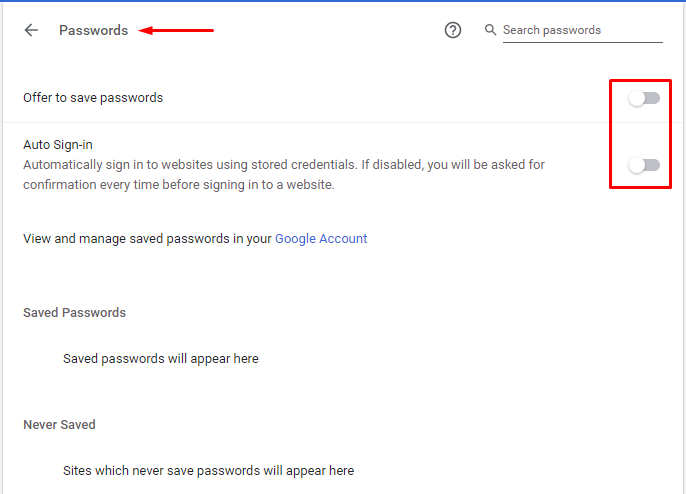
First go to the Password section and disable Offer to save passwords and Auto Sign-in.
| Best Practice: You should never save your passwords in a web browser. Use a password manager instead to save all your passwords and other confidential information. |
Click Password at the top to go back to the previous screen.
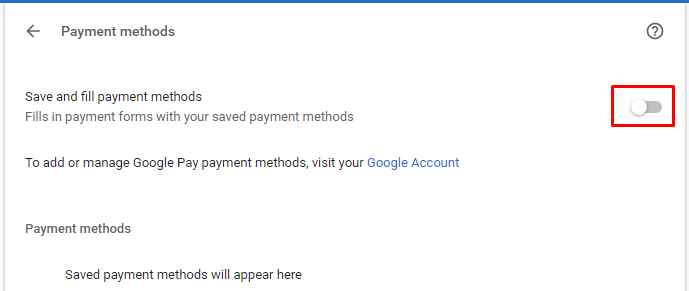
Go to the Payment methods section and disable the option Save an fill payment methods.
| Best Practice: You should never save your payment options in a browser. Use a password manager instead to save payment information, if necessary. |
Click Payment methods at the top to go back to the previous screen.
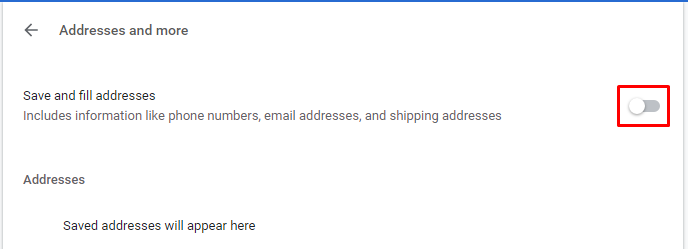
Go to the Addresses and more section and disable the option to Save and fill addresses.
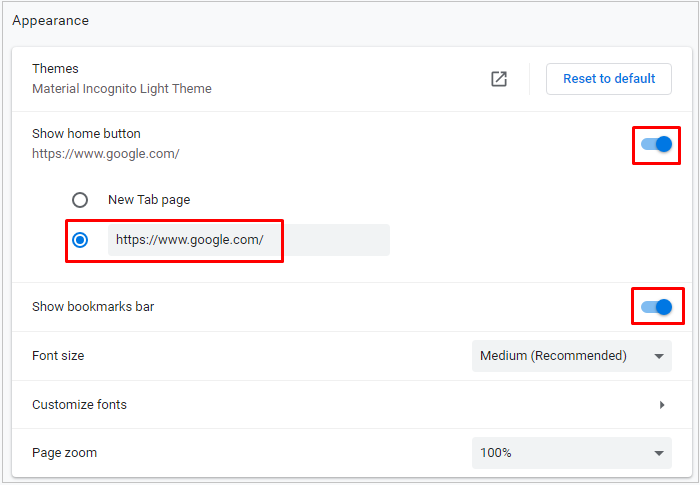
In the Appearance section, turn on the Show home button and Show bookmarks bar options.
Add the URL for your favorite search engine. For example, for Google add https://www.google.com/.
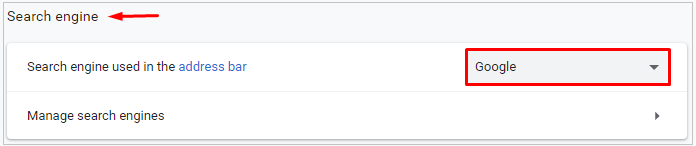
In the Search engine section select your favorite search engine from the drop-down box. Optionally, you can also go to Manage search engines and remove any search engines that you don’t use, or add search engines that are not listed.
Because I configured Google as my default browser, the next section displays my Default browser. If your default browser is Internet Explorer you can change it to Google (or a different browser of your choice). In Windows 10 you will be taken to the Settings, where you can change your default browser.

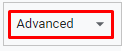
At the bottom of the page you will notice Advanced options. Click the down arrow to expand this section.
The first section under Advanced is called Privacy and security. We already took care of the first section in an earlier step. We will first go over the Clear browsing data section.
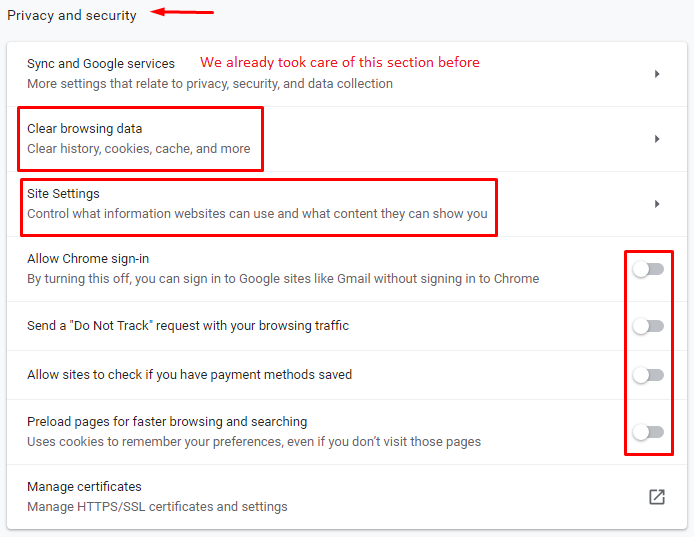
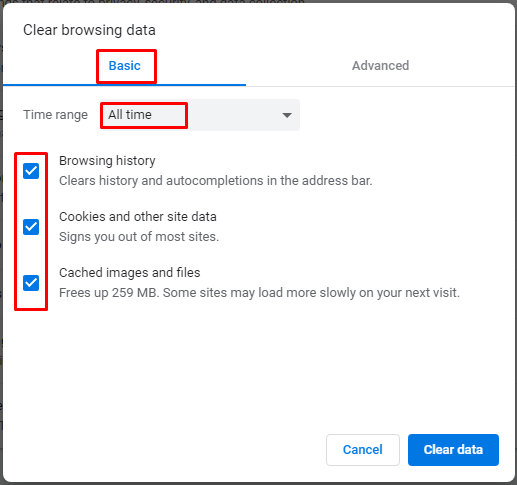
Click Clear browsing data. A popup window will appear. First select the Basic tab. From the drop-down button next to time range select All time. Then select all three boxes. Finally, click the blue Clear data button. This will wipe out all your basic browsing data, which includes:
- Browsing history
- Cookies and other site data
- Cached images and files
By wiping this browsing history, you will be enhancing your privacy. Your browser saves this information to load pages and information faster, but hackers can use this information. On most computers you won’t notice your browser slowing down if you clear the browsing history.
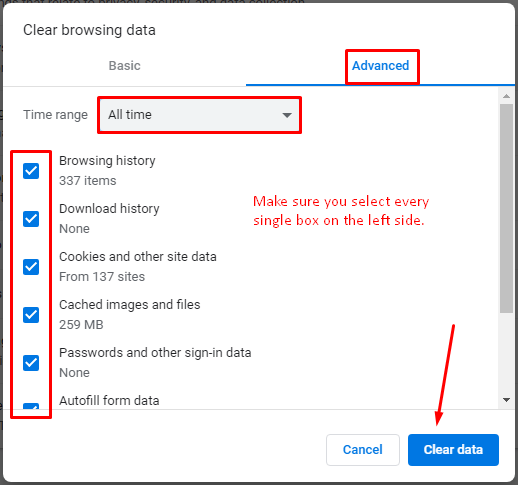
Go back into the Clear browsing data section and repeat the above steps for clearing browsing data on the Advanced tab. Make sure you select All time for the time range.
When the browsing data is cleared, you will find yourself back on the Privacy and security section. Click the next section Site Settings. There are a lot of settings that need to be configured in this section.
The first section under All sites is View permissions and data stored across sites. This should be pretty clean if you’ve cleared your browsing data. Rather than changing anything manually here, you can simply clear the browsing data on the Basic and Advanced tab, which you just did in the above step.
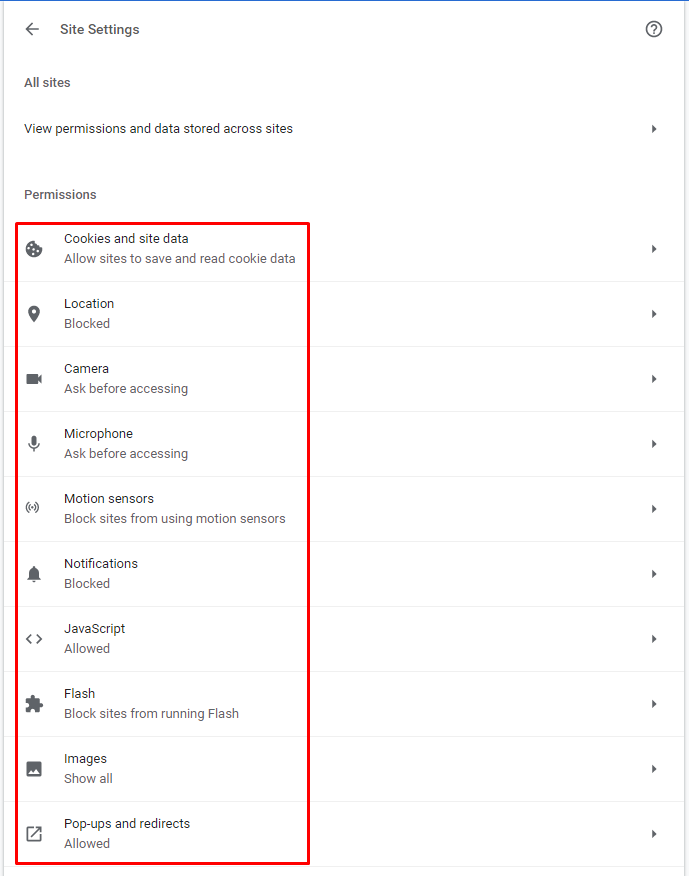
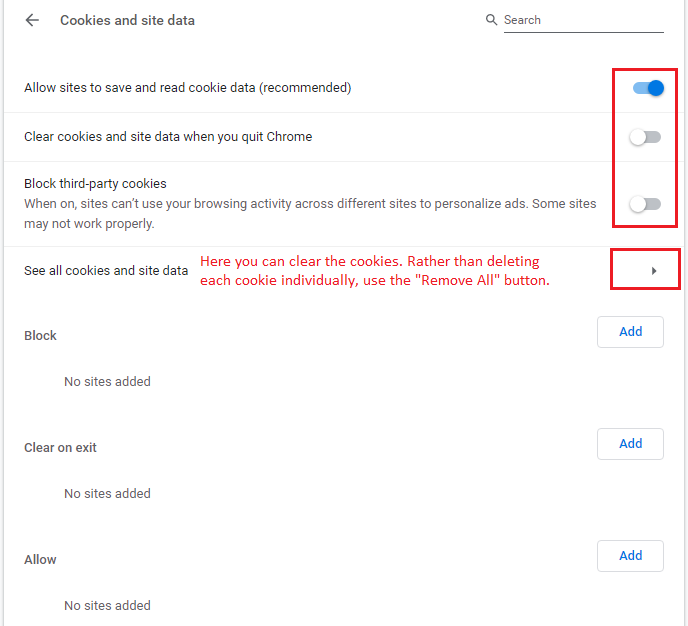
Now we are going to walk through each of the above sections. The first one is Cookies and site data. Here configure the settings as you see below.
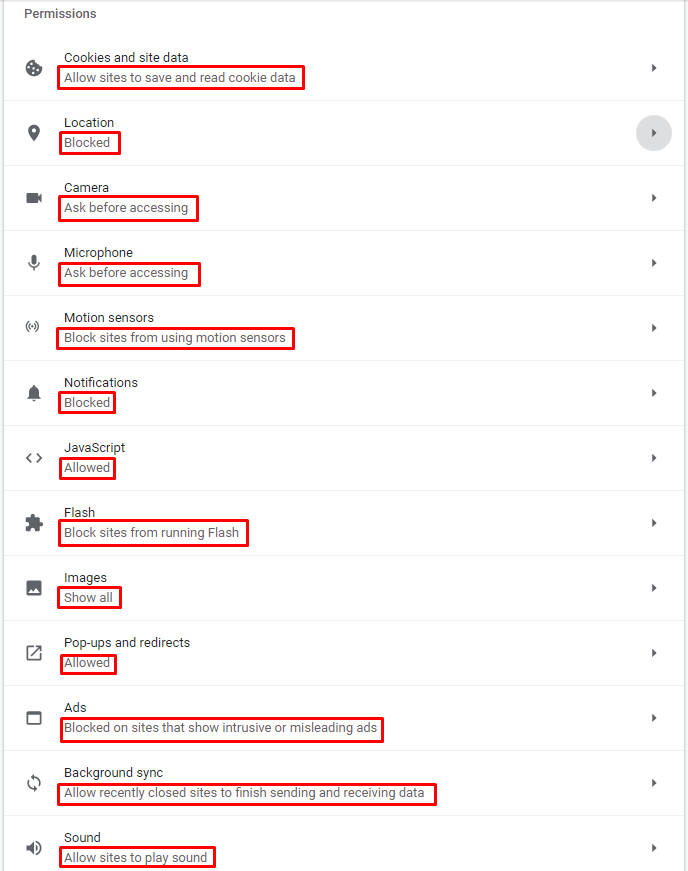
In the Permissions section go over each of the following settings and configure it so it matches with what you see in the following screenshot. When you see blocked in a section, e.g. under Location it says Blocked, it means you will be disabling the option. If you don’t disable the option, it would display Ask before accessing (recommended), rather than Blocked. Don’t share your location with Google. They keep track of every single place you go on this planet. In fact, if you travel around the world with your laptop, you can look at Google map where it will show you all the countries you have visited. This could be a great gift to hackers, if they get access to this information. This type of information can also be used by bad guys to rob your house when you are out of town.
The following settings allow most people to work normally, yet secure their browsers and protect their privacy. For example, even though the setting for camera would be set to Ask before accessing, you will be able to use the camera in application like Zoom, GoToMeeting, or Microsoft Teams without any problems. In rare situations you may need to tweak some of these settings.
Adobe Flash is one of the most dangerous technologies that poses the biggest threat to people who use computers. It’s an old technology, which is outdated and not necessary. Make sure it is blocked from running. This technology has been replaced with newer technologies, such as HTML5 and CSS3.
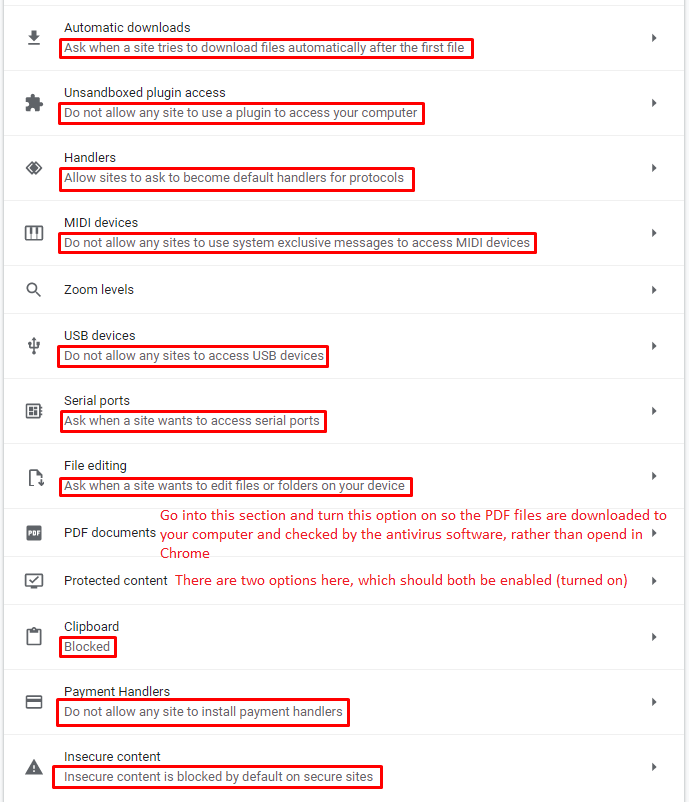
Here are the additional settings under the Site Settings.
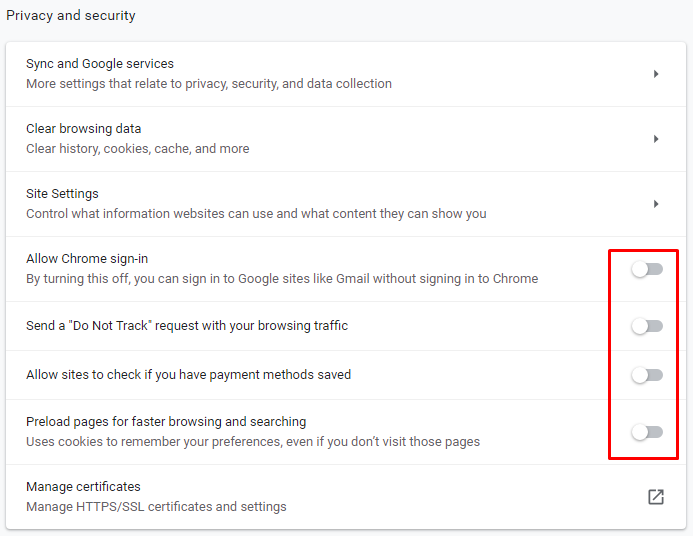
Now finish the last section under Privacy and security by disabling the four options shown below.
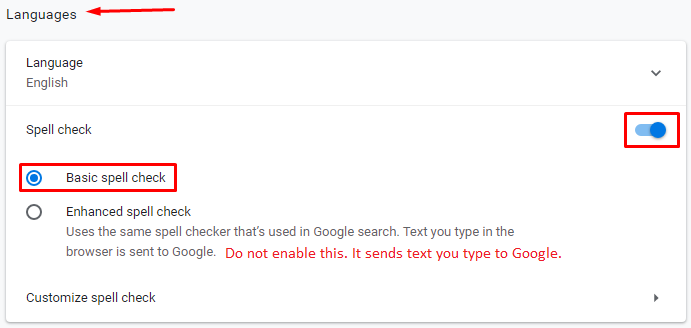
In the Languages section, enable the Basic spell checker.
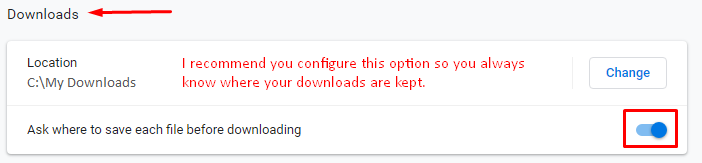
Configure the Downloads settings as shown below.
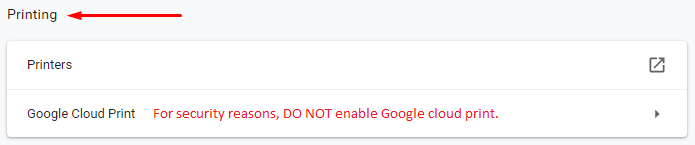
Skip the Printing section. There is nothing you need to configure here. For security reasons, never enable any type of cloud printing.
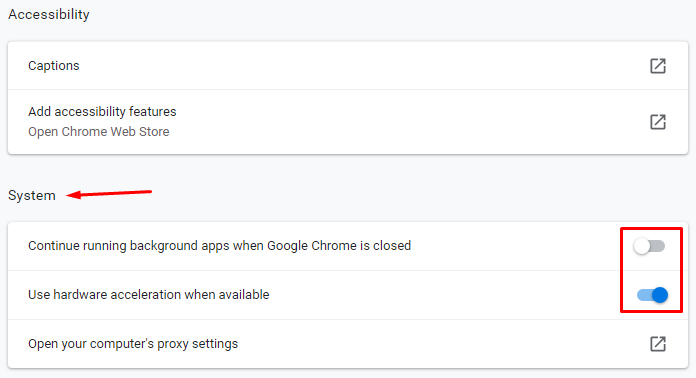
Skip the Accessibility section and configure System section as shown below.
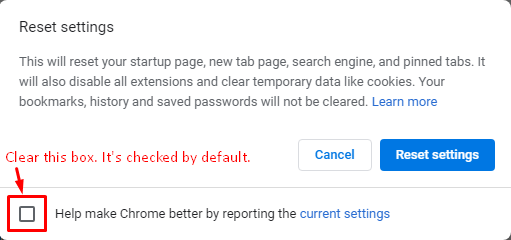
Google, like some other vendors, hides certain settings so you won’t notice them but they will be able to capture information from your computer. For example, here’s how Google tricks you. You will never think you would want to restore settings to their original defaults because this will wipe out all your custom settings. So why would anyone want to enter this section? They won’t, except under extremely rare situations. But if you click here, you will discover a hidden option that is checked. The option sends Google your current settings without you ever knowing it.

Click Restore settings to their original defaults. Don’t worry, it won’t do any harm. You would have to go in and click Reset settings before it will wipe your current settings.
Clear the box Help make Chrome better by reporting the current settings and then click Cancel. This will prevent your browser from sending information to Google. In addition to the browser version, it sends Google other details like what’s your home page, which websites you visit at startup, what is your default search engine set to, whether you are running your browser in incognito or standard mode, and every single extension that you are using in your Chrome browser, which can tell a whole lot about you (among other things, which password manager you use).
Normally, when you cancel a setting it would discard the changes. However, this a weird setting which will save your unchecking of the box for a while, even though you clicked cancel. Go back and verify that the box is still clear. This setting is very deceiving. It gives you the impression that you can clear the box and prevent sharing of your data with Google, but if you refresh the web page you will notice that this box is checked again. In other words, there is no way for you to prevent sharing your data with Google, even though there is a box that’s meant to prevent sharing of data by clearing the box. I will have to call some folks at Google to find out more about this setting. It’s either a feature that was intentionally created by Google developers, or it’s simply be a bug. Either way, it’s a bad thing and problematic for the users.
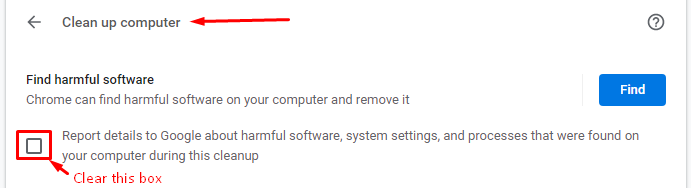
Now click the last setting Clean up computer. Again, a lot of people won’t know what this means and would never enter this section. However, you need to go into this section and clear another box so that your browser won’t send Google detailed information about certain software running on your computer, your system settings, and the processes running on your computer. I know what you are thinking. Why doesn’t Google simply ask you if you want to send this information to Google? Probably because if they would ask, chances are you will definitely say no. I know I would.
Clear the box Report details to Google about harmful software, system settings, and processes that were found on your computer during this cleanup.
As a general rule, never share data with vendors about applications, operating system, processes, scripts, or anything else on your computer.
The final thing for you to do is to relaunch the Chrome browser to apply your changes.

Article Updated: July 10, 2020
You may have seen emails from Google sent to each Gmail account that you own. Recently, Google has been sending emails with the subject “YourFirstName, complete your Privacy Check.” This gives a false impression that you were in the middle of your privacy check at one point and failed to complete it. Therefore, now you should complete the task where you left off. Not only this is deceiving, even if you do the privacy check in your Gmail account frequently, you’ll still get the same message.
Article Updated: October 1, 2020
Google’s Privacy Check is very limited. Follow my recommendations and secure your Google account using the walk-through in my article How to Secure Your Google Account.
| Thanks for reading my article. If you are interested in IT training & consulting services, please reach out to me. Visit ZubairAlexander.com for information on my professional background. |
Copyright © 2020 SeattlePro Enterprises, LLC. All rights reserved.

