How to Permanently Add SharePoint PowerShell Commands to PowerShell ISE

You can permanently register the SharePoint PowerShell commands into PowerShell ISE so you don’t always have to manually add the command Add-PSSnapIn Microsoft.SharePoint.PowerShell every time you start PowerShell ISE. Here’s the step-by-step procedure.
- Activate PowerShell Integrated Scripting Environment (ISE). By default, PowerShell ISE is installed on Windows Server 2008/R2 but not activated. To activate it you can use the Add Features wizard in Server Manager. The reason I prefer PowerShell ISE over PowerShell is because it is much nicer and offers a multi-line editor and additional help for scripting.
- Start PowerShell ISE from Start, All Programs, Accessories, Windows PowerShell, Windows PowerShell ISE.
CAUTION: Make sure that you start Windows PowerShell ISE, which is 64-bit, rather than Windows PowerShell ISE (x86) which is 32-bit.
- Start PowerShell ISE and enter the command test-path $profile. This will either return a True or a False.
- If it returns False then you can create a profile for yourself using the following command.
if (!(test-path $profile)) {new-item -type file -path $profile -force}
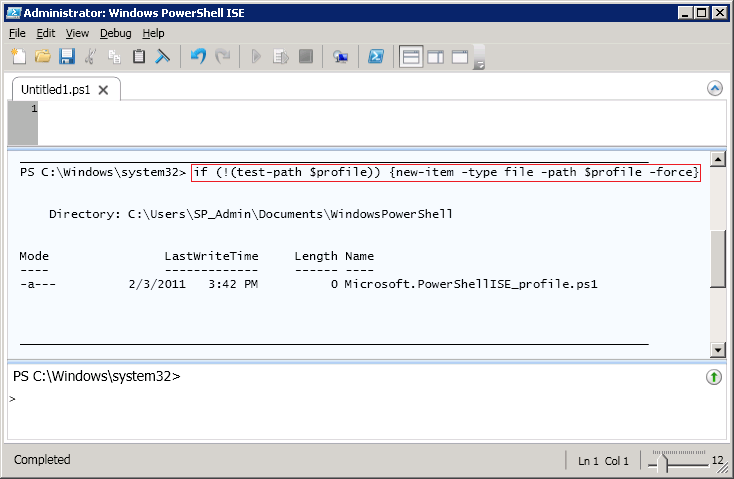
- The path to the profile is provided, e.g. C:\Users\SP_Admin\Documents\WindowsPowerShell. The name of the file is also provided, e.g. Microsoft.PowerShellISE_profile.ps1.
- Open the .ps1 file in Notepad. The file will be blank. Enter the following command and then save the file (File, Save). Make sure that the file is saved with the original .PS1 extension and not .txt.
Add-PSSnapIn Microsoft.SharePoint.PowerShell
NOTE: If you get an error that the access is denied, simply save the file on the desktop and then copy it back to the original location. You will overwrite the existing file, which is empty.
- Close and restart the PowerShell ISE. Your SharePoint PowerShell commands should now be available to you. Verify this by typing the following command. You should get a listing of all your sites.
Get-SPSite - If you want to see all the SharePoint PowerShell commands that are available to you, type the following command.
Get-Command -PSSnapIn Microsoft.SharePoint.PowerShell - For more details you can use the pipe symbol with the Format-List option (fl).
Get-Command -PSSnapIn Microsoft.SharePoint.PowerShell | fl - You have over 500 cmdlets available to you. You can verify the total count by using the following command.
(Get-Command -PSSnapIn Microsoft.SharePoint.PowerShell).count
Last Update: December 4, 2015:
Added note in step 4 about Access Denied error.
Copyright ©2011 Zubair Alexander. All rights reserved.


Thank you VERY much for this perfect procedure… works like a “snap” :).