How to Customize the SharePoint Site Logo in the URL

If you go to Google or Bank of America’s Web site you will notice that your browser displays a custom logo to the left of the URL. I have customized most of my Web sites the same way. When you bookmark the site it adds the logo next to the URL so it is easy to identify. To add this type of custom logo you can create your own favicon.ico file and upload it to the root of your Web site. Here’s what the end result will be in Internet Explorer.
In this article I will show you how to add a custom logo to your SharePoint site. There are lots of free utilities that you can use to create the .ico file. I use Easy Icon Maker to create .ico files for my sites from scratch but there are lots of other tools available that you may find more convenient. For example, some tools will let you save your existing .gif files as .ico files.
The add the custom logo to your SharePoint site, create the logo and save it as favicon.ico. You cannot use any other name, you must save the file as favicon.ico using a tool that allows you to create .ico files. Here are the steps to add your logo to SharePoint sites.
WARNING! Backup your SharePoint site collection. Anytime you use SharePoint Designer there is always a possibility that your site can get totally messed up, depending on the type of changes you are going to make. If you are not comfortable using SharePoint Designer 2010 and don’t understand the risks, do not perform these tasks.
- Upload your favicon.ico file to your SharePoint site collection using the browser.
- Open your site in SharePoint Designer 2010.NOTE: You can’t edit a MOSS 2007 site with SharePoint Designer 2010, or a SharePoint 2010 site with SharePoint Designer 2007.You have to use SharePoint Designer 2007 for MOSS 2007 sites and SharePoint Designer 2010 for SharePoint 2010 sites.
- If prompted, select edit the page layout option. You may also be asked to check out the document, which is necessary if you want to edit the master page.
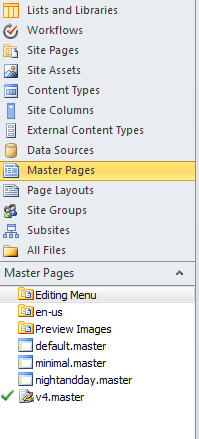
- Go to the Master Pages library.
- Edit the Master Page for your site. I am using Team Site in my example so my master page is v4.master.

- Click the Edit file link under Customization heading otherwise you won’t be able to edit the page in SharePoint Designer 2010. When prompted Do you want to check it out?, select Yes.
- Switch to the Code view by clicking Code at the bottom of the page.
- Use the Find option on the ribbon to locate the tag “SharePoint:SPShortcutIcon” in the code. It’s usually located in the heading section at the beginning of the page.
- Edit the existing URL (/_layouts/images/favicon.ico) and replace it with the URL for the favicon.ico. You need to replace everything between the quotes. For example, replace the text /_layouts/images/favicon.ico with the URL to your favicon.ico file.

- If you uploaded the favicon.ico file to the Site Collection images than the URL might look like this.
http://<YourSiteName>/SiteCollectionImages/favicon.ico. - If you are not sure what site definitions are and what the effect might be then stop right here. Discard all changes and exit SharePoint Designer 2010. Otherwise, click Yes when you see the warning message about the Site Definition Page Warning.

- Save the v4.master page in SharePoint Designer.
- In the left hand Navigation window notice the green check mark next to the file v4.master. This means the file has been checked out. Right-click the file and Check In. Unless the file is checked-in, the changes will not be visible in the browser.
- In the Check In window select Publish a major version and click OK.
- When prompted for content approval, select Yes.

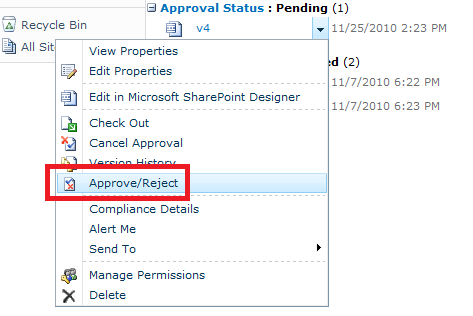
- You will be taken to the Master Gallery page where the approval status for the file will show pending.
- Click on the drop-down button and select Approve/Reject.

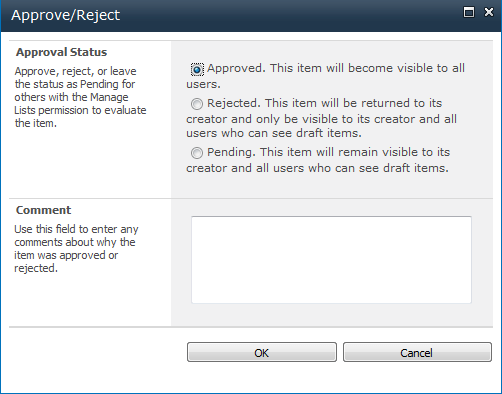
- In the Approve/Reject Window select the Approved button and click OK.

- As soon as you approve the document, the browser will display your custom logo.

- Now when you add the site to the Favorites in Internet Explorer or Bookmark the site in Firefox, the address will also display the logo.

Copyright ©2010 Zubair Alexander. All rights reserved.


