Is Your Spell-Checker Not Working in Outlook Web Access (OWA) 2013?
 2013?")
Is your spell-checker not working in Microsoft Outlook Web Access (OWA) 2013? Don’t bother looking for the setting in OWA to enable spell-checking because OWA in Exchange Server 2013 uses your Web browser’s setting for spell-checking. For example, if you are using the Google Chrome Web browser and the spell-checking feature is not offering you correct spellings in OWA, then you need to make sure that the spell-checking option is enabled in Google Chrome. Depending on the Window operating system you are using, you should also make sure that spell-checking is enabled in the operating system. For example, Windows 10 has an option to enable spell-checking functionality in the operating system.
In this article I will show you where the spell-checker settings are located in Windows 10, Google Chrome and Firefox. Notice I didn’t mention Internet Explorer. That’s because, unlike Chrome and Firefox, Internet Explorer 11 doesn’t have a spell-checker setting in the browser. Instead, it utilizes the spell-checking functionality of the Windows operating system, such as Windows 10 or Windows 8/8.1. Keep in mind that the screens can be slightly different in different versions of the browsers and the operating systems. The screens in this article are based on:
- Windows 10 Enterprise and Windows 10 Pro: Build 10240.
Type SystemInfo at the command prompt to get the build number. - Google Chrome version 47.0.2526.106 m.
Go to Chrome menu -> Help -> About Google Chrome to get the version number. - Mozilla Firefox version 43.0.1.
Go to Help -> About Firefox to get the version number.
Windows 10
- To enable or disable spell-checking option in your Internet Explorer browser, you need to make the change in Windows 10 operating system.
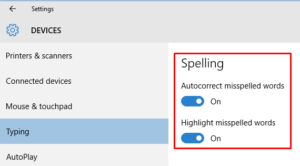
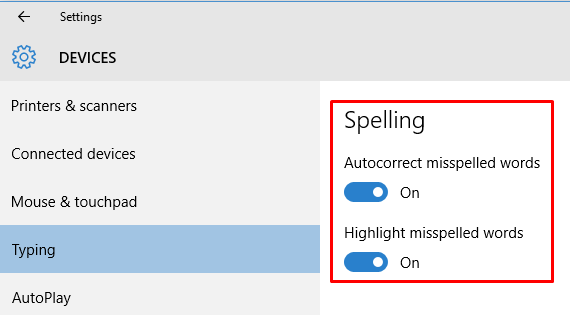
- Click Start, Settings.
- On the Settings screen select Devices -> Typing.
NOTE: You can also type the word Typing in the Search the web and Windows box to quickly get to the spell-checker settings. - Make sure under Spelling the two options are set to On. If not, turn them on.
Internet Explorer 11 and Microsoft Edge
The previous versions of Internet Explorer offered an add-on for the browser to add spell-checking functionality. Starting with Windows 8/8.1 Microsoft decided to add the spell-checking functionality in the operating system, which affects the native applications in Windows, the Windows store apps and it also affects the Internet Explorer browser. Therefore, if you enable spell-checking in the operating system as described in the previous section, it will automatically apply to the Internet Explorer.
Google Chrome
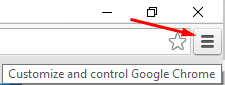
- In Google Chrome, in the upper right-hand corner click the menu, which allows the customization and control of Google Chrome.
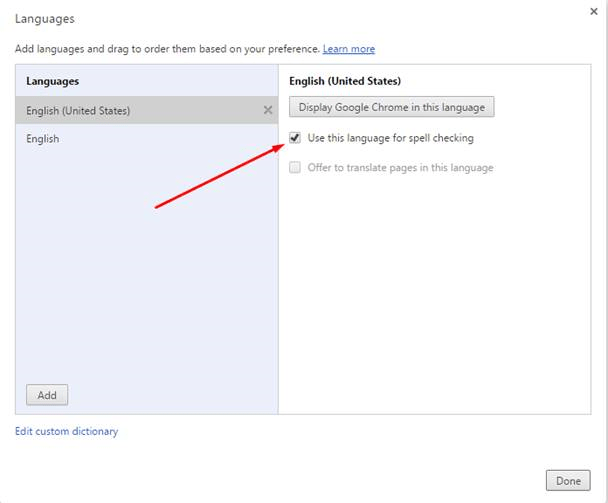
- Go to Settings -> Show advanced settings -> Languages -> Language and input settings.
- Highlight your language, check the box Use this language for spell checking and click Done.

- There is no Save option in Chrome version “47.0.2526.106 m” after you make changes. Simply making the change saves the modification.
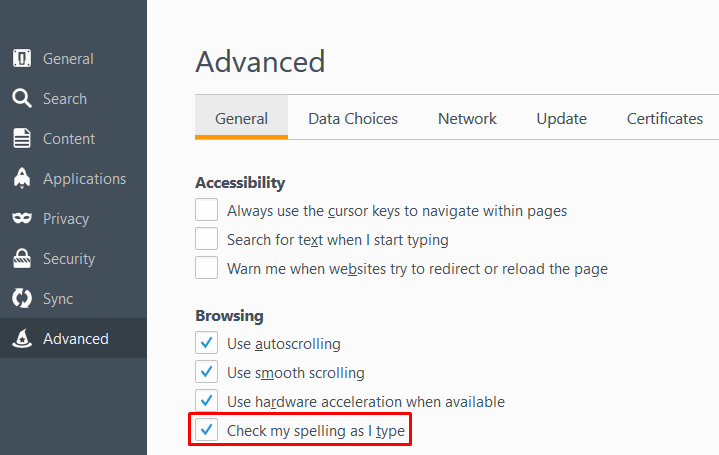
Mozilla Firefox
- In Firefox go to Tools -> Options -> Advanced -> General.
- Under Browsing check the box Check my spelling as I type.

- There is no Save option in Firefox version “43.0.1” after you make changes. Simply making the change saves the modification.
Verify that Spell-Checker is Working
This step is pretty obvious but if you are very new to OWA and Windows 10 then these steps may be helpful. Let’s say you want to verify that spell-checker is working in Internet Explorer 11 or Microsoft Edge on Windows 10. Follow these steps for verification.
- Start Internet Explorer or Microsoft Edge and login to OWA.
- Start typing in a new message. Misspell a couple of words to see if there is a red squiggly line under the misspelled words. If not, the spell checker is not working and you need to make the changes described in this article. For example, if you are using Windows 10 and OWA 2013, make sure spell-checker is enabled in the operating system as described earlier in this article. You DO NOT need to restart the computer when you enable or disable spell-checker in Windows 10 but you must close the browser completely and then restart it, otherwise the change you made in Windows 10 won’t be reflected in the browser.
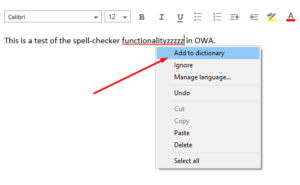
- Create new message and start typing. Misspell some words. You should see a red squiggly line under the misspelled words, indicating that the spell-checker is working. You can right-click the word and add it to the dictionary if you want.
- If you are just curious and want to prove to yourself that OWA really depends on the spell-checker in Windows 10, simply disable the spell-checker in Windows 10. Open IE or Edge and create a new message and type some text in OWA. You will notice that OWA doesn’t underline the misspelled words in red. Re-enable the spell-checker, restart the browser and run the test again. The spell-checker should be working again. Congratulations! You just convinced yourself :).

Copyright © 2015 SeattlePro Enterprises, LLC. All rights reserved.

