How to Hide the Number of Responses & Time of Creation for Surveys in SharePoint 2007

One question that people managing SharePoint surveys often ask is “how can I hide the number of responses and the time of creation for my survey?.” In this article I will demonstrate a solution that answers this question. I run a User Group in Seattle, WA. I am going to use one of my surveys on my SharePoint site as an example. It’s a survey that people take when they want to join my User Group by answering a few questions.
I have been searching for an easy answer to the above question for a while. During my research, I found a posting on SharePoint Kings blog that I thought will work. However, after following the instructions I realized that I would have to change a lot of code in my survey, not just the site URL, as the blog post had indicated.
I use SharePoint Designer 2007 as a tool so it makes the entire process very straight forward, once you understand how to manipulate the survey. SharePoint Designer is free and can be downloaded from Microsoft’s Web site. Here’s the step-by-step procedure for hiding the number of responses and the time of creation from the people who are taking the survey. I am documenting the steps in detail for those who may need this level of detail. If you are more experienced, you can read through the article and achieve your goal in just a few steps.
1. Login to your SharePoint site in Internet Explorer (IE). For example, http://www.winnetusergroup.com.
NOTE: I prefer to use Mozilla Firefox. Although IE is supposed to work better with SharePoint but in my experience that is not always the case. If there are certain features that I can’t use in Firefox then I try IE as a last resort. From Microsoft’s perspective, you always want to use IE. From my perspective, when working with SharePoint, Firefox works better in 95% of the cases while IE works better in only 5% of situations.
2. Go to the survey page in your browser. For example, http://www.winnetusergroup.com/Lists/Signup/overview.aspx.
Warning! Make sure that you are logged into your site. If you are not, you will not see all the code that is necessary to properly accomplish your goal.
3. In IE click View, Source. In Firefox click View, Page Source (or use CTRL-U).
4. Highlight the entire page (CTRL+A) and copy the source code to the clipboard.
5. Start SharePoint Designer 2007 and open your SharePoint site.
6. Create a new page (CTRL+N) and switch to the code view (View, Page, Code).
7. Delete the existing code and paste the content that you copied in step 4.
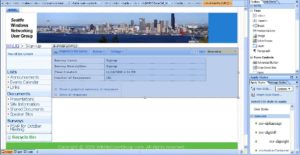
8. Switch to the Design view (View, Page, Design) and highlight the main area for the survey as shown below.
9. Copy the highlighted area and paste it into a new page (CTRL+N) in Design View.
10. Delete the two rows: Time Created and Number of Responses.
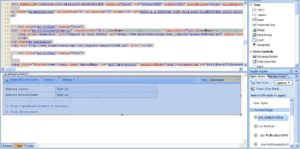
11. Highlight all the content in Design View and and then click View, Page, Split in SharePoint Designer to switch to the split view, as shown below.
12. Right-click the text in the upper pane of the window and copy it to the clipboard. This is the text that we are going to paste in a Web part in a later step.
13. Switch to your browser (IE or Firefox).
14. You logged into your site in Step 1 but in case you closed your browser, login to your site with an administrative account.
15. Edit the Survey page.
16. Insert a new Content Editor Web Part to your page and then Modify the Shared Web Part. Make sure that you modify (edit) the new Content Editor Web Part that you just added, not the original Web part.
17. Paste the HTML code that you copied in step 12 above in the Content Editor Web Part.
18. Apply the changes. It is not necessary to change the default title of the Web part, which is “Content Editor Web Part”, because that is not displayed in the browser. If it is, click on Appearance and modify the text under Title.
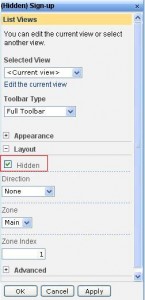
19. Highlight the original Web part (not the new Content Editor Web Part) and in the Layout section click the Hidden box as shown below. We need to hide the original Web part so people can only see the new Web part that we have customized.
20. Click OK and exit the editing mode.
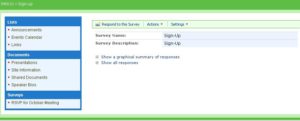
21. Your survey should look like this at this point.
My survey originally displayed the time of creation and the number of responders who took the survey. The new survey does not show the time of creation or the number of responders anymore.
Copyright ©2009 Zubair Alexander. All rights reserved.


