How to Give Guest Access to External Users in an Office 365 Group

Microsoft has recently added a new feature to the Office 365 Groups, called guest access. This new functionality will allow organizations to collaborate with business partners, vendors, contractors and other individuals outside of the organization. If you don’t see this feature available in your Office 365 portal today, don’t worry because Microsoft often deploys features in phases over a period of time and this new feature is no different. The Office 365 Roadmap lists all planned updates for Office 365. If you are not familiar with this roadmap, you should definitely check it out because you will find it informational, interesting and useful.
The words “Guest access” may freak out some Office 365 administrators and I don’t blame them because you will be giving outsiders access to your “intranet” Web site. Office 365 sites in general are not public sites, they are private sites on your organization’s Office 365 portal that is hosted by Microsoft in the cloud so you can think of them as your intranet, or team sites.
The Office 365 Groups are an awesome feature and I am sure in future they will play an even bigger part in collaboration than they currently do. Okay, so we can add guests to the Office 365 but who are these “guests” anyway? If you are an Office 365 Administrator and you hear the word guest or guest access, you are bound to get nervous. Luckily, Microsoft is ask not asking you to enable the Guest account. A guest in this context is simply an email alias for an external user who is added to an Office 365 Group. You can add users outside your organization to the Office 365 Groups as guests by adding corporate email addresses, or addresses from the free domains, such as Gmail, Yahoo, or Outlook.
NOTE: You need to go to Microsoft Outlook in your Office 365 portal to give guest access to external users. Do not go to the Groups in the Office 365 Admin Center.
Adding a Guest to an Office 365 Group
Here are the steps for adding a guest to an Office 365 Group.
- Sign in to your Office 365 portal.
- Click the waffle (9 squares) at the top left hand corner of your screen.
- Go to Outlook.
- Click the Office 365 Group where you want to provide guest access to an external user.
- You will see the links for All, Owners, and Guests at the top. If you don’t see the Guests link, it means the feature has not yet been added to your Office 365 subscription.
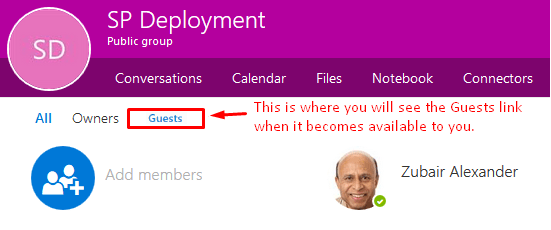
- Click the blue Add members link to add one or more guests to the group. The guest will be clearly identified as a Guest.
- Enter an email address for the guest and press Enter. Add additional guests if necessary and then click Save. You can add corporate email addresses, or Gmail, Yahoo, or Outlook addresses. If the guest user you add has a Microsoft Account (Outlook, Live, Hotmail, Office 365, etc.), the user will be prompted to sign in to the Microsoft account when he/she tries to access the resource.
What Can the Guest Do?
When you give access to a guest by adding him/her to the Office 365 Group, the guest will receive a welcome email and will be able to collaborate with other members of the group by exchanging emails, accessing documents in SharePoint Online site, and receiving and responding to calendar invitations. The guests may leave the group if they don’t want to be part of the group by clicking on the link in the footer of group emails and calendar invitations.
NOTE: Because the external users are guests, Outlook will display visual reminders to let the members know about the guest’s presence in the group.
Check out Microsoft’s visual display below to see how you can add guest access to an Office 365 Group.

References
Introducing guest access for Office 365 Groups
Copyright © 2016 SeattlePro Enterprises, LLC. All rights reserved.

