How to Force ReadyBoost on USB Drives

Windows Vista has a ReadyBoost feature that can improve the performance of your Windows Vista computer. ReadyBoost has certain requirements so not all USB flash devices can be used for Windows ReadyBoost. Here’s a method that you can try to force ReadyBoost on a USB flash drive. I am not sure if it has any adverse effect so use it at your own risk.
1. Plug in your USB flash drive in Windows Vista.
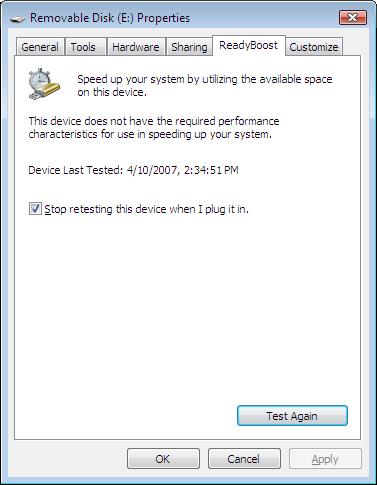
2. In the AutoPlay window, click on the “Speed up my system” option. You may see the following on your screen which indicates that your USB device doesn’t support ReadyBoost.
If you don’t see the AutoPlay window, go to My Computer, right-click the USB drive, click on Properties, then click the ReadyBoost tab.
3. Uncheck the box “Stop retesting this device when I plug it in.”, click OK and then remove the USB drive.
4. Start the registry editor and go to the following location: HKLM\SOFTWARE\Microsoft\Windows NT\CurrentVersion\EMDMgmt.
5. Look for the folder that starts with {“_??_” as shown in the following screen shot.
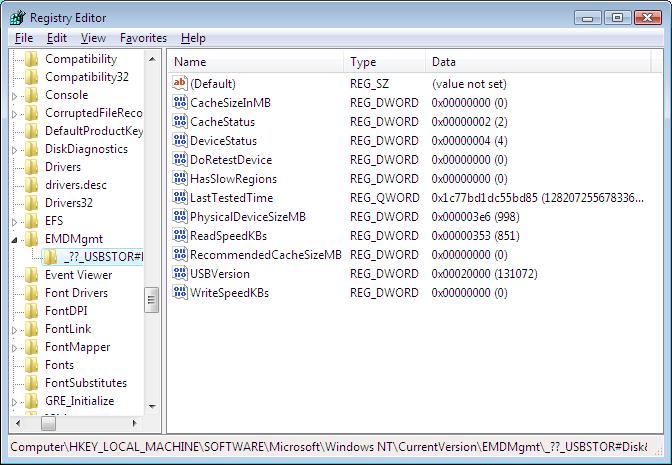
6. Set the values of ReadSpeedKBs and the WriteSpeedKBs to 1000 (decimal).
7. Plug in the USB device again and you should be able to use ReadyBoost.
This method may not work on every USB flash drive and you should know that you are modifying the registry at your own risk. However, I don’t use the same drive that I am using for ReadyBoost for storing my data so I am not worried about losing any data on the USB flash drive.
Copyright ©2007 Zubair Alexander. All rights reserved.

