How to Disable or Remove OneDrive in Windows 10
OneDrive is becoming more popular, not only because Microsoft is encouraging people to use it, but also because businesses want to take advantage of the benefits of OneDrive for Business. For most users, multiple OneDrives can be very confusing. You can end up with more than one OneDrive if you have a personal OneDrive (e.g. the one that comes with Windows 10) and you install Office 2013, which includes OneDrive for Business, or you may have installed OneDrive for Business as a stand-alone product. In this article I will show you how to disable ore remove OneDrive in Windows 10.
NOTE: OneDrive used to be called SkyDrive and OneDrive for Business used to be called SkyDrive Pro. Due to legal issues, Microsoft was unable to use the name SkyDrive so the name was changed to OneDrive.
In case you are wondering, here’s the difference between OneDrive and OneDrive for Business.
| Product | Description |
| OneDrive | This product is included in Outlook.com account, Windows phone and Windows 10. People can use OneDrive to store their personal files securely in the cloud on Microsoft’s servers. Think of OneDrive as your own personal file server hosted by Microsoft. You can access the files on OneDrive from anywhere and share them with certain people, just like you would on a file server. You can either give them read-only access, or give them the ability to edit the files. |
| OneDrive for Business | OneDrive for Business is not really the personal OneDrive product enhanced for business use, as one might assume. The two products have very little in common. OneDrive for Business works with SharePoint, while OneDrive does not. You can either install OneDrive for Business as part of Microsoft Office 2013, or download it from Microsoft as a stand-alone product. OneDrive for Business is also the new name for what used to be called My Site in SharePoint. In SharePoint 2013, My Site has been replaced with OneDrive for Business. |
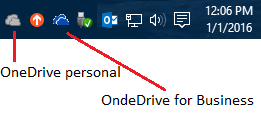
If you have both OneDrive personal and OneDrive for Business on your computer, you will notice that the clouds icon in the taskbar is gray for personal OneDrive and dark blue for OneDrive for Business, as shown below.
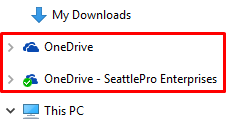
In File Explorer the icons are dark blue in both cases. In the image below, the first OneDrive is my personal OneDrive connected to Outlook.com and requires me to sign in with my Microsoft account at Outlook.com. The second OneDrive is my OneDrive for Business and requires me to use my Office 365 account.
Disabling OneDrive in Windows 10
Getting rid of the OneDrive in Windows 10 is not as easy as one might think. You can get rid of the OneDrive icon in the taskbar by exiting OneDrive but that doesn’t disable OneDrive from other places in Windows 10, such as File Explorer. To disable OneDrive completely you have to use the Group Policy Editor. This will prevent it from syncing with the cloud, or connecting with other apps. Notice I used the word disable, not remove. By disabling OneDrive, you can re-enable it any time if there is a need. Here’s how.
- If you want to disable your personal OneDrive that is included in Windows 10 Pro or Windows 10 Enterprise then first exit the OneDrive. Right-click the OneDrive gray icon in the taskbar and select Exit.
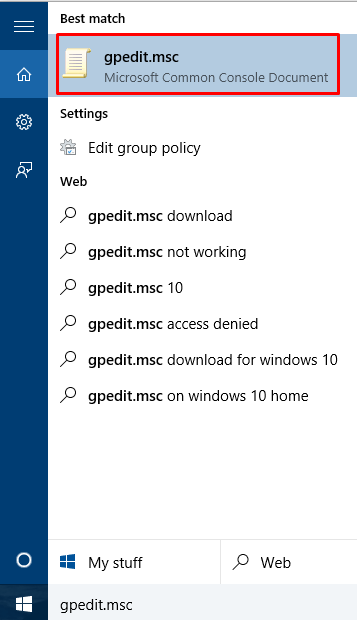
- Type gpedit.msc in the Windows 10 Search box to locate the Group Policy Editor. You will not be able to use the Group Policy Editor in Windows 10 Home version.

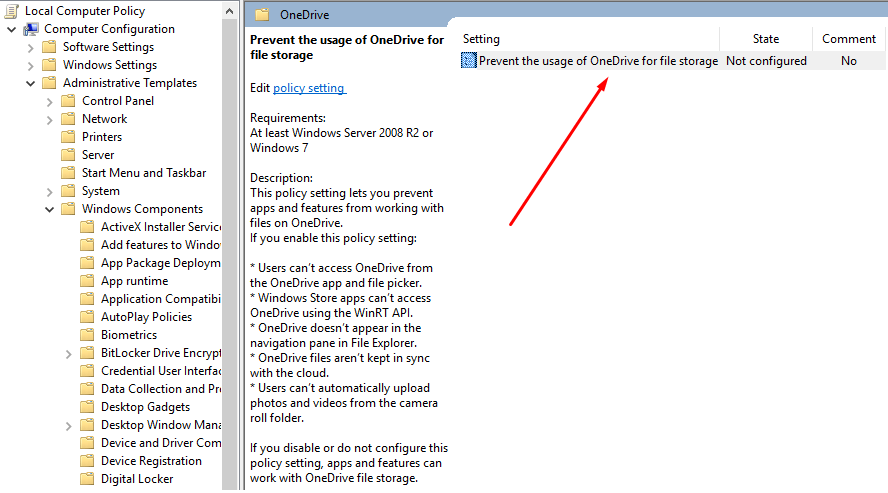
Best Practice: Never install a home version of any Microsoft operating system (Windows 7, Windows 8, Windows 10, etc.) on your home computer because it is essentially a limited version of the actual operating system, such as the “Pro” version. - In the Local Computer Policy go to Computer Configuration -> Administrative Templates -> Windows Components -> OneDrive. You will notice the setting Prevent the usage of OneDrive for file storage. By default, this setting is not configured.
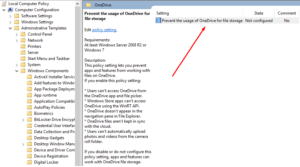
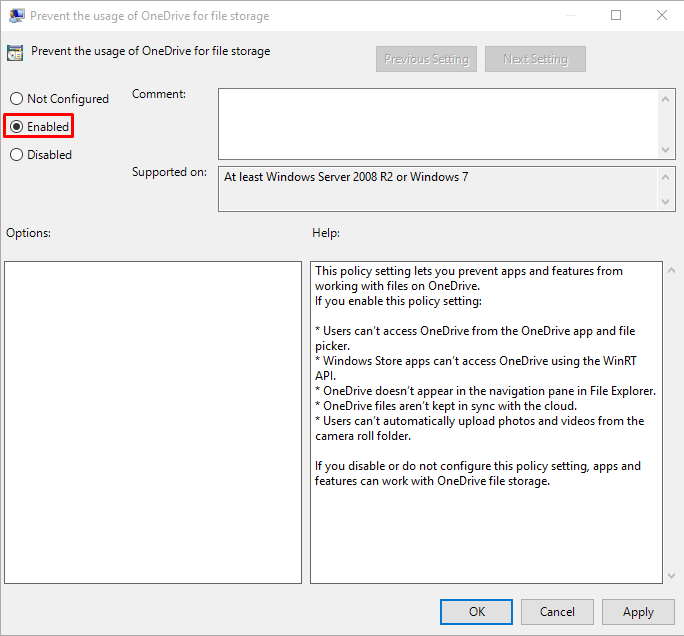
- Double-click the setting, select the Enabled radio button, and then click OK. By enabling this setting you are disabling your OneDrive on your computer. Keep in mind that when you modify the local policy it will effect everyone who uses your computer. In other words, no one will be able to use OneDrive on this particular computer.

- Close the Group Policy Editor.
- Reboot your computer.
- When you login to your computer your OneDrive for Business should still be there. You may have to sign into your account. Your personal OneDrive should no longer be on the taskbar or in the File Explorer. If you see it in the File Explorer, wait for a few minutes and it should go away. At least that’s what my experience has been. If you are still seeing OneDrive in some places then try using the following techniques in this article from Microsoft.
- In the Notifications area on the bottom of the Windows screen, right-click the OneDrive icon. You might have to click the Show Hidden Icons arrow to find OneDrive.
- Click Settings, and on the Settings tab, uncheck all the boxes under General.
- On the Auto save tab, set the Documents and Pictures lists to This PC only, and uncheck the other boxes.
- On the Account tab, click Choose folders.
- In the Sync your OneDrive files to this PC box, check and uncheck the box at Sync all files and folders in my OneDrive. (The first check selects all the boxes, then the uncheck clears them all.) Click OK to close the box and return to settings.This step removes all OneDrive files from your computer, but leaves them on OneDrive.com.
- Click OK to save your changes in the Settings box.
- Open the Settings box again: In the Notifications area, right-click the OneDrive icon, click Settings. On the Account tab, click Unlink OneDrive. Close the Welcome to OneDrive box that appears.
- Open File Explorer, right-click OneDrive, and then click Properties.On the General tab, next to Attributes, check the Hidden box. This hides OneDrive from File Explorer.
- One more time, back in the Notifications area, right-click the OneDrive icon and click Exit. This removes the OneDrive icon from the Notifications area.
WARNING! According to Microsoft, OneDrive cannot be uninstalled from all versions of Windows 10 because it is built into Windows 10. Although it is possible, depending on your Windows version, to remove OneDrive from Windows 10, I recommend that you only disable OneDrive through Group Policy and then hide it from Windows 10, rather than completely removing it because there’s a lot of cleanup you will have to do to completely remove it from your computer. Also keep in mind that because OneDrive is built into Windows 10, removing it (rather than disabling it) may have some unexpected consequences.
Removing OneDrive Completely in Windows 10
Again, I don’t recommend removing OneDrive completely because you can always disable it and hide it. However, if you must then you can remove OneDrive from your Windows 10 by using the following command on a 32-bit computer. Make sure that you are logged in as an Administrator:
%SystemRoot%\System32\OneDriveSetup.exe /uninstall
On a 64-bit computer use the following command:
%SystemRoot%\SysWOW64\OneDriveSetup.exe /uninstall
To reinstall OneDrive on a 64-bit computer, you will use the above command without /uninstall switch at the end.
%SystemRoot%\SysWOW64\OneDriveSetup.exe
Copyright © 2016 SeattlePro Enterprises, LLC. All rights reserved.

