What to Do When Creating Folders or Accessing Files on Remote Computer is Very Slow
For the past few weeks, I had been experiencing an issue that has been bugging me. I would spend about 30-60 minutes here and there to try to resolve the problem but couldn’t dedicate enough time to fix my issue. In this article, I am going to describe my scenario, then share the different techniques I used to try to solve the problem, in case one of the techniques may prove to be helpful to you; and finally share the solution that worked for me.
My Scenario
While working on my Windows 10 Enterprise workstation, whenever I tried to “touch” a file (e.g., simply click, or save) on another computer running Windows 10 Professional, it took anywhere from 30 to 90 seconds to save the file. This delay was experienced in all the applications, such as Word, Excel, PowerPoint, Outlook, File Explorer, Web browsers, etc. For example, if I tried to save an attachment in my email, it would take about a minute before the system allowed me to actually save the file. Sometimes I would see the Not Responding message and my screen would simply freeze for a couple of minutes or so. If I tried to create a folder before saving a file within an application, such as Excel or Word, I experienced the same delay. Creating or renaming a folder in File Explorer was also slow.
I noticed that if I either logged on at the console or connected to the remote Windows 10 Professional computer using Remote Desktop Protocol (RDP), I didn’t experience the delay. The problem was only experienced on my local Windows 10 Enterprise computer when it tried to access data on the remote computer. A couple of things to keep in mind.
- I was connected to the remote computer with mapped drives (\\computername\d$, \\computername\e$, etc.). In case you are wondering, connecting to a shared folder, e.g., \\computername\HR, rather than the root of the drive didn’t solve my problem.
- RDP connectivity between the two computers had no issues. The problem was experienced only with the connectivity associated with the mapped drive.
Solutions that Didn’t Work for Me, But May Help You
I tried a lot of solutions and used the process of elimination wherever possible. A complete list would be way too long, but here’s a short list, in no particular order, of the solutions that I tried. Depending on your computer and environment, any one of the following solutions may solve your problem and that’s why I am documenting them here.
- Remapped the drives and recreated the shares that were causing the problem.
- Disabled applications that were potentially busy scanning my drives, such as Antivirus software, Enhanced Mitigation Experience Toolkit (EMET), backup software, etc.
- Ran Windows built-in Disk Cleanup tool on local and remote hard drives to clean the temporary and cache files.
- Ran the built-in Checkdisk tool on all drives on both computers, in case there were hard disk errors or broken chain links.
- Ran the built-in System File Checker (SFC) tool. This tool has the /SCANNOW and /SCANFILE options which scans and repairs protected system files and referenced files that may have some problems. The process can take quite some time but is worth running once in a while to ensure system integrity.
- Made sure that there was plenty of disk space available on both my local and remote computer. The remote computer was a bit low on free space, so I added a 2 TB drive and moved all my data to one of the new logical drives to eliminate lack of free space as an issue. This also helped with defragmentation, but because Windows 10 takes care of fragmentation in the background I didn’t expect this to make much difference.
- Tried various Internet Explorer settings that could have possibly affected this behavior.
- Tried several registry hacks related to caching, SMB, etc. If you have Windows 8.1 and earlier, you can try setting the DirectoryCacheLifetime to zero, as described here.
- Tried different settings in the local group policy editor.
- Experimented with folder options in File Explorer.
- Disconnected USB devices from both computers.
- Closed all the applications, except one, to eliminate application compatibility issues.
- I temporary disabled BitLocker on the drive where the data was stored. It didn’t make a difference, so I turned BitLocker on again.
- I disabled all the applications on the Start tab of the Task Manager. It didn’t make a difference, so I selectively enabled the ones that were absolutely necessary.
- I created a new user profile on my workstation.
- On the Performance tab of my Task Manager, I noticed that the throughput on my Ethernet card was pretty high. I switched to a different Ethernet card to see if my network card was a culprit.
- Rebooted the computer after trying most of these solutions.
Solution that Worked Temporarily
There was one solution to my problem that worked for a few hours. I turned off the indexing of files on the remote computer. As soon as I turned off indexing, I was able to work at full speed. I only disabled indexing on the data drives and left indexing enabled on the system drive (C). Because this may solve your issue, as it has for others, I am documenting the steps below.
- Open File Explorer (formerly known as Windows Explorer).
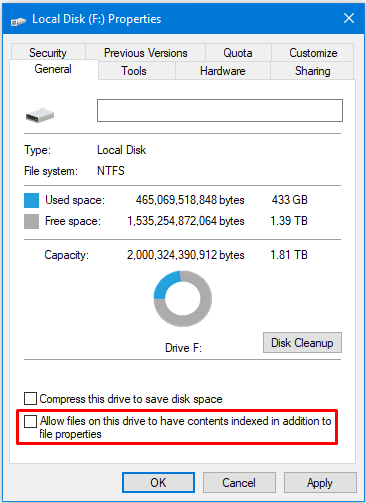
- Right-click the drive in question and select Properties.
- On the General tab, disable indexing by clearing the box Allow files on this drive to have contents indexed in addition to file properties.
- Click OK. Depending on your computer, the process may take a while to complete. On my drive with about half a terabyte (500 MB) data it took about 5 minutes, but your mileage may vary depending on several factors, including the amount of data, the type of data, disk speed, whether the drive is compressed or encrypted, etc.
- You don’t need to reboot the computer. If indexing is the reason for your slow performance, you should be able to create folders, rename files, and save files to the remote share at normal speed as soon as indexing is turned off.
Consequences of Disabling Indexing
By clearing the box in the above screenshot, you are disabling indexing of file content. This means that you won’t be able to search the contents of the files, but you will still be able to search the file properties, such as name of the file or other metadata. If you really need to search the contents of your files, then there are ways to work around this problem. You can selectively index the folders that you want by customizing the indexing functionality. Here’s how.
- In the Windows 10 search box type “indexing” without the quote.
- Click Indexing Options in the search results.
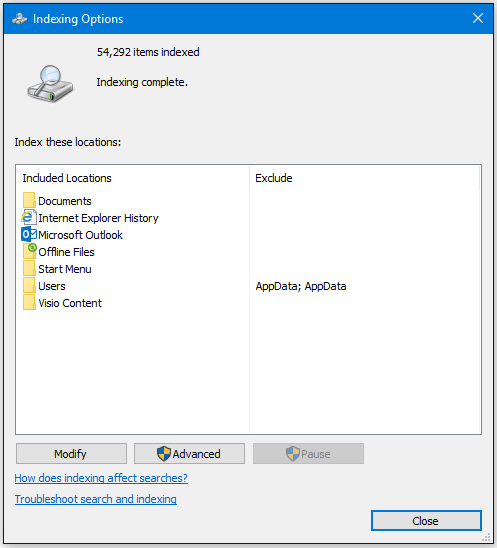
- Highlight a folder, e.g., Documents, and select Modify.
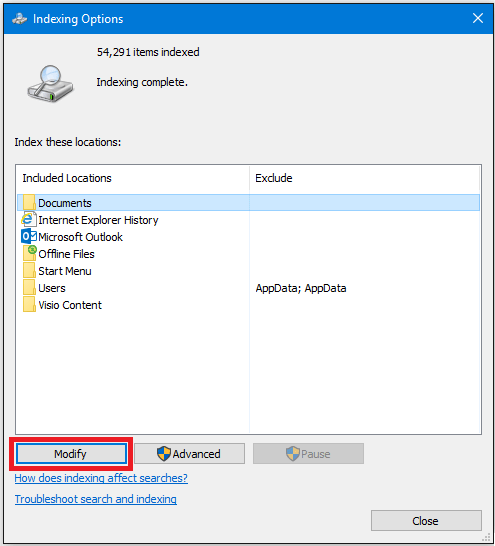
- Now you can select the folders that you want to index and clear the box next to folders that you don’t want to index. You can also create new folders as necessary to better organize your data and store files that need indexing of content into separate folders. This may not be helpful in every situation, but it’s one workaround that you may consider. You may also consider splitting data into two drives, one that contains the indexed content and the other that does not. You can save the data into the non-indexed drive so you can get the job done quickly and then later move the data to the indexed drive. Again, these are some ideas to consider. Perhaps they may lead you to some better options that are suitable for you.
As I mentioned earlier, this solution turned out to be a temporary one for me, but it has worked for others as a long-term solution.
Solution #1 That Worked in 2017
The solution that finally worked for me was to reset the TCP/IP stack. TCP/IP is the communication protocol used on the Internet. It’s also used on the private networks. Although it’s rare, but once in a while the TCP/IP stack can get corrupted. Luckily resetting TCP/IP solved my problem right away.
You can use the NetShell (netsh.exe) utility to reset TCP/IP on any Windows computer, client or server. I have documented all the details in my article How to Reset TCP/IP on Windows Computers.
Solution #2 That Worked in 2018
After a while I started to have the same problem with slow network access to the shared folders, saving files in Outlook, opening or saving files that were on a shared network folder. I am talking about the standard network shares mapped as drives in Windows, not Distributed File System (DFS) shares. This time I modified the registry and disabled DirectoryCacheLifetime, as explained in Microsoft’s article SMB2 Client Redirector Caches Explained. This fixed the problem immediately. For details, please check out my article How to Fix Slow Access to Network Shares.
Article Updated: February 1, 2018
| Thanks for reading my article. If you are interested in IT training & consulting services, please reach out to me. Visit ZubairAlexander.com for information on my professional background. |
Copyright © 2017 SeattlePro Enterprises, LLC. All rights reserved.

