Virtualized Domain Controller Cloning in Windows Server 2012

Microsoft has made some major changes to its server operating system in Windows Server 2012, which is in beta at the time of writing. One of the new features in Active Directory Domain Services (AD DS) in Windows Server 2012 is the ability to clone a virtualized Domain Controller (DC). In this article, I will explain how cloning works, describe the XML files that are required for cloning, and walk you through step-by-step process of cloning a virtualized DC.
Remember all the pain you had to go through to deploy a virtualized DC replicas in the previous versions of Windows Servers? All the messing around with sysprep images, promoting the DC manually and then going through all the post-configuration process is now the thing of the past because in Windows Server 2012 you can create replicas of virtualized DCs by cloning the existing DCs. Simply copy the virtual hard disk (VHD) of a virtualized DC, insert a configuration file, and create a new virtualized DC pointing to the copied VHD. Imagine how much time you will be saving. Okay, you do have to do some work for the first time so I don’t want to give you the impression that you are going to wave your magic wand and everything will take place magically. However, the steps to clone a virtualized DC are not as complicated any more.
According to Microsoft, the requirements for virtualized DC cloning are as follows:
- Windows Server 2012 virtual DC hosted on VM-Generation-ID-aware hypervisor platforms. This DC will act as source for the cloning operation.
- In order to authorize the cloning operation, the PDC operations master FSMO role must be running on a Windows Sever 2012 but doesn’t have to be running on a hypervisor.
- Source DC must be authorized for cloning through permission on domain – “Allow DC to create a clone of itself.”
- You must create the DCCloneConfig.XML file on the clone DC and copy it in the directory where NTDS.DIT file is located.
- Common Windows Server 2012 services, such as DNS, FRS, and DFSR, that are co-located with DCs are supported.
- Additional services and scheduled tasks installed on the clone-source must be added to an admin-extensible whitelist,
The Cloning Process
Here’s how the cloning process works.
- First make sure that you meet the above requirements.
- Make a copy of an existing virtual DC’s VHD or its VM.
- Authorize the DC for cloning in AD DS.
- Create DCCloneConfig.XML file in the directory where NTDS.DIT file is located. By default, it’s located in %windir%/NTDS folder.
- The clone DC uses two triggers to detect that it is a copy of another DC:
a) The VM-Generation ID provided by the virtual machine is different from the one that’s stored in the Directory Information Tree (DIT).
b) There is a DCCloneConfig.xml present either in the directory where the DIT is located or in the root of a removable drive, such as a DVD drive. - Once the DC identifies that it’s a clone by detecting that the VM-Generation ID is different on the imported or new VM and there’s a DCCloneConfig.xml file, it goes through the process of cloning itself as a DC.
- The clone DC contacts a Windows Server 2012 PDC emulator. It uses the security context of the source DC to accomplish this.
- The PDC emulator verifies that the requesting DC is authorized to be cloned and it creates the necessary objects that will be used to identify it as a clone. These objects include a SID, account and password.
- The clone DC then creates the AD DS database files and it also calls the selected sysprep providers to clean up the machine state. The list of components for which the clone calls sysprep providers is available in the DefaultDCCloneAllowList.xml file located in %windir%\system32.
Understanding the XML Files for Cloning
There are three xml files used by the cloning process. Let’s take a closer look at them.
- DefaultDCCloneAllowList.xml – This file exists by default in the %windir%\system32 folder on all Windows Server 2012 DCs . It lists the services and installed programs that can be cloned by default. You should never mess with this file at all. There is nothing in this file that you would want to manually change so leave it alone or else your cloning will fail.
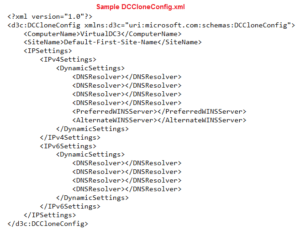
- DCCloneConfig.xml – This file is also required to clone a virtualized DC. This file should be present in %windir%\NTDS folder, or wherever your DIT file exists. It can also be present in the root of your DVD drive. This file not only helps initiate cloning it also contains configuration information for the clone DC, such as its name, site and IP settings. You need to make sure that you update the file with these parameters otherwise the system will generate these settings for you. I don’t want the system to make up name and IP address for my DC, neither should you. You can find a sample DCCloneConfig.xml file at %windir%\system32\SampleDCCloneConfig.xml.
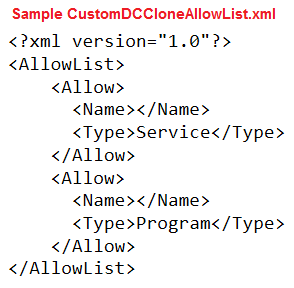
- CustomDCCloneAllowList.xml – This file should be present in %windir%\NTDS folder, or wherever your DIT file exists. You may have services running on your source DC that are not listed in the DefaultDCCloneAllowList.xml file. Those services should be listed in this CustomDCCloneAllowList.xml file. To get a list of these services or applications that are not listed in the in the DefaultDCCloneAllowList.xml file, use the Get-ADDCCloningExcludedApplicationList cmdlet. If you run this cmdlet and it returns any output, you must list those items in this file after evaluating that they can be safely cloned or remove them from the source DC cloning to successfully complete. For more information, visit Microsoft’s Web site.
WARNING! If the applications are not cloneable, make sure you remove them from the source DC, otherwise the cloning will fail.
Step-By-Step Process of Cloning a DC
Now that you have a better understanding of the cloning process and the different files that are used for cloning, let’s walk through the step-by-step procedure of cloning a virtualized DC. There are 5 major steps to clone a virtualized DC.
Step 1: Make sure you meet the prerequisites.
Step 2: Grant the source virtualized DC the permission to be cloned.
Step 3: Create DCCloneConfig.xml file.
Step 4: Run Get-ADDCCloningExcludedApplicationList cmdlet.
Step 5: Export the VM of the source virtualized DC and then import it.
Step 1 – Meet the Prerequisites
- The source DC (the DC that will be used for cloning) and the destination DC (the new DC that will become the clone of the source DC) must be running on Windows Server 2012 with Hyper-V role installed and they must be in the same domain.
- The source DC must be a virtualized DC running in Hyper-V environment on a Windows Server 2012.
- There needs to be a Windows Server 2012 DC (virtual or physical) that is running the PDC emulator FSMO role on your network. It is not necessary that this role is running on the source or destination DC, it needs to be running on a Windows Server 2012 DC somewhere on the network.
- The virtual network switches on both Hyper-V hosts should have the same name. In other words, if one is named DEVNET then the other must also be named DEVNET.
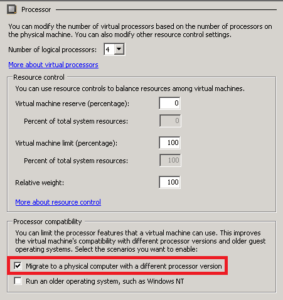
- The processors on the source and destination DCs don’t need to be the same but if they are different than follow this procedure. Right-click the source DC’s in Hyper-V Manager and click Settings. Click Processor, Compatibility and select Migrate to a physical computer with a different processor version. This option will be grayed out if your virtualized DC is running.
Step 2 – Grant Source Virtualized DC Proper Permissions
- Open Active Directory Administrative Center (ADAC).
- Go to Domain Controllers OU.
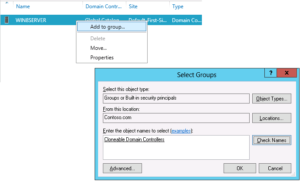
- Right-click the DC that will be cloned and select Add to group, under the Enter the object name to select type Clonable Domain Controllers and then click OK. Clonable Domain Controllers is a builtin group in Windows Server 2012. This step will ensure that the source virtualized DC has the proper permissions to be cloned.
Step 3 – Create DCCloneConfig.xml File
- Copy the SampleDCCloneConfig.xml located in the %windir%\system32 folder from source DC to the %windir%\NTDS folder and rename it to DCCloneConfig.xml.
- Update the DCCloneConfig.xml file as necessary. The information you need to enter is described below.ComputerName – This should be the name of the new cloned DC, i.e. the destination DC. Do not enter the name of the source DC here.
SiteName – Enter the site name for the destination DC
Under IPv4Settings element:
Address – Enter a static IPv4 address
SubnetMask – Enter the IPv4 subnet mask
DefaultGateway – Enter the IPv4 default gateway
DNSResolver – Enter the IPv4 DNS server
DNSResolver – If you have an alternate DNS server you can enter it here
Under IPv6Settings element:
DNSResolver – Enter the IPv6 DNS server
DNSResolver – If you have an alternate DNS server you can enter it here
Step 4 – Run Get-ADDCCloningExcludedApplicationList Cmdlet
- On the source DC, click Server Manager, Tools, Active Directory Module for Windows PowerShell, and then type the following command:
Get-ADDCCloningExcludedApplicationList - If you see a list of returned services and/or installed programs then you need to work with the vendor of the service or program to ensure that they can be cloned. If there are any items that cannot be cloned, you must remove them from the source DC or the cloning will fail.
- Assuming that you have applications that can be cloned, create a file called CustomDCCloneAllowList.xml in the %windir%\NTDS folder on the source DC where the DIT file resides and and list these services or installed programs in the appropriate element tags in the CustomDCCloneAllowList.xml file (see sample file earlier in this article in the section Understanding the XML Files for Cloning). Just enter the Service or Program’s name listed in the cmdlet’s output within the <Type> tags.
Step 5 – Export and then Import the Source Virtualized DC
The final step is to export the VM of the source virtualized DC and then import it. Here’s how.
- Ensure that the source virtualized DC has been shutdown.
- Delete all the snapshots to merge all the AVHD files into a single VHD file for the source virtualized DC.
- Create a folder on the source Hyper-V server (e.g. C:\VirtualMachines) and export the virtual machine image of the source virtualized DC to that folder (e.g. C:\VirtualMachines\SourceDCImage).
- Create a folder on the destination Hyper-V server (e.g. C:\VirtualMachines) and copy the SourceDCImage to that folder.
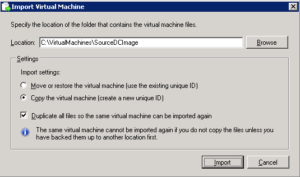
- In the Hyper-V Manger of destination Hyper-V server, import the virtual machine you copied to the C:\VirtualMachines\SourceDCImage folder on destination Hyper-V server. Right-click the server name and select Import Virtual Machine.
- Select the option to Copy the virtual machine (create new unique ID), as shown below. I prefer to select the option to Duplicate all files so the same virtual machine can be imported again. This ensures that I can repeat the process in future and create additional copies if necessary.
- Restart the source virtualized DC.
- Start the newly imported destination cloned virtualized DC.
This completes the process of cloning a virtualized DC. For more information visit Microsoft’s Web site.
Copyright ©2012 Zubair Alexander. All rights reserved.


Super article Zubair!
Excellent writeup..
Step 4,3 can be done by using
Get-ADDCCloningExcludedApplicationList –GenerateXml
Also I’m not sure that a hard requirement is having an online PDC. If you check out the graphic here it seems that the Source machine can be the PDC. Though it’s mentioned in the requirements above that another DC (with the PDC role) is running and not used as a source DC.
http://i.technet.microsoft.com/jj574223.df1a9665-b1cf-4fab-91ea-797b60b7c40b(en-us,WS.11).gif
http://technet.microsoft.com/en-us/library/jj574223.aspx
-Jonas, Denmark
Hi Jonas,
Thanks for your feedback. Here’s my take on this. PDC Emulator must be online either somewhere else on the network or on the source DC, but this role must be on a Windows Server 2012. The requirements do not state that PDC Emulator role can’t be on the source DC. Your observation is correct, according to the graphic the PDC Emulator role can be on the source DC. I do not see anywhere in the requirements that a different DC must be running the PDC Emulator role. According to Microsoft, the PDC Emulator role doesn’t need to be on a hypervisor. In other words, it can also be on a physical server, as long as it is running on a Windows Server 2012.